Instructions for Personalized Product feature
Personalized Product is a feature that allows buyers to create important elements of the product such as text and artwork according to their wishes during the purchase process. This feature provides customers with an enjoyable shopping experience and helps drive store sales. Join Merchize to see the instructions for use right away.
I. General information about Personalized Product module
- Target: Provide a feature that allows shoppers to personalize products.
- Module Personalized version 1.2 allows:
- Sellers create, view, edit, delete and manage personalized products.
- Buyers provide personalized content when ordering.
- Sellers view the details of personalized content at each order and upload the corresponding artwork according to the order.
II. Instructions for seller to create and manage Personalized product
1. Seller manage Personalized product
1.1 Seller creates Personalized product
Step 1: Seller logging into the system. Open Product> Create Personalized Product

-> Select product from Preset/Product

Step 2: Upload gallery picture of product
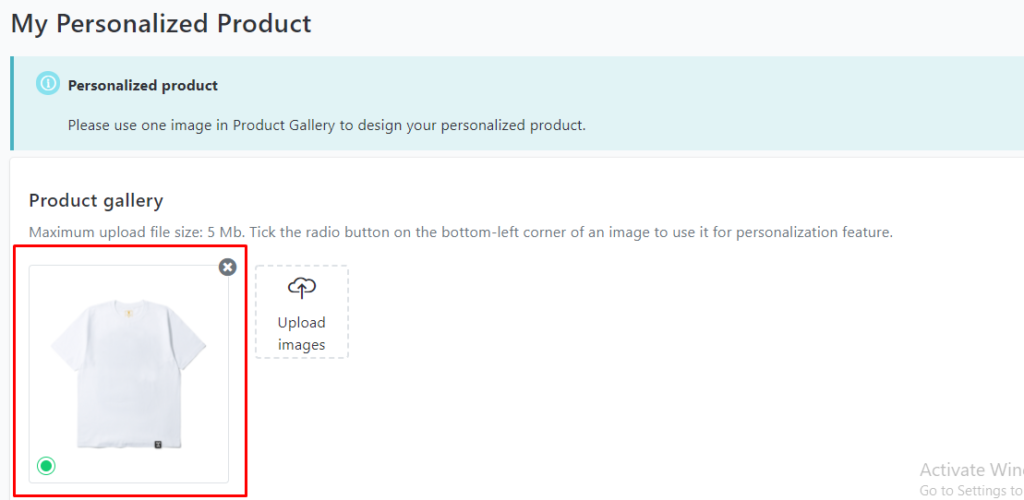
Step 3: Set up format for Elements
1. Main function

- Allow Preview: The feature allows Buyers to preview the product with the personalization elements they add to the product.
- Add Text, Add Image, Upload font.
- Drag/Move the element to the desired position.
- Lock/Unlock elements: Lock elements not for manipulation.

To add a Text element, Seller clicks [Add Text].
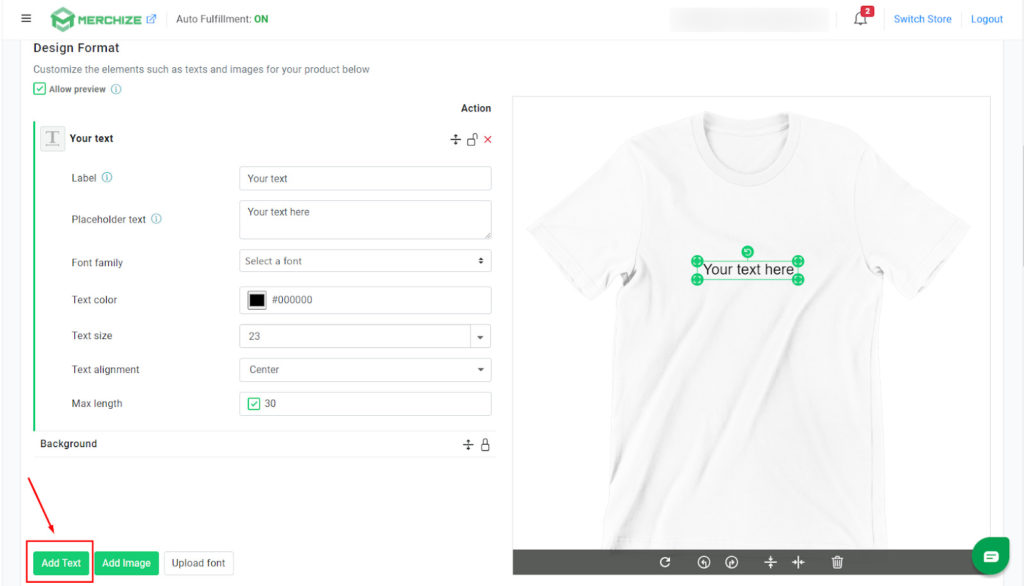
- Label: Upload the element name
- Placeholder text: Upload the text content
- Font family: Change the font style
- Text color: Change the text color
- Text size: Change the font size
- Text alignment: Align text
- Max length: Checkmark to allow Buyer to enter the maximum number of characters
<B> Image Element
To add an Image element, Seller clicks [Add image].

- Label: Upload the element name
- Placeholder Image: Upload the image, change the upload image
- Set up Max dimensions: The maximum width and height of the image allowed by Buyer to upload.
- Note for buyer: Enter the content of the note for Buyer
<C> Upload font

To add a new Font for the Text element, the Seller clicks [Upload Font], uploads the Font File to the system. Font File to upload needs to have a format (otf, ttf).
*Text Element: in the Font family section, click Select a font, the uploaded font is displayed in the Custom fonts section.
(*) You can save your favorite font by clicking on the ❤️ icon next to the font.
In addition, you can optionally change the sort order or delete/add elements in the Personalized product.

2. Design feature
- Drag/drop the image to change its position on the preview frame
- Rotate photo
- Delete photos
- Click on the Text/Image element on the preview to display the icon below the frame

 : Reset element to its original position when not fixed
 : Rotate to the left
 : Rotate to the right
 : Horizontal center
 : Vertical center
 : Delete selected element on Preview
3. Support Tooltip
Move the mouse pointer to the icons displayed the instructions

4. Upload product information: Title, Description

5. Upload product Attributes, Variants information


- [Save as draft]: Personalized product is successfully created as a draft, Seller is allowed to edit
- [Submit for review]: Personalized product is successfully created as pending approval, Seller is not allowed to edit
Note:
- The information is allowed to be edited and must be approved, including: Title, Description, Product gallery, Artworks, variant image.
- The information is allowed to edit and not need to be browsed: Collections, Tags, Facebook Pixel ID, Display, Price, select image variants as default.
- Each variant is only allowed to edit Price.
1.2 Seller edit/delete Personalized product
Step 1: Seller loggins into the system. Open Manage Product feature. Click Personalized product to edit or delete.

Step 2: Update product information. The steps are the same as when creating a Personalized product.
In case the Seller wants to delete the Personalized product, just click [Delete product], the Personalized product has been deleted successfully.

2. Buyer purchases Personalized product
2.1 Buyer upload Personalized product
The Personalized product created by seller will be displayed in the store as follow:

With Personalized products, Buyer must provide personalized product content by customizing Text, Upload Image for products. The position and format of Text, Image will be according to the position and format that Seller has set up on the Product.
To custom enter Text, upload Image for the product, Buyer need to:
Step 1: Buyer selects Personalized product needed to be bought

Step 2: Buyer uploads Text, Image of the Personalized products to purchase

2.2 Buyer selects to buy Personalized product
After Add to Cart, the screen will display all Personalized product information that Buyer has just ordered and move to Proceed to Check out.

At the Proceed Checkout screen, Buyer enters the required information as below:

After successful Check out, the Personalize product information that Buyer has just ordered will appear.

2.3 Buyer view Order Confirmation Email
After successfully purchased, Buyer would receive Order Confirmation Email automatically from the system
2.4 Buyer tracks order processing status
After successful order payment, Buyer can track the Order processing status by clicking the View order link on the Order Confirmation Email.
3. Seller manages Order
3.1 Seller views Order list
- At the Orders list:
- For non-customized orders, view detail is not given
- For Personalized orders, displaying the Order number as a link allows opening the Order detail screen
Step 1: Seller loggins into the system. Open Manage Order feature. The system will display all Store Order.

3.2 Seller view Personalized Order details
Step 1: Seller loggins into the system. Open Manage Order feature. Click Personalized Order to view details

Step 2: Seller views Personalized Order detail
The screen only shows personalized items, not the non-personalized ones.

