
Contents
Embroidered T-shirts are growing in popularity, especially on platforms like Etsy. And if you want to make your own embroidered T-shirt from home, you will have to own an embroidery machine. In this post, let’s explore the top embroidery machines for shirts.
Types of Embroidery Machine for Shirt
When diving into the world of embroidery machines for T-shirts, it’s essential to understand the various types available and which one best suits your needs. Let’s explore two key distinctions: Combo vs. Embroidery-Only Machines, and Manual Thread Changes vs. Multi-Needle Commercial Embroidery Machines.
Combo vs. Embroidery-Only Machine
Combo Machine
If you expect a machine that’s as versatile as a Swiss army knife, ready to tackle not just embroidery but also sewing tasks, then a combo machine is the right choice for you. These machines offer both embroidery and sewing functions in one neat package. Perfect for those who want to dabble in various textile DIY crafts or don’t have much space for keeping separate machines.
- Pros: With a combo machine, you’re not limited to just one type of project. You can seamlessly switch between stitching up garments and adding intricate embroidery designs to them without breaking a sweat. Plus, they’re often more budget-friendly compared to purchasing two separate machines.
Another significant advantage of a combination machine is its space efficiency. Having one machine that handles both sewing and embroidery saves precious space in your crafting corner.
- Cons: Jack of all trades, master of none. While combo machines offer convenience and versatility, they might not excel in either embroidery or sewing compared to dedicated machines.
It’s also essential to consider another trade-off – the price. Combo machines tend to be pricier compared to embroidery-only counterparts, particularly if you primarily intend to use them for embroidering.
Embroidery-Only Machines
If you only care about making embroidery, then an embroidery-only machine might be your best choice. These machines are designed specifically for embroidering, allowing them to hone in on perfecting this craft.
- Pros: With all their focus on embroidery, these machines often come equipped with advanced features tailored specifically for this craft. You can expect larger embroidery areas, faster stitching speeds, and intricate design capabilities. Plus, they’re generally more compact and lightweight than combo machines, making them ideal for dedicated embroidery spaces.
It is especially suitable if you want to start a custom embroidery business where you will turn blank T-shirts into beautiful embroidered pieces. In this case, there is no need for sewing. With dedicated embroidery machines only, you can ensure that your embroidery business runs efficiently and smoothly.
- Cons: While embroidery-only machines excel in their craft, they might leave you hanging when it comes to sewing tasks. If you’re someone who enjoys doing handmade projects, you might find yourself longing for the versatility of a combo machine rather than an embroidery-only machine.
In short, if you are interested in multiple DIY projects, then pick a combo machine. On the other hand, if you prefer a dedicated machine for business purposes, you should go with embroidery-only machines.
Manual Thread Changes vs. Multi-Needle Commercial Embroidery Machine
Multi-needle machines are generally preferred for T-shirt embroidery as they allow for faster production and the ability to use multiple colors without manually changing threads.
Are you wanting to create shirts for your own or loved ones as a hobby, or are you looking to start a home embroidery business? Hobbyists may not need the snazziest machines. In that case, a single-needle embroidery machine might suffice. However, if your embroidery aspirations lean towards commercial ventures, time is indeed money, and it makes more sense to go with multi-needle commercial embroidery machines.
Multi-Needle Changes Machine
Embroidering multi-colored, dense designs on a single-needle embroidery machine can take forever. It’s made even longer by having to stop after each thread color to change threads.
For budget-minded t-shirt machine embroidery enthusiasts, a multi-needle machine is not likely a possibility. However, purchasing a multi-needle embroidery machine might make sense if you want to sell your designs commercially.
With a multi-needle embroidery machine, you can set up several colors at once to embroider without having to manually change threads.
They’re also capable of handling larger, more complex designs with ease, making them a favorite among professional embroiderers and businesses.
As with any high-performance machine, multi-needle commercial embroidery machines come with a heftier price tag. They’re an investment, and not necessarily suitable for beginners or hobbyists who are just starting out. Plus, their larger size and weight might require a dedicated workspace.
Manual Thread Changes
Manual thread changes are often found on entry-level embroidery machines, making them more accessible to beginners or hobbyists dipping their toes into the world of embroidery. They’re straightforward to operate and require minimal setup.
Cons: The biggest drawback of manual thread changes is the interruption they cause to your workflow. Constantly stopping to switch threads can be tedious and time-consuming, especially for larger or more intricate designs. It can also lead to inconsistencies in your embroidery if not done carefully.
Embroidery area and Hooping size
Another thing to consider for your T-shirt embroidery machine is the embroidery size and hooping size. Hooping size determines the maximum embroidery size that a machine can stitch in a single pass.
Normally, the actual embroidery size will be slightly smaller than the hooping size. If your embroidery machine comes with 5”x7” hooping size, it can not embroider a design larger than 5”x7” in one go.
In case you want to embroider larger designs than the given embroidered area, you would have to split them into sections using software, rehooping the T-shirt between each section, or utilizing a repositional hoop.
The smallest size you can find in an embroidery machine is 4”x4”. If you just want to create simple embroidery designs on T-shirts, you can get by with a 4”x4” embroidery area.
However, if your budget permits, you can opt for a larger 5″x7″ embroidery size which allows more space for you to create more intricate and bolder embroidery designs.
If you’re eyeing embroidering larger areas on T-shirts, opting for a machine with a larger hoop size will help to fight against the space restrictions.
However, if your embroidery ambitions are centered around small logos or patches for your company’s T-shirts, there’s no need to splurge on a massive hoop size.
It’s worth noting that even if you opt for a machine with a larger hoop size, having a smaller hoop available can be advantageous. For example, if you want to embroider on smaller-size toddler T-shirts or onesies, behemoth hoops can feel like an exercise in futility. Additionally, small designs are easier to align and center using a smaller hoop, enhancing precision and efficiency.
When choosing the right embroidery machine for your T-shirt projects, consider the size of designs you intend to embroider and the frequency of rehooping. A larger hoop size can expedite the process for larger designs, but having a smaller hoop on hand can offer versatility for smaller projects. By assessing your needs and budget, you can make an informed decision that sets you up for successful and enjoyable T-shirt embroidery endeavors.
Speed and Efficiency
To max out the efficiency, especially if you plan to produce T-shirts in large quantities, besides choosing multi-needle machines, you also need to pay attention to the embroidering speed. A faster machine allows you to complete projects faster, reducing turnaround times and increasing output.
When selecting an embroidery machine for T-shirts, assess your embroidery needs and production goals. If you’re a hobbyist embroidering T-shirts in your spare time, a moderate-speed machine may suffice.
However, if you’re running a bustling embroidery business with orders pouring in, investing in a high-speed machine can be a game-changer, even though it can be more expensive initially.
Embroidery Free Arm
Embroidering designs onto T-shirt cuffs, sleeves, or pockets would be very tricky without the help of an embroidery free arm.
With an embroidery-free arm, hooping T-shirts becomes a breeze. This feature makes it easier to access smaller spaces and tubular garment structures. You can effortlessly slide the shirt onto the arm, ensuring it’s properly stretched and stabilized for embroidery. This not only streamlines the process but also enhances the quality of your embroidery work, leaving you with professional-looking results every time.
It should be noted that embroidery free arm feature is more commonly seen on multi-needle embroidery machines than in single-needle machines.
Stitch Quality
Pay attention to the quality of stitches produced by the machine. Look for smooth, even stitching, especially on stretchy fabrics like T-shirts. Some machines offer features like automatic tension adjustment to ensure consistent stitch quality.
Ease of Use
Choose a machine that is user-friendly and intuitive to operate, especially if you’re new to embroidery. Look for features like touchscreen interfaces, automatic thread trimming, and easy design transfer options.
Compatibility with T-shirt material
Ensure that the machine is suitable for embroidering on T-shirt materials, which are often stretchy and delicate. Look for features like adjustable presser foot pressure and specialized needles for knit fabrics.
Software compatibility
Check if the machine is compatible with embroidery design software that allows you to create or customize designs. This will give you more flexibility and creativity in your embroidery projects.
Durability and reliability
Invest in a machine from a reputable brand known for durability and reliability. Read reviews and consider the warranty and customer support offered by the manufacturer.
Budget
Determine your budget and choose a machine that offers the best combination of features within your price range. Consider the long-term value and return on investment of the machine for your embroidery business or hobby.
Even when you can’t afford an embroidery machine for your own business, you can always seek help from a print on demand business to turn your beautiful design into best-selling products. Check out the list of the best print on demand embroidery print on demand companies that can help you start an embroidery business without owning an embroidery machine.
Best embroidery machine for T-shirts
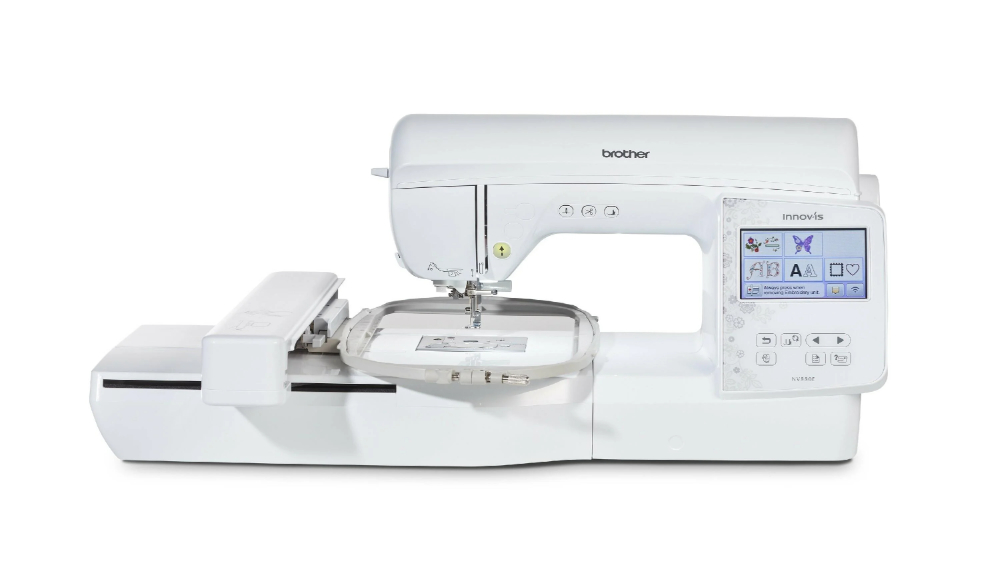
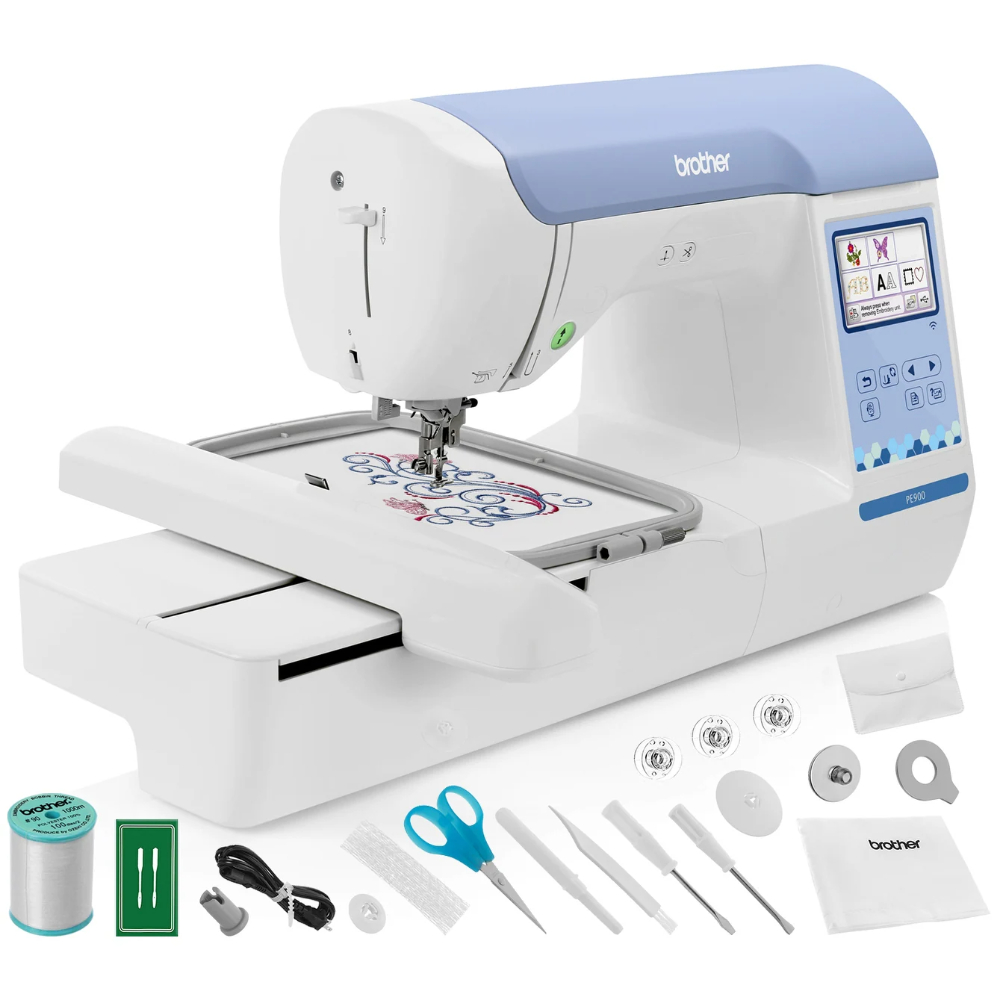
Brother PE800/Brother PE900 Embroidery Machine
Let me introduce you to the Brother PE800 embroidery machine – a powerhouse in the world of embroidery, specifically tailored for T-shirt enthusiasts. While it’s true that you won’t be able to sew with this machine, its robust embroidery capabilities more than makeup for it, all at an affordable price point.
Features and Specs
With a maximum embroidery size of 5″x7,” the Brother PE800 can handle most medium-sized designs with ease, minimizing the need for tedious design splitting and rehooping. Plus, there’s the option to purchase a 5″x12″ repositional hoop for added versatility.
Equipped with 138 built-in designs and 11 fonts (including 7 English fonts), this machine offers a solid foundation to kickstart your T-shirt embroidery journey. While the built-in designs are a nice starting point, you’ll likely want to import your own designs via the convenient USB port located on the side of the machine.
Pros and Cons
One of the standout features of the Brother PE800 is its color LCD touchscreen, which is an absolute must-have for any embroidery machine in my book. The touchscreen allows for easy pattern editing directly on the machine, giving you greater flexibility and control over your designs.
In terms of automatic features, the Brother PE800 doesn’t disappoint. It boasts automatic thread tension, a thread trimmer (at the end of each color, not just jump stitches), and an advanced needle threading apparatus, making the embroidery process smoother and more efficient.
Why you should choose the Brother PE800
If you’re in the market for a reliable embroidery machine specifically for T-shirts, the Brother PE800 is definitely worth considering. Its ample embroidery area, diverse built-in designs, and user-friendly features make it an ideal choice for both beginners and experienced embroiderers alike.
However, it’s essential to weigh the pros and cons based on your individual needs and preferences. While the Brother PE800 excels in many areas, its inability to sew may be a deal-breaker for some. Additionally, if you anticipate working with larger designs frequently, you may want to explore options with a larger embroidery area.
Janome Memory Craft 400E Embroidery Machine
If precision, efficiency, and versatility are what you’re after, Janome MC400E might just be your new best friend.
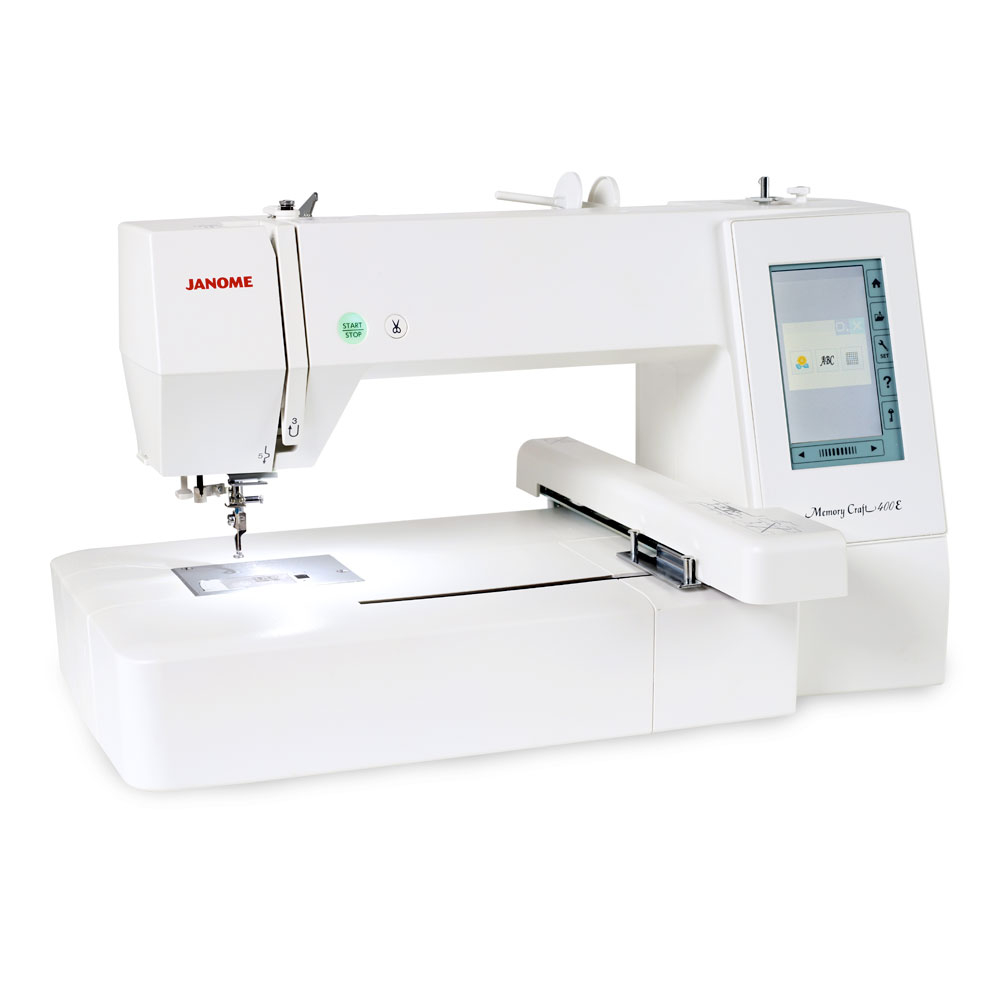
Features and Specs
The Janome MC400E is an embroidery-only machine with a generous maximum embroidery area of 7.9″x7.9.” This ample space is perfect for larger shirt designs, allowing you to unleash your creativity without constraints.
With a maximum embroidery speed of 860 stitches per minute (spm), this machine means business when it comes to completing your designs efficiently. No more waiting around for hours – your T-shirt designs will come to life in record time.
Equipped with 160 built-in designs and 6 monogramming fonts, the Janome MC400E offers a diverse array of design options straight out of the box. Plus, you can easily import additional designs or fonts via USB, ensuring endless possibilities for customization.
Pros and Cons
One of the standout features of the Janome MC400E is its user-friendly interface, which includes a color touchscreen for easy design editing. Whether you’re adjusting stitch settings or fine-tuning design placement, the touchscreen makes the process a breeze.
For users seeking efficiency and ease of use, the Janome MC400E delivers in spades. Features like automatic jump stitch trimming, adjustable embroidery speed, and flexible stitch traveling streamline the embroidery process, saving you time and frustration.
Why you should choose the Janome Memory Craft 400E
If you’re serious about T-shirt embroidery and demand precision, speed, and versatility, the Janome Memory Craft 400E is definitely worth considering. Its spacious embroidery area, high-speed stitching capabilities, and user-friendly features make it a top choice for both hobbyists and professionals alike.
However, it’s essential to weigh the pros and cons based on your individual needs and budget. While the Janome MC400E offers an impressive array of features, its higher price point may be a deterrent for some users. Additionally, if you anticipate working with even larger designs, you might want to explore the upgraded Janome Memory Craft 500E, which boasts a larger embroidery area.
Brother Personal PRS100 Single Needle Embroidery Machine
If you’re looking for a machine that offers the versatility of embroidering cuffs, sleeves, pockets, and even small onesies without the hassle of moving fabric out of the way, then the Persona PRS100 is your perfect match.
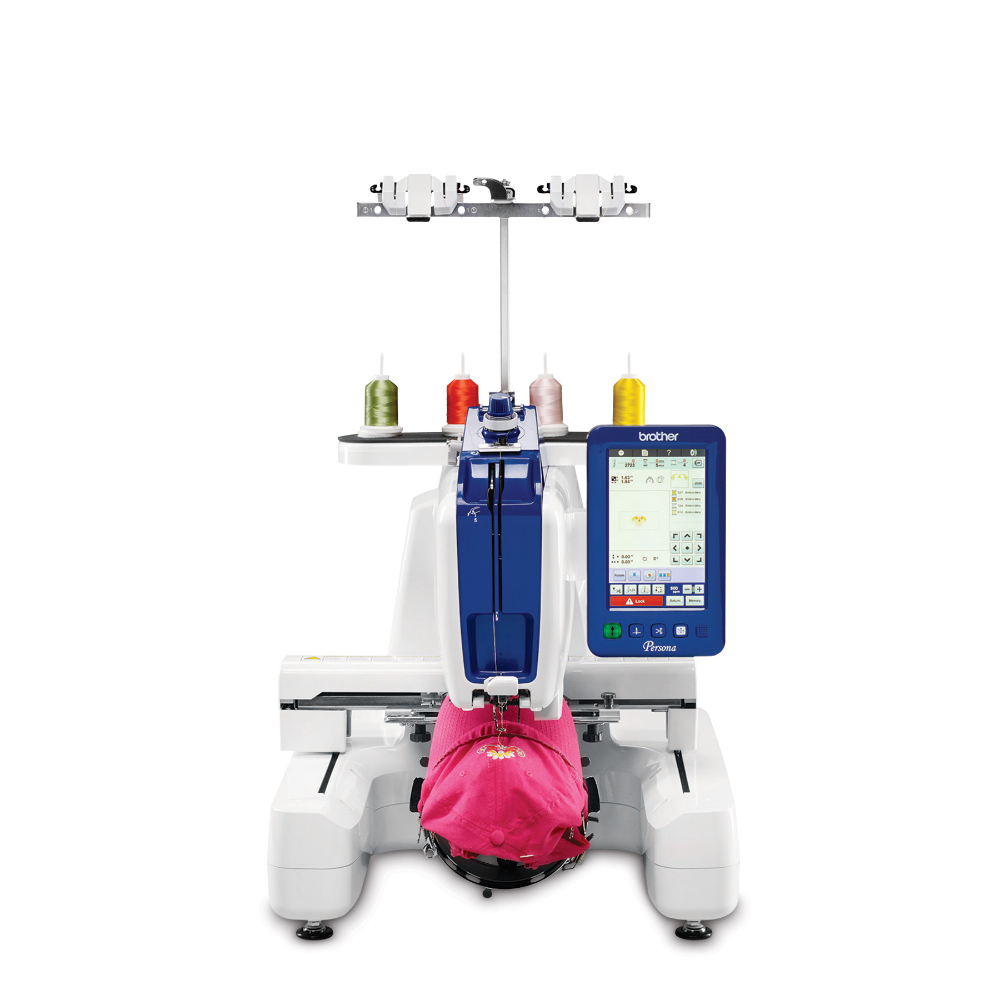
Features and Specs
The Brother Persona PRS100 boasts a free arm design that allows you to access and embroider areas of shirts that would otherwise be tricky to reach. This feature is especially handy when embroidering tubular items like cuffs and sleeves, making it a breeze to add custom touches to your T-shirts.
As a single-needle embroidery machine, you’ll still need to change threads after every color, but the convenience of the free arm more than makes up for it. Plus, compared to Brother’s multi-needle embroidery machines, the Persona PRS100 offers a much more affordable option without sacrificing functionality.
With a maximum embroidery area of 8″x8″ and an impressive selection of 405 designs, 20 fonts, and 6 alphabet designs included, the Persona PRS100 provides ample opportunities for creativity. And with a stitching speed of up to 1,000 stitches per minute (spm), you’ll breeze through your embroidery projects in no time.
Pros and Cons
One of the standout features of the Brother Persona PRS100 is its free arm design, which allows for easy embroidery on tubular items. This feature opens up a world of possibilities for customizing T-shirts and other garments with precision and ease.
Additionally, the Persona PRS100 offers a fantastic balance of affordability and functionality compared to multi-needle embroidery machines, making it an excellent choice for both hobbyists and small businesses.
Why you should choose the Brother Persona PRS100
If you’re in the market for an embroidery machine specifically for T-shirts and other tubular items, the Brother Persona PRS100 is definitely worth considering. Its innovative free arm design, generous embroidery area, and impressive stitching speed make it a top contender in the world of single-needle embroidery machines.
However, it’s essential to consider factors like thread changes and design complexity when making your decision. While the Persona PRS100 offers fantastic features and functionality, it may not be the best fit for complex multi-color designs that require frequent thread changes.
Brother SE1900 Sewing and Embroidery Machine
Introducing the ultimate multitasker in the realm of embroidery machines for T-shirts – the Brother SE1900 Sewing and Embroidery Machine. If you’re a budding entrepreneur running a home-based T-shirt business, this machine might just be your secret weapon. Let’s delve into its features, pros and cons, and why it could be the perfect choice for your endeavors.
Features and Specs
The Brother SE1900 is a true powerhouse, offering both sewing and embroidery capabilities in one sleek package. With an embroidery field of 5"x7" and a plethora of design options – including 138 designs, 11 fonts, 10 frames, and 14 borders – this machine gives you the creative freedom to bring your T-shirt designs to life.
But here’s where it gets even better – the SE1900 isn’t just an embroidery machine. It’s also a fully functional sewing machine, complete with 240 built-in stitches and 10 buttonhole options. Whether you’re stitching seams, hems, or embellishments, this machine has you covered.
Pros and Cons
One of the standout features of the Brother SE1900 is its versatility. By combining sewing and embroidery capabilities into one machine, it allows you to save space in your craft room while expanding your creative horizons. Plus, with features like automatic thread trimming, automatic reverse stitching, and an advanced needle threader, sewing becomes a breeze even for beginners.
However, it’s worth noting that the SE1900’s embroidery field is limited to 5"x7", which may be restrictive for larger designs. Additionally, while the machine offers a wide range of features, it may be overwhelming for those just starting out in embroidery or sewing.
Why you should choose the Brother SE1900
If you’re a home-based entrepreneur looking for a versatile and feature-rich machine to elevate your T-shirt business, the Brother SE1900 is definitely worth considering. Its combination of sewing and embroidery capabilities, along with its user-friendly design and advanced features, make it an invaluable tool for anyone serious about their craft.
However, it’s essential to weigh the pros and cons based on your individual needs and budget. If space is limited and you value versatility, the SE1900 could be the perfect solution. But if you anticipate working with larger embroidery designs or prefer a more straightforward sewing experience, you may want to explore other options.
Janome MB-4S Four-Needle Embroidery Machine
Introducing the Janome MB-4S Four-Needle Embroidery Machine – the perfect blend of affordability and functionality for home-based T-shirt embroidery enthusiasts. If you’re dreaming of stepping up your embroidery game without breaking the bank, this machine might just be your ticket to success. Let’s explore its features, pros and cons, and why it could be the ideal choice for your embroidery endeavors.
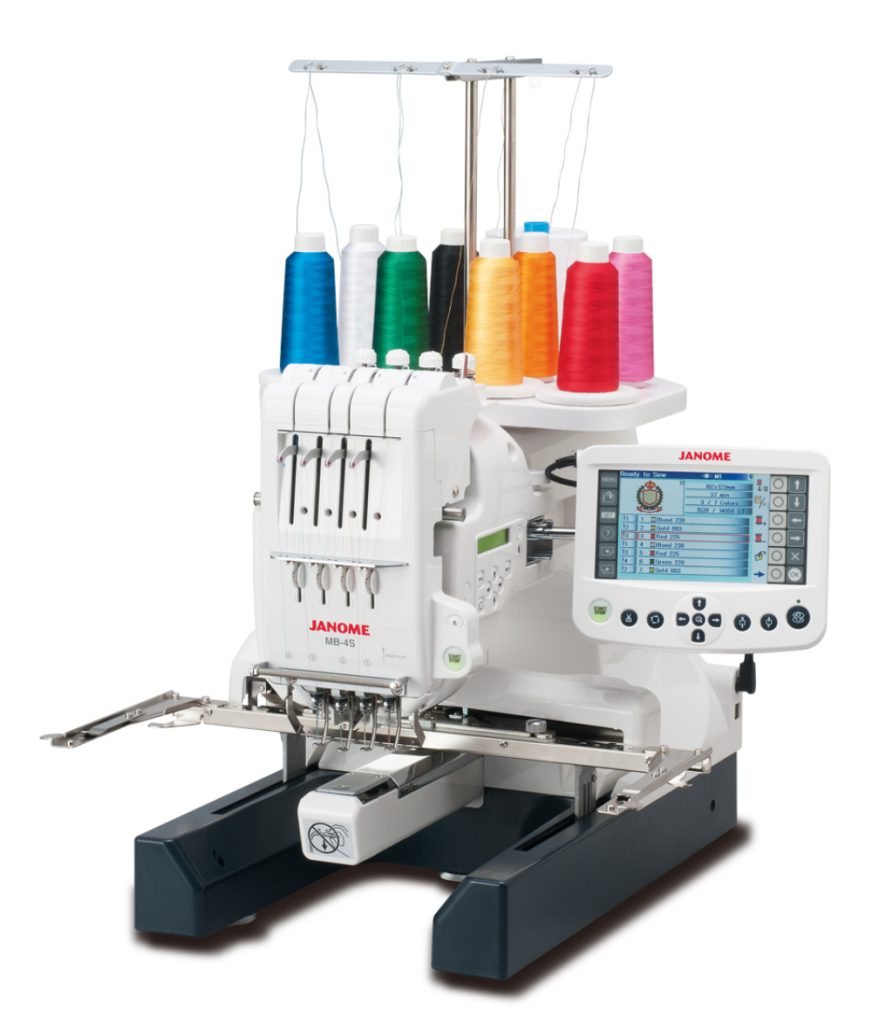
Features and Specs
The Janome MB-4S is a single-head, multi-needle embroidery machine designed to streamline your embroidery process. With four needles at your disposal, you can thread up to four colors at a time, eliminating the need to rethread between thread changes. This feature alone can save you valuable time and effort, allowing you to focus on bringing your T-shirt designs to life.
Equipped with a maximum embroidery area of 9.4″ x 7.9″, the MB-4S offers ample space to unleash your creativity. Plus, with 50 built-in designs and 10 monogramming fonts, you’ll have plenty of options to choose from when customizing your T-shirts.
Pros and Cons
One of the standout features of the Janome MB-4S is its ability to embroider with up to four colors simultaneously, without the need for user interaction between thread changes. This feature not only saves time but also reduces the risk of errors and inconsistencies in your embroidery designs.
Additionally, the MB-4S comes equipped with a range of time-saving features, including adjustable hoop positioning, automatic jump thread trimming, and presser foot and upper thread sensors. These features make the embroidery process more efficient and hassle-free, allowing you to focus on creating stunning T-shirt designs.
However, it’s worth noting that the maximum embroidery speed of 800 spm may not be as fast as some other machines on the market. While this may impact productivity for larger projects, the time saved from not having to manually change threads can more than makeup for it.
Why you should choose the Janome MB-4S
If you’re looking for an affordable yet capable embroidery machine for home-based T-shirt embroidery, the Janome MB-4S is definitely worth considering. Its multi-needle design, generous embroidery area, and user-friendly features make it an excellent choice for hobbyists and small businesses alike.
However, it’s essential to consider your specific needs and budget when making your decision. If you anticipate working on larger projects or require faster embroidery speeds, you may want to explore other options. Additionally, if you’re looking for even more thread options, the Janome MB-7 – a 7-thread embroidery machine – could be worth considering.
Brother SE600 Sewing and Embroidery Combination Machine
Introducing the Brother SE600 Embroidery Machine – the perfect choice for budget-conscious crafters looking to add custom logos and monograms to their T-shirts without breaking the bank. While it may not have all the bells and whistles of its higher-priced counterparts, the SE600 packs a punch with its impressive features and affordability. Let’s dive into what makes this machine a standout option for your T-shirt embroidery needs.
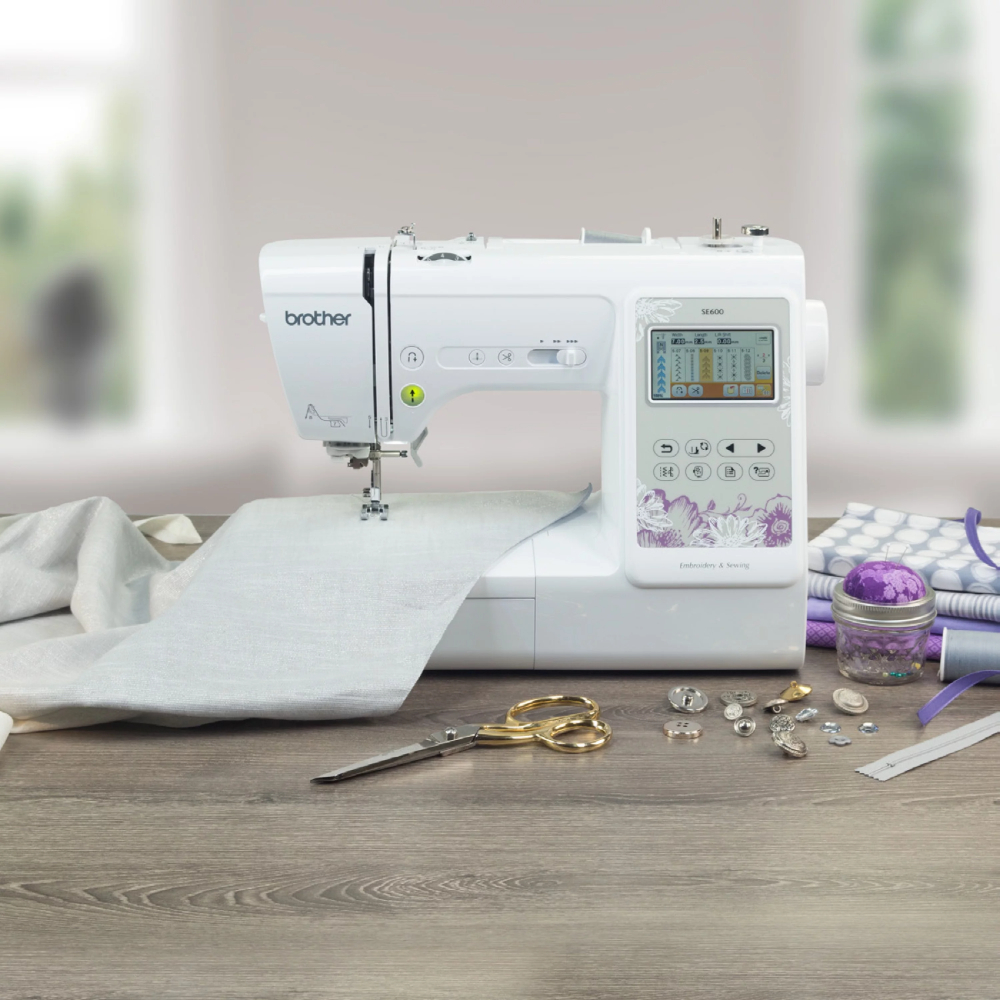
Features and Specs
With an embroidery field of 4"x4" and 80 built-in designs, the Brother SE600 offers plenty of options for adding flair to your T-shirts. Whether you’re monogramming shirts for a family reunion or adding small logos to promote your business, this machine has you covered.
In addition to its embroidery capabilities, the SE600 also functions as a sewing machine, with 103 stitch options and 10 buttonhole options. While its maximum sewing speed of 710 stitches per minute may be slower than higher-priced machines, it’s still more than capable of handling a variety of sewing projects.
Pros and Cons
One of the biggest advantages of the Brother SE600 is its affordability. As the least expensive option among T-shirt embroidery machines, it’s perfect for hobbyists and small businesses on a budget. Plus, with its combination of embroidery and sewing capabilities, it offers excellent value for money.
However, it’s important to note that the SE600 may not be ideal for mass production of T-shirts due to its slower sewing and embroidery speed. Additionally, its smaller embroidery field may limit the size of designs you can stitch, making it more suitable for smaller logos and monograms.
Why you should choose the Brother SE600
If you’re a hobbyist or small business owner looking to dip your toes into the world of T-shirt embroidery without making a significant investment, the Brother SE600 is an excellent choice. Its affordability, versatility, and user-friendly design make it the perfect companion for all your embroidery and sewing projects.
However, it’s essential to manage your expectations and consider your long-term goals when choosing the SE600. While it may not offer the same speed and features as higher-priced machines, it provides an excellent entry point into the world of T-shirt embroidery without breaking the bank.
In conclusion, the Brother SE600 Embroidery Machine offers unbeatable value for money for those looking to add custom logos and monograms to their T-shirts. With its affordability, versatility, and ease of use, this machine is sure to become a staple in your crafting arsenal.
Tips for Machine Embroidery on Shirts
Whether you’re a seasoned pro or just starting out, mastering a few key tips can make all the difference in achieving professional-looking results. Let’s dive into some essential tips for machine embroidery on shirts and how each one can elevate your craft.
Hooping the Shirt
Hooping is a crucial step in the embroidery process that can greatly impact the outcome of your design. Proper hooping ensures that the fabric remains stable and taut during embroidery, resulting in crisp, clean stitches. When hooping your shirt, be sure to:
- Use the appropriate size hoop for your design to prevent fabric distortion.
- Smooth out any wrinkles or creases in the fabric before hooping.
- Ensure that the fabric is evenly stretched across the hoop to avoid puckering or distortion during stitching.
- Double-check the placement of your design before embroidering to ensure it’s centered and aligned correctly on the shirt.
Choosing the Best Shirt Stabilizer
Stabilizer is like the unsung hero of machine embroidery – it provides support to the fabric during stitching, preventing stretching, puckering, and distortion. Choosing the right stabilizer for your shirt embroidery project is crucial for achieving professional results. Consider the following tips:
- Select a stabilizer appropriate for the fabric and design density. For lightweight shirts, a tear-away stabilizer may suffice, while heavier fabrics may require a cut-away stabilizer for added support.
- Test different stabilizers and combinations to find the best option for your specific shirt and design.
- Experiment with using multiple layers of stabilizer for extra support, especially for intricate or densely stitched designs.
Thread and Needle Choices
The thread and needle you use can have a significant impact on the quality of your embroidery. Choosing the right combination can ensure smooth stitching and vibrant colors. Here are some tips for selecting the best thread and needle for your shirt embroidery:
- Use high-quality embroidery thread specifically designed for machine embroidery to prevent breakage and ensure consistent stitch quality.
- Match the thread weight to the fabric weight – lighter threads for lightweight shirts and heavier threads for thicker fabrics.
- Choose the appropriate needle size and type for your fabric – use a sharp needle for woven fabrics and a ballpoint needle for knits to prevent snags and damage to the fabric.
After Embroidering
Once your embroidery is complete, taking proper care of the finished shirt is essential for maintaining its appearance and longevity. Here are some tips for post-embroidery care:
- Remove the shirt from the hoop carefully to avoid stretching or distorting the fabric.
- Trim any jump stitches or loose threads with sharp embroidery scissors for a clean finish.
- Gently press the embroidered area on the reverse side of the fabric using a pressing cloth to remove any hoop marks and smooth out any wrinkles.
- Launder the shirt according to the fabric care instructions, using mild detergent and avoiding harsh chemicals or bleach that could damage the embroidery.
By following these tips for machine embroidery on shirts, you’ll be well-equipped to tackle your next shirt embroidery project with confidence and achieve professional-quality results every time. Happy stitching!


