
Custom photo night lights are one of the most eye-catching personalized décor products on the market. With vibrant LED colors, precision-cut acrylic shapes, and high-quality UV printing, they’re perfect for gifts, home decoration, and business displays.
If you’re a designer or seller, knowing how to properly prepare your print file and generate a professional mockup is essential to ensure flawless production and high-converting product listings.
In this step-by-step guide, we’ll walk you through:
- How to prepare your print-ready file using the PSD template
- Key technical requirements to avoid production issues
- How to generate a polished mockup for marketing
Let’s get started.
Step-by-Step Guide to Creating a Design for Custom Photo Night Lights
Step 1: Download the Official Template
You can download our template from the product page under the “Mockup & Template” tab.
There are three templates for Custom Photo Night Light
- ULD Photo Night Light (Rectangle display base)
- ULD Photo Night Light Rectangle (Round display base)
- ULD Photo Night Light Square (Round display base)
Depending on the type of product you want to design, download the respective template file.
Step 2: Open the Template in Photoshop or Photopea
You can use:
- Adobe Photoshop
- Photopea (free online alternative)
Make sure your software supports:
- PSD files
- Smart Objects
Understanding the 2 Customizable Parts
When opening the template, you will find 2 main sections:
1️⃣ Shape: This section defines the actual physical piece of acrylic that will be cut by the laser. Color of Cut Shape design must be 100% Solid Black. The laser uses this black silhouette as the cutting path.
2️⃣ Design: This is the colored artwork that will be UV-printed onto the acrylic shape defined on the left.
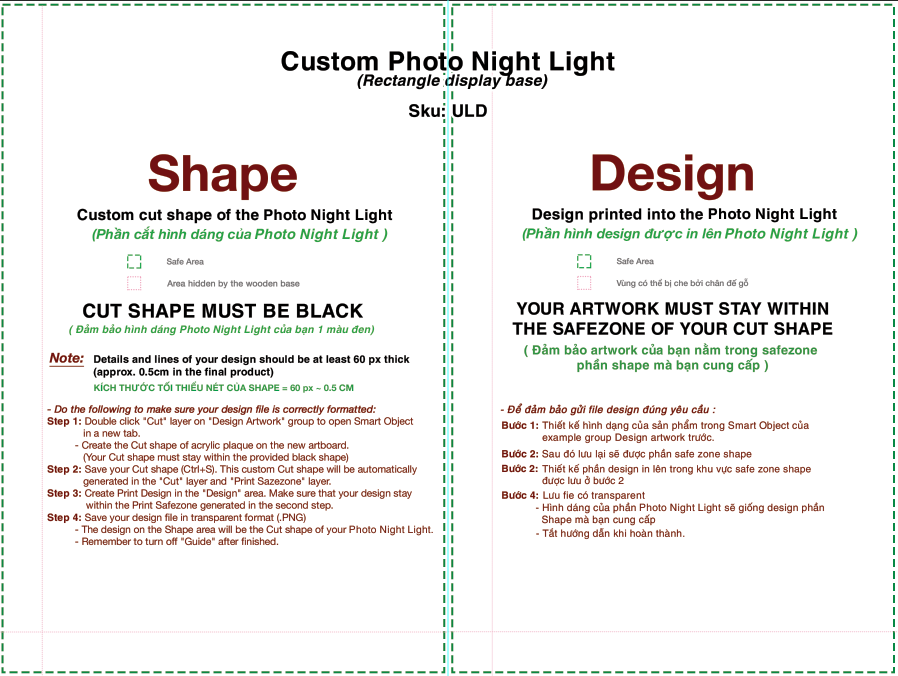
Template for Custom Photo Night Light (Rectangle display base)
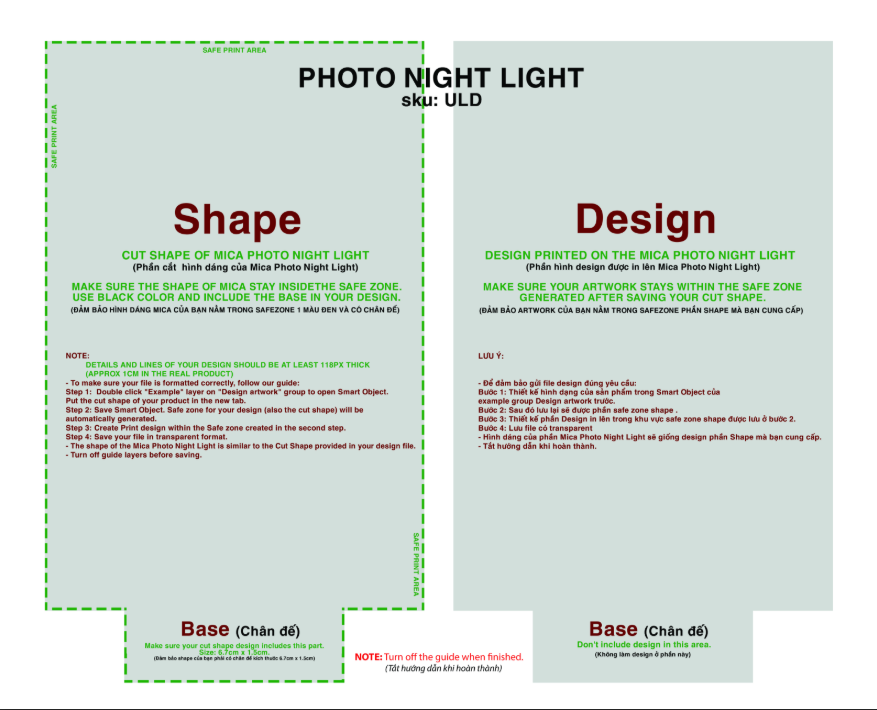
Template for Round Base (Rectangle acrylic)
Note:
- Shape Thickness: Any lines or details of the shape must be at least 60px thick (approx. 0.5cm).
- Printing Safe Zone: All design elements (photos, text, icons) must stay within the silhouette of your black shape (Turn on Safezone IN layer to check). If the design goes outside the black area, it will not be printed on the acrylic.
- Safezone: Both Shape and Print design must stay inside the green dashed line. Anything that goes outside the line might be cut off in the final product.
- For the Rectangle display base template, note the “Area hidden by the wooden base" (indicated by the red dotted line in the template). Do not put important text or faces at the very bottom, or they will be hidden inside the wooden stand.
Step 3: Design the Cut Shape
1. Find the Cut Layer in the layer panel. Double-click the Smart Object thumbnail to open a new tab.
2. On the new tab, turn off the example layer and turn on Guide.
3. Add Shape design to the workspace. Make sure to place your cut shape for the main artwork above the red dotted line.
4. Add base insert area to your cut shape design.
The base insert section ensures your acrylic panel fits securely into the wooden base.
- For the Rectangle base template, you can draw a rectangle shape within the designated insert area. Keep it connected to your main cut shape. Keep it aligned precisely so the acrylic can stand firmly
- For other Round display base templates, keep the cut shape for the base section as in the template.
Make sure your shape design stays within the green line and complies with other requirements (Refer to the requirements below).
5. When done, turn off Guide and other unnecessary layers, save Smart Object (Ctrl + S). Close tab.
Important Shape Requirements (Do NOT Skip)
To ensure smooth cutting and durability:
✔ Combine All Artwork into One Connected Object: All elements must be merged into a single unified shape.
If elements are separated:
- Apply a stroke around the artwork
- Increase stroke thickness until outer paths connect
✔ Fill Shape Area with Solid Black: The cutting system reads black as the cut area.
✔ Minimum Cutting Line Thickness: 60 Pixels. Always simplify overly intricate edges and avoid thin details. Thin details may:
- Break during cutting
- Crack during shipping
- Reduce product durability
Step 4: Create Design Artwork
Next, move to the Print Part.
1. Turn on the “Safezone In” layer on the layer panel. The cut shape will now show in the Print section
2. Use the shape design as a reference to place your design. Make sure to put your design within the cut shape. Besides, don’t place important texts or details in the area hidden by the wooden base (marked by the red dotted line)
3. When it’s done, turn off the Guide layer.
Resolution Requirements for Best Print Quality
For raster (bitmap) files:
- Minimum resolution: 300 DPI
- Always use the highest resolution possible
Low-resolution files may result in:
- Blurry printing
- Pixelation
- Loss of detail
Step 5: Exporting the Final Print File
Before saving:
- Turn off all guide layers
- Ensure background is transparent
Export your final file in a transparent format (such as PNG). Your print file is now production-ready.
How to Create Mockup Images for Custom Shape Photo Night Light
A high-quality mockup increases buyer trust and boosts conversions. Here’s how to create one using the PSD template.
Step 1: Download the mockup file
In the Google Drive folder where you downloaded the template, open the “Mockup” folder. You can find 2 folders for Rectangle or Round Base.
For each option, there are different mockup versions. Select and download one that matches your design & product.
Step 2: Add designs to your mockup
1. Open the download mockup files on PhotoShop
2. Locate the “Place Your Design Here” layer in the layer panel
3. Double-click the Smart Object thumbnail
4. In the new tab, drag your finished design file into the workspace
5. Press Ctrl + S. Close Smart Object tab.
Now your design has been updated to the mockup.
Step 3: Adjust lighting effects
Click this icon on the Color layer to open the color selection box.
Adjust the light to the light you want to show in your mockup (Note that Photo Night Light only comes in certain colors. Only select colors within this range of colors).
Step 4: Customize the Background
You can switch between the available background options or upload new backgrounds for your mockup.
Step 5: Export mockup images
Once satisfied, export your final mockup for use in:
- Product listings
- Social media ads
- Marketing materials
Ready to Create Your Custom Photo Night Light?
With proper file preparation and a polished mockup, you’re not just creating a product — you’re building a premium customer experience.
If you’re selling print-on-demand night lights, mastering this process will reduce production errors, improve reviews, and increase conversion rates.


