Contents
Have you ever owned a T-shirt that you really loved, from the fit, texture, and colors, everything is good, except for the prints. Don’t worry. There are a few methods that you can apply to remove the prints on a T-shirt. With these special tips on how to remove print from shirt, you can keep your T-shirt and wear it as you wish without bearing the pain of seeing its unwanted print.
Removing Printing with an Iron
Heat is the most effective way to remove prints. To apply heat on a shirt, there is no better way than using an iron. They are easy to find and easy to use. In some simple steps, you will be able to remove the printed decoration on your T-shirt.
Step-by-Step Guide To Remove Print on Shirt with an Iron:
Discover a step-by-step guide to effectively remove printed designs from shirts using a simple method involving heat application, ensuring minimal damage to the fabric.
- Set your iron to a low to suitable heat setting
To effectively remove the print, a higher temperature is preferable. However, it is not recommended to automatically adjust the iron to the highest temperature setting because it can ruin both the prints and the fabric. Depending on the material types and the recommendation by the manufacturer, adjust your iron temperature setting accordingly.
- Apply heat to the print area
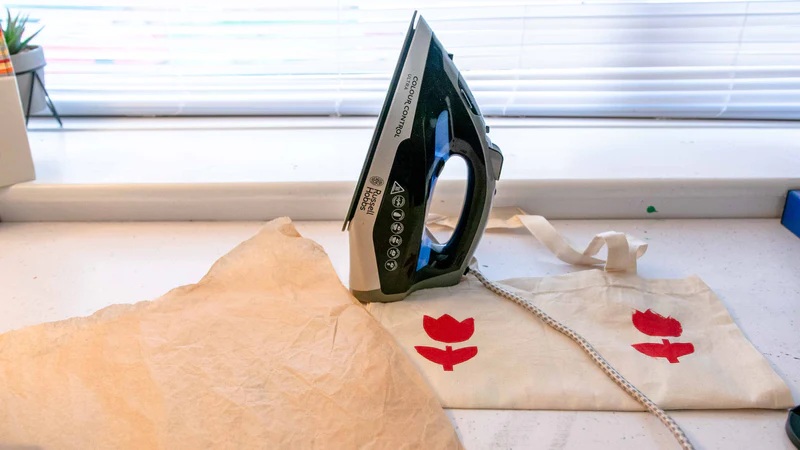
There are two ways to apply heat to the print area. The most convenient way to apply heat to the fabric is to put the iron on the back of the fabric, to avoid direct contact between the iron and the prints. The heat will emit through the fabric and melt the print on the front.
With this option, you should let your iron stand firmly on a surface and wrap the fabric around its soleplace.
Alternatively, you can place a clean cloth to cover the printed area and apply heat on the cover cloth. Then gently iron the cloth and let the heat work its magic.
- Remove the melted print
Once the print is melted to a certain degree, it will become easy to remove. At this point, you can use either a knife or something with a sharp or pointy edge to peel off the print.
If you place the iron on the back of the fabric, don’t forget to adjust the temperature then proceed to remove the print so that you won’t be injured by the heat.
- If the print is still hard to peel off, reapply the heat and slightly set the temperature higher.
Useful Tips:
- Be cautious not to overheat the fabric, especially if it’s delicate. Always test a small, inconspicuous area first.
- This method might not work if the ink is deeply set. Consider trying other options to remove the prints.
- There might be still a residue after the print is peeled off. But don’t worry, you can remove the residue and make the fabric clean by washing it.
Nail Polish Remover or Acetone
To get rid of screen prints once and for all, use a nail polish remover-an effective, easy, and quick way to remove screen prints from your fabric without damaging it. One of the main constituents of nail polish remover is acetone (dimethyl ketone), which can effortlessly dissolve any old or cracked ink design.
Step-by-Step Guide to Get Print Off a Shirt with Nail Polish Remover or Acetone:
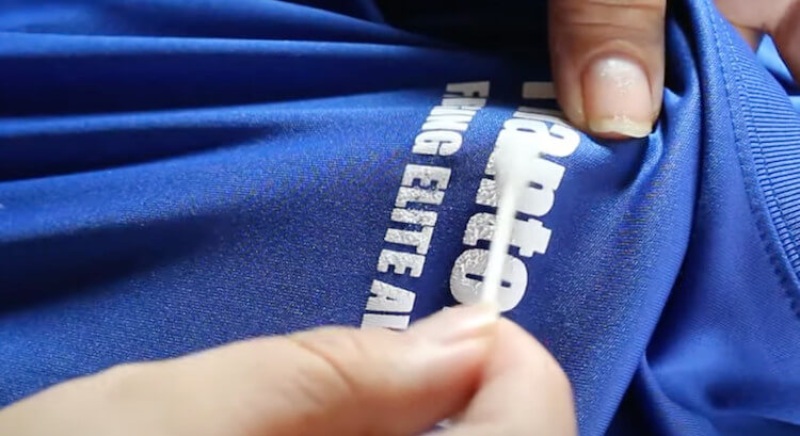
- Turn the T-shirt inside out and apply acetone on the backside of the fabric. Make sure to apply an amount that is enough to soak the entire printed area.
- Wait for the acetone to soak in and dissolve the print. Slightly stretch the fabric out to make acetone work faster.
- Flip the T-shirt back and start peeling and scraping off the printing.
- If the print is not entirely dissolved or peeled off the fabric, repeat the entire process again.
Useful Tips:
- During the process, acetone might emit some harmful chemicals. Find a well-ventilated space or go outdoors to follow the process. You can also wear a facemask to avoid the solvent smell.
- Acetone may discolor or damage certain fabrics, especially delicate ones. To avoid damage, you must test on a small area first to see if there is any wrong with the fabric before proceeding to apply acetone to the printed area.
Solvents:
Other than using acetone, you can also find other alternative products that can be used to remove the prints. The procedure is somewhat similar to how you remove prints with acetone.
Step-by-Step Guide:
- Get the necessary supply. Rubbing alcohol or any type of adhesive remover can used as a solvent to remove the prints. These products can be easily found around the house or at any convenience store.
- Apply the solvent to a smaller area first to check if the solvent is safe to use.
- Dampen your T-shirt with the solvent. As the print is dissolved with solvents, you can remove the print by peeling or rubbing it off. A stretch
- Check progress and repeat if necessary. Some prints may require multiple applications for complete removal.
Useful Tips:
- Wash the shirt after removing the print to eliminate any residue left by the solvent.
- Remember to use a glove to prevent direct contact with solvents which can irritate your skin.
Plastisol Remover
Image Source: 5-minute Crafts
Screen print is very hard to get rid of. If you have tried all the methods above but not succeeded yet, it is recommended to resort to a special treatment – plastisol remover.
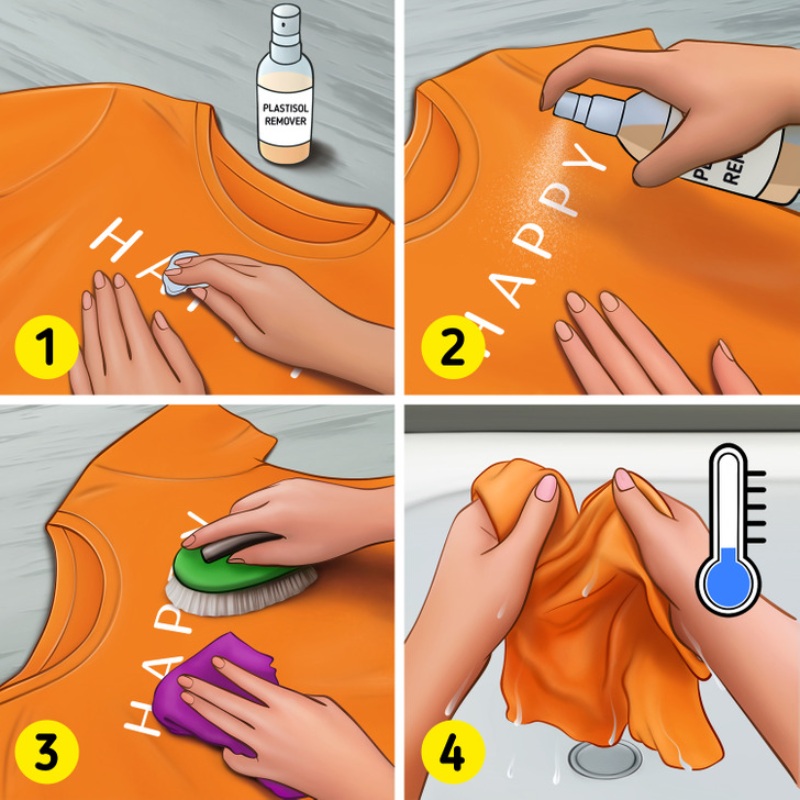
Plastisol is a popular ink type that is used frequently for screen printing. To completely remove screen print, the most effective way is to use plastisol remover. Here’s step-by-step guide on how to remove screen print:
Step-by-Step Guide:
- Apply plastisol remover according to product instructions. Different products may have varying application methods, so follow the guidelines provided.
- Allow it to sit for the recommended time (mostly around 30 minutes). This step allows the remover to penetrate and soften the ink.
- Wipe away the softened print with a brush and soft cloth.
- After completely removing all the prints, you can try to wash off all the remaining plastisol and print residue by washing the clothes.
Useful Tips:
- Follow the safety precautions outlined by the product, including using gloves and working in a well-ventilated area.
- This method is particularly effective for plastisol-based inks commonly used in screen printing.
Spot Removal Fluid
Spot removal fluid is frequently used by screen printers themselves to remove any stray ink spots. This method provides another way to remove the screen print ink completely without damaging the material.
However, this specific method requires special equipment and products that might not be easily purchased or are quite costly for one-time usage.
If you want to remove prints in bulk, this option is a highly recommended option.
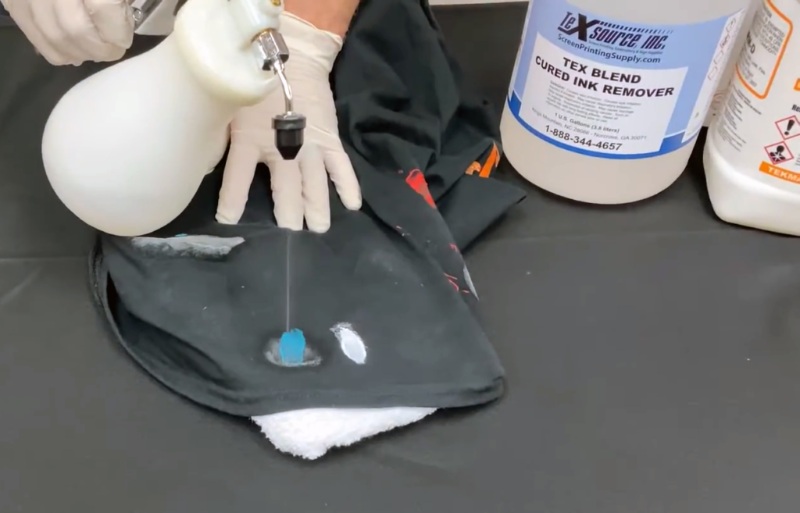
Spot removal fluid also can be highly effective for erasing screen printing designs. Certain spot-cleaning guns utilize air compressors, while others simply work similarly to toy water guns. This type of cleaning item serves as an excellent solution for removing small stains in a design. Just be sure to only spray on the design and not your item’s plain fabric, as the latter can easily become damaged. As with plastisol, finish by washing your product to remove all chemicals.
Step-by-Step Guide:
- Use an air compressor spray to apply spot removal fluid onto the fabric.
- Place a soft cloth on the backside of the fabric where the print is. Spray the spot removal fluid into the fabric. Spot removal fluids through the compressed gun will break down the print instantly. Continue to spray all over the printed area to remove printing completely.
- Use a soft cloth to clean off the excess fluid and resolve the ink.
- After removing all the prints, wash the screen printed shirt again to rinse all the residues completely.
Useful Tips:
- Check the fabric care label to ensure compatibility with spot removal fluid.
- Wash the shirt promptly after removing the print to eliminate any lingering chemical residue.
- Be careful with the spay. Wear a mask and glove before spaying.
Conclusion
Knowing how to remove screen prints would be increasingly helpful. It will help you to avoid fashion waste and promote recycling clothes. Hopefully, you can find the most convenient method and breathe new life into your favorite screen-printed T-shirt.


