Categories
-
Ordering & Fulfillment
- Complete Guide: How to get started & set up fulfillment on Merchize
- Create a Manual Order in Merchize
- How To Import Order to Merchize Manually
- How To Create Products And Campaigns At Merchize
- Create & Import orders for FBA Fulfillment
- How to set up Merchize x Order Desk Integration
- F.A.Q About Fulfillment Procedure On Merchize
- General Introduction to Merchize Store Administration
- How To Add Sub Account To Your Store
- How To Connect PayPal Account To Pay Subscription & Transaction Fee Automatically.
- How To Contact Merchize Support
- Connect Merchize to Shopify API via a Custom App
- Brand Packaging Kit & Thank-you Card Features I Setup Guides
- Verify US Shipping Address
- How to cancel orders and items
- Set up custom fulfillment workflow with conditional logic
- How to Process TikTok Shop Orders With Merchize
- Instructions for Update Artwork
- How to Bulk Import Artwork via CSV and API
- How to Track and Manage Packages in Shipment Status
- Guide to Order Tracking and Management on Orders page
- How to Process Walmart Orders with Merchize
- Show all articles7 Collapse Articles
-
Integrations
- Connect Merchize to Shopify API via a Custom App
- How to set up Merchize x Order Desk Integration
- Create & Sync Products from Merchize to Shopify
- Create & Sync Products from Merchize to Etsy
- Create & Sync Products from Merchize to WooCommerce
- Create & Sync Products from Merchize to Ebay
- Amazon Integration: Connect & Fulfill Orders Automatically
- eBay Integration: Connect & Fulfill Orders Automatically
- How to configure and sync your Etsy orders to Merchize?
- Google Shopping Custom Label User Guide
- Guideline To Integrate Email Marketing Klaviyo Solution On Your Merchize Store.
- How to sync orders automatically and fulfill from Shopify
- Integrate & Fulfill Orders From ShopBase
- Integrate WooCommerce Fulfill with Merchize
- Integration with Google Shopping
- Connect Customily and Merchize for Product Personalization
- Integrate TeeinBlue and enjoy personalized fulfilment with Merchize
- Connect Merchize to Shopify API via a Custom App With Client ID and Secret ID
- Show all articles3 Collapse Articles
-
Print & Mockup Guidelines
-
Payment & Billing
- How to take payments with PayPal
- Guideline to Merchize Payment
- General Introduction to Merchize Store Administration
- How To Connect PayPal Account To Pay Subscription & Transaction Fee Automatically.
- Set Up Payment In Merchize Setting - To Receive Payment From Customers
- F.A.Q About Fulfillment Procedure On Merchize
- How To Contact Merchize Support
- Account Suspension and Restoration
- How to take payments with Payoneer
- How to take payments with LianLian
-
Delivery & Shipping
-
Storefront Setup
- How to create a storefront on Merchize and configure domain to connect to Merchize
- Add WWW To Your Store
- Bulk Import Products
- Bulk Add Tags For Multiple Products (Bulk Add Tags) Guideline
- General Introduction to Merchize Store Administration
- General Settings In Settings > General of Merchize
- Google Shopping Custom Label User Guide
- Guideline To Integrate Email Marketing Klaviyo Solution On Your Merchize Store.
- How To Add Product Review
- How To Add Promotion Bar For Your Storefront
- How To Add Sub Account To Your Store
- How To Bulk Edit Description
- How To Connect PayPal Account To Pay Subscription & Transaction Fee Automatically.
- How To Contact Merchize Support
- How To Create and Edit Pages on Merchize Storefront
- How To Create Products And Campaigns At Merchize
- How To Create Free Shipping Code For Built-in Payment Store
- How To Edit Store Homepage on Merchize
- How To Fix The Price of a Series of Products
- How To Get Bing Site Verification Code
- How To Get Facebook Pixel ID
- How To Get Google Analytics Tracking ID
- How To Get Google Conversion Tracking Code
- How To Get Google Site Verification Code
- How To Get Google Tag Manager Container ID
- How To Get Store Sitemap Link
- How To Import Bulk Of Products From Shopify To Your Merchize Store
- How To Insert Code Into GTM To Change CSS Store
- How To Install Multi-pixel Using GTM
- How To Integrate The Feature Of Adding Multiple Facebook Pixel ID
- How To Manage And Create New Discount For Store On Marchize
- How To Prevent DDOS Attack By Using Cloudflare
- How To Set Up Facebook Conversion Api
- How To Set Up Free Shipping From $Xx On Merchize
- How To Set Up Shipping Rates With Merchize
- How To Use Product Gallery
- Launching Upsell And Cross-Selling Features V1
- Set Up Payment In Merchize Setting - To Receive Payment From Customers
- Setting up the Menu Navigation Management feature for Store
- How to Generate Facebook Product Feed Files with Merchize Storefront
- Merchize Customer Management
- Connect Customily and Merchize for Product Personalization
- Integrate TeeinBlue and enjoy personalized fulfilment with Merchize
- Show all articles28 Collapse Articles
-
Features & Store Management
-
Other Functionalities & Settings
Set Up Payment In Merchize Setting – To Receive Payment From Customers
🇻🇳 Click here for Vietnamese version
Go to settings on the left side, choose Payment to set up payment function for your store:
Merchize is now supporting Paypal and Stripe payment. You need to have a Paypal and Stripe account to make payment on Merchize. In addition, Merchize is also trying on Paypal Pro payment for sellers who have Paypal Pro accounts. This article has 3 parts:
- Guideline for configuring regular Paypal payment
- Guideline for configuring Paypal Pro payment
- Guideline for configuring Stripe payment.
1 – Guideline for configuring regular Paypal payment
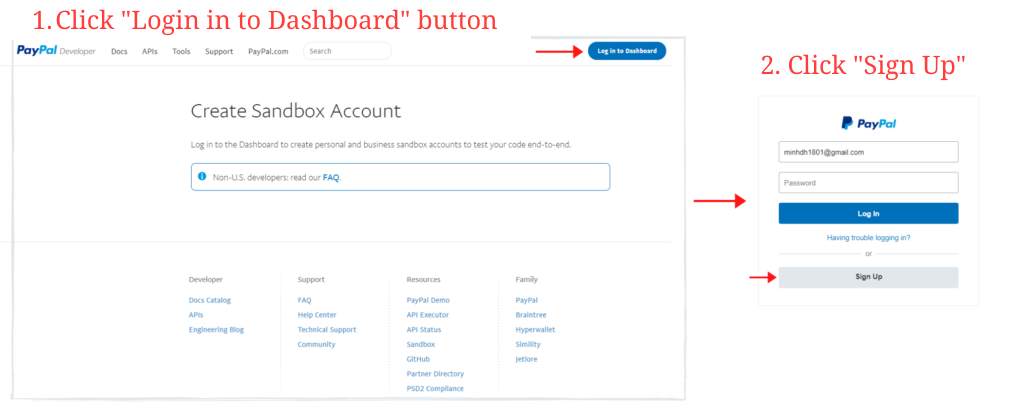
Firstly, you need to create a sandbox account at https://developer.paypal.com/developer/accounts/create.
Choose login to Dashboard, then choose Sign Up

Choose the country as Vietnam and choose the account as Business Account.

After that, you fill in the account and business information as the guideline.
Next you get Paypal Client Key and Paypal Secret Key at: https://developer.paypal.com/developer/applications/.
You need to log in your paypal account which is used to receive the payment on store.
Then:
- In My Apps & Credentials, choose Live, choose Create App. Some common problems in this step:
+ If PayPal requires the email confirmation, you can confirm email as the instruction then come back this step
+ If you already confirm email but Paypal still requires email confirmation, you turn off the browser and wait for 1 hour then turn on again.

- Choose App Name then choose Create App.

- Then, you scroll down to Sandbox App Setting and choose the following items for Merchize to activate.

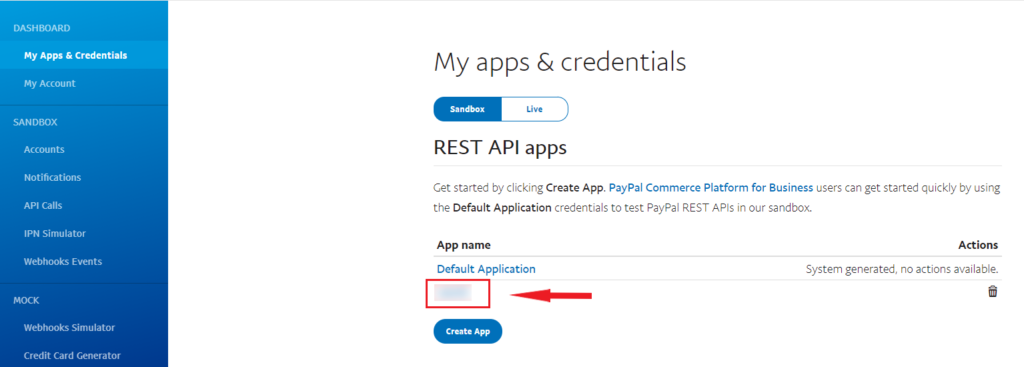
- In My apps & credentials, choose the app that you create in the previous step. After that , copy the information about Client ID and Paypal Secret Key (press Show in Secret to copy).


- Paste into Payment Settings on Merchize, choose Enable Paypal, put Paypal ENV in Production mode (Sandbox mode is the test mode for developers. If you put “Sandbox”, customers cannot make payment and you cannot receive the payment from customers).

- After setting up Paypal, when customers pay for their orders, they will be transferred to the display below, Cancel and Return to will connect with Paypal account name of sellers.

2 – Guideline for configuring Paypal Pro payment
With Paypal Pro, when customers make payment, they can enter the card information in the payment page immediately without clicking on the Payment by Paypal link as usual.
This function is only for sellers who already have a Paypal Pro account. You can get more information about Paypal Pro here.
How to do:
- Go to Settings → Payment
- Fill in full information on Paypal Payflow Pro. These information all have in your Paypal PRO account. You can log in your Paypal PRO account to see these information:
+ Merchant Login, Password: Enter login and password of your Paypal PRO account.
+ Partner: Partner information. You can find this information in your Paypal account.
+ Paypal Pro ENV: 2 settings are Sandbox or Production. If you want to test the system, you can choose Sandbox. The system will stay in Test mode at this time. For real customer payments, you have to set it in PRODUCTION.
- Then, clicking on Enable PayPal Pro. If you are turning on Stripe, you need to turn it off to open Paypal Pro.
Finally, Save is done.

3 – Guideline for configuring Stripe payment.
In the Stripe Payment section, you need to fill in into 2 fields Stripe Client Key and Stripe Secret Key
- To get this Stripe API information, you access to https://dashboard.stripe.com/account/apikeys and log in your Stripe account to get the information as in the picture below.

- Then, copy/paste these information into following fields and remember to choose enable Stripe and save
How to collect billing addresses for Stripe transactions
Merchize’s Storefront now provides a new feature that allows sellers to acquire billing address information from buyers for Stripe transactions in the checkout process.
Here’s how you can set up “Collect billing address”
- From the Merchize dashboard, navigate to Settings > Payment
- Under the Stripe section, check the “Collect billing address” box
- Click “Save” to apply the changes
How does your store collect buyer’s billing address information
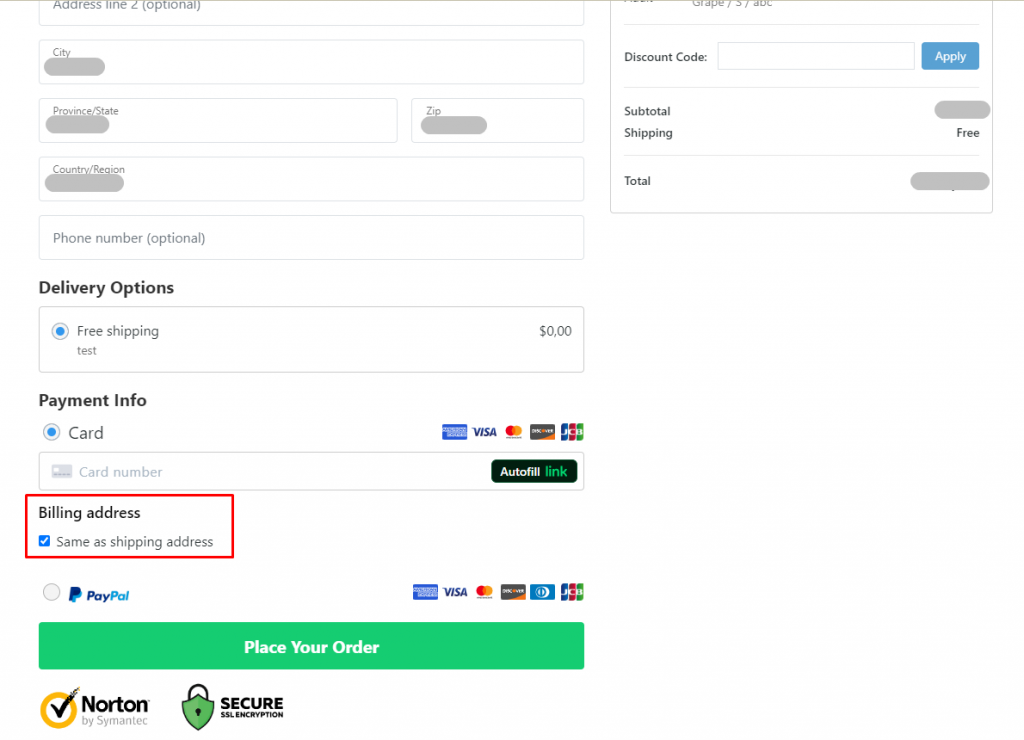
After the collect billing address is activated, when the customer choose to process payment with Stripe, the Billing address block will be added to the Checkout page as follows:
Scenario 1: “Same as shipping address” is checked as the default option. With this option check, the billing address will be similar to the Shipping address, and customers won’t have to reenter all the information.

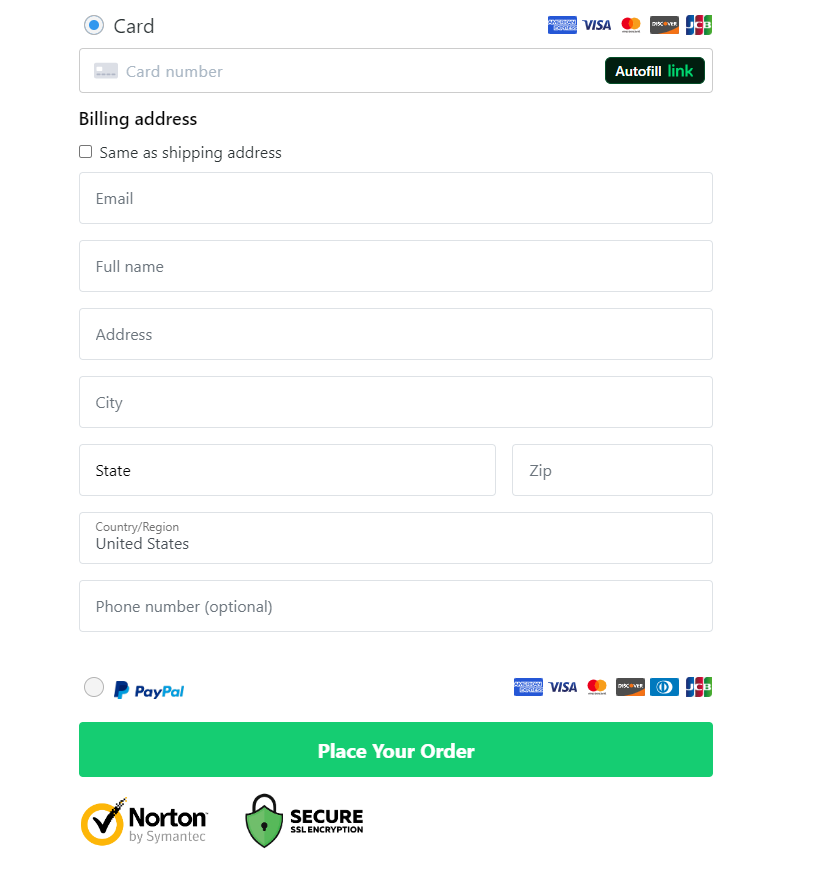
Scenario 2: If buyers uncheck the “Same as shipping address” option, they will have to fill in all the billing information, including:
- Email (Required),
- Full name (Required),
- Address (Required),
- City (Required),
- State (Required),
- Zip (Required),
- Country/Region (Required, United States as the default value)
- Phone (Optional)

