How To Create and Edit Pages on Merchize Storefront
Creating and managing pages on your Merchize storefront is crucial for providing essential information to your customers. This guide will walk you through creating, editing, and deleting pages on your store.
1. Types of Pages
1. Default Pages: Default Pages are pre-created pages, including:
- Contact Us
- Terms of Services
- Privacy Policy
- Copyright Dispute Policy
- Refund Policy
- Fulfillment Policy
- Help Center
- About Us
- Payment Method
Default pages are automatically generated to comply with regulations and to enhance your store’s credibility. They help in handling customer disputes, returns, and refunds, ensuring that your store meets legal requirements and stakeholder expectations, such as Google Shopping. However, each store might need to tailor the content of these pages to better fit their specific business needs.
2. Custom Pages: New pages created by you.
Custom pages allow store owners to create unique content, such as promotional information, detailed product guides, or personalized brand stories, which are not covered by default pages.
Custom pages help tailor your e-commerce store to meet specific business needs and enhance customer engagement.
2. How to Create a Custom Page
To create a custom page, follow these steps:
1. On Merchize admin dashboard, hover to Online Store > Pages
2. Click the Create Page button located at the top left corner of the screen.
3. Enter page information:
- Title (Required): Enter the title of your page.
- Slug (Required): Enter a unique slug for your page. The slug must be unique and differ from the existing slugs.
- Description: Provide a description for the page.
4. Click Save to create your page
After creating a page, you can click “View” to open the newly-created Custom page in a new tab.
3. How to edit pages
Here’s how you can edit pages:
1. On Merchize admin dashboard, hover to Online Store > Pages
2. Use the search box or filter to search for the page you want to edit, or simply browse from the page list.
3. Click on the page you want to edit and modify the content as needed.
On the detailed page, you can edit:
- Custom Pages: title, description, and slug. (Follow the same conditions as when creating the page).
- Default Pages: title and description. The slug cannot be edited.
Tips: Use variables in your content to ensure consistency. Look for the available variables on the right sidebar.
Variables in pages allow you to dynamically insert information that can be updated consistently across your site without manual changes. This ensures that the content is always up-to-date.
For example, instead of writing your full email address, like “[email protected]”, you can use {email_support} variable. When you change your support email to [email protected], you don’t have to go to each page and change the email address manually. The variable will be updated dynamically and automatically.
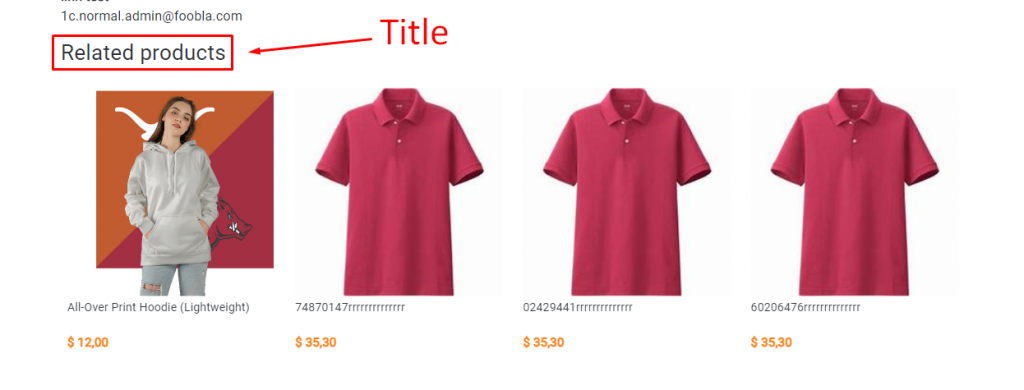
4. How to Add Related Products to Custom Pages
Adding Related Products to a custom page will help showcase complementary or similar products, increase product discoverability, and boost cross-selling opportunities.
Here’s how to add Related Products to Custom Page with Merchize’s Storefront:
1. Browse/Search and open a new or existing page in the page editor.
2. Configure the Related Products
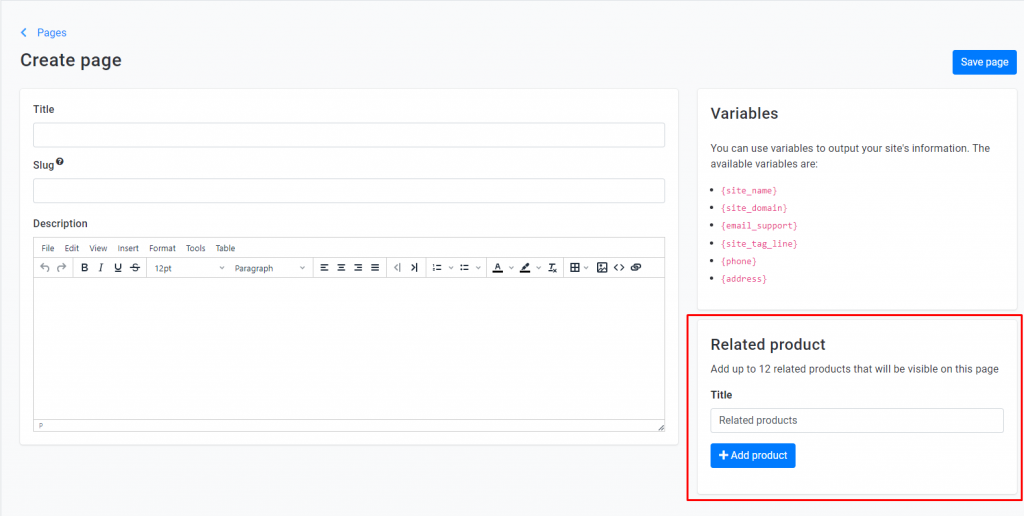
On the “Related products” section, you can select and add related products to the page. With this section, you can:
- Edit Title: You can edit the name of this product list, which will show up on the page. The default title is “Related Products".
- Add Products:
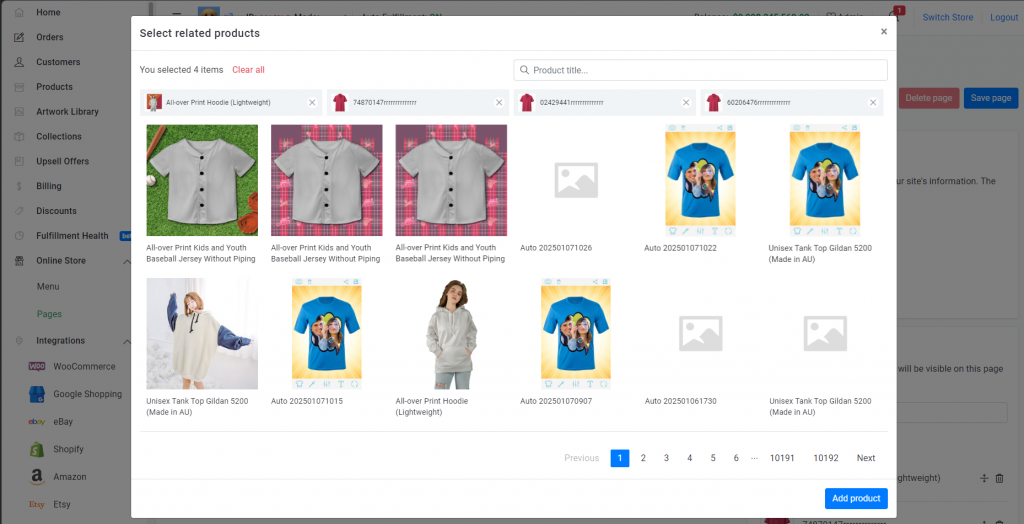
- Click the Add Product button. On the new selection pop-up, you can:
- Search for active products that haven’t been deleted.
- Select up to 12 products.
- Remove selected products individually or all at once (“Clear all”).
- Click Add Product in the pop-up to save your selection.
- Click the Add Product button. On the new selection pop-up, you can:
 Note: Ensure all selected products are active and not deleted. If any product is inactive or deleted, or the title is empty, saving the page will result in an error.
- Manage the Product List:
- Reorder products by dragging each product up and down.
- Remove products from the list.
- Manage the Product List:
3. Click Save Page to apply changes.
5. How to Delete a Page
Deleting a page is limited to custom pages. To delete a page, click the “Delete” button on the bottom right of each page editor.
For any further assistance, visit our Help Center or contact our support team.