Categories
-
Ordering & Fulfillment
- Complete Guide: How to get started & set up fulfillment on Merchize
- Create a Manual Order in Merchize
- How To Import Order to Merchize Manually
- How To Create Products And Campaigns At Merchize
- Create and Import orders for FBA Fulfillment
- How to set up Merchize x Order Desk Integration
- F.A.Q About Fulfillment Procedure On Merchize
- General Introduction to Merchize Store Administration
- How To Add Sub Account To Your Store
- How To Connect PayPal Account To Pay Subscription & Transaction Fee Automatically.
- How To Contact Merchize Support
- Brand Packaging Kit & Thank-you Card Features I Setup Guides
- Verify US Shipping Address
- How to cancel orders and items
- Set up custom fulfillment workflow with conditional logic
- How to Process TikTok Shop Orders With Merchize
- Instructions for Update Artwork
- How to Bulk Import Artwork via CSV and API
- How to Track and Manage Packages in Shipment Status
- Guide to Order Tracking and Management on Orders page
- How to Process Walmart Orders with Merchize
- How to Sync Products From Merchize To TikTok Shop
- How To Update Tax Information for EU Orders (IOSS / VOEC / UK Tax)
- How to Map Order Items to Merchize Catalog Products
- Show all articles9 Collapse Articles
-
Integrations
- How to set up Merchize x Order Desk Integration
- Create & Sync Products from Merchize to Etsy
- Create & Sync Products from Merchize to WooCommerce
- Create & Sync Products from Merchize to Ebay
- Amazon Integration: Connect & Fulfill Orders Automatically
- eBay Integration: Connect & Fulfill Orders Automatically
- How to configure and sync your Etsy orders to Merchize?
- Google Shopping Custom Label User Guide
- Guideline To Integrate Email Marketing Klaviyo Solution On Your Merchize Store.
- Integrate & Fulfill Orders From ShopBase
- Integrate WooCommerce Fulfill with Merchize
- Integration with Google Shopping
- Connect Customily and Merchize for Product Personalization
- Integrate TeeinBlue and enjoy personalized fulfilment with Merchize
- How to Sync Products From Merchize To TikTok Shop
-
Shopify App
-
Print & Mockup Guidelines
-
Payment & Billing
- Guideline to Merchize Payment
- General Introduction to Merchize Store Administration
- How To Connect PayPal Account To Pay Subscription & Transaction Fee Automatically.
- Set Up Payment In Merchize Setting - To Receive Payment From Customers
- F.A.Q About Fulfillment Procedure On Merchize
- How To Contact Merchize Support
- Account Suspension and Restoration
- How to take payments with Payoneer
-
Delivery & Shipping
-
Storefront Setup
- How to create a storefront on Merchize and configure domain to connect to Merchize
- Add WWW To Your Store
- Bulk Import Products
- Bulk Add Tags For Multiple Products (Bulk Add Tags) Guideline
- General Introduction to Merchize Store Administration
- General Settings In Settings > General of Merchize
- Google Shopping Custom Label User Guide
- Guideline To Integrate Email Marketing Klaviyo Solution On Your Merchize Store.
- How To Add Product Review
- How To Add Promotion Bar For Your Storefront
- How To Add Sub Account To Your Store
- How To Bulk Edit Description
- How To Connect PayPal Account To Pay Subscription & Transaction Fee Automatically.
- How To Contact Merchize Support
- How To Create and Edit Pages on Merchize Storefront
- How To Create Products And Campaigns At Merchize
- How To Create Free Shipping Code For Built-in Payment Store
- How To Edit Store Homepage on Merchize
- How To Fix The Price of a Series of Products
- How To Get Bing Site Verification Code
- How To Get Facebook Pixel ID
- How To Get Google Analytics Tracking ID
- How To Get Google Conversion Tracking Code
- How To Get Google Site Verification Code
- How To Get Google Tag Manager Container ID
- How To Get Store Sitemap Link
- How To Import Bulk Of Products From Shopify Custom App To Your Merchize Store
- How To Insert Code Into GTM To Change CSS Store
- How To Install Multi-pixel Using GTM
- How To Integrate The Feature Of Adding Multiple Facebook Pixel ID
- How To Prevent DDOS Attack By Using Cloudflare
- How To Set Up Facebook Conversion Api
- How To Set Up Free Shipping From $Xx On Merchize
- How To Set Up Shipping Rates With Merchize
- How To Use Product Gallery
- Launching Upsell And Cross-Selling Features V1
- Set Up Payment In Merchize Setting - To Receive Payment From Customers
- Setting up the Menu Navigation Management feature for Store
- How to Generate Facebook Product Feed Files with Merchize Storefront
- Merchize Customer Management
- Connect Customily and Merchize for Product Personalization
- Integrate TeeinBlue and enjoy personalized fulfilment with Merchize
- Show all articles27 Collapse Articles
-
Features & Store Management
-
Other Functionalities & Settings
How to create a storefront on Merchize and configure domain to connect to Merchize
🇻🇳 Click here for Vietnamese version
Creating POD or Dropshipping store on Merchize with some basic steps:
- Access https://seller.merchize.com to create a store with your domain.
- Contact Merchize’s support to active domain
- Our supporter will activate the store and guide you to do the rest.
Instruction to set up DNS through Cloudflare and Connect Domain with Merchize.
Step 1: Go to https://seller.merchize.com
After signing up using your email, fill in your store name and domain to create your own store.
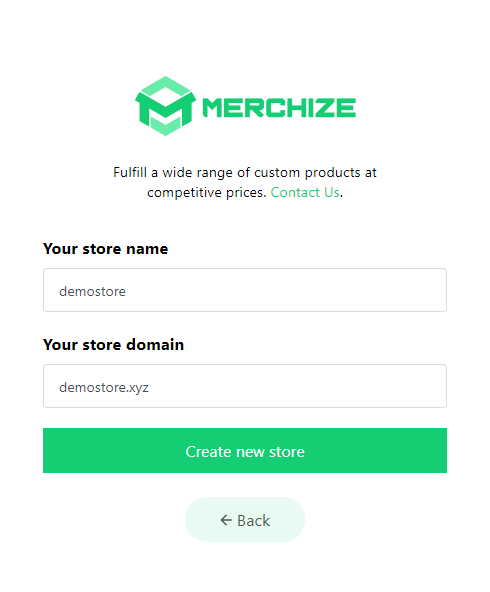
For example, I have created a store with storen name and domain: demostore and demostore.xyz and have status as pending – waiting to active.
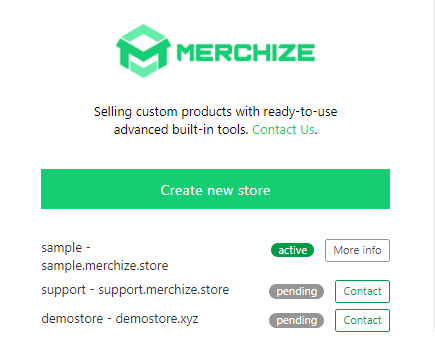
Step 2: Contact our support team to active your store.
Once your store is activated, pending status will be removed and you can click on the store name to manage your store.
You can contact our team via fanpage Fulfillment by Merchize or live chat on seller.merchize.com.
Now, Merchize has 3 pricing plans: $79/month or $299/month for storefront and Merchize Lite plan $0/month for fulfillment only. You can refer to detailed information for each plan here: https://merchize.com/platform-pricing/.
Note: Your store can only run if it is activated by our team. When waiting for the Dev team to activate your store, you can jump to step 3 – domain configuration to connect with Merchize.
Step 3: Domain configuration to connect with Merchize.
This step is only required if you are using a storefront plan. If you just want to use a fulfillment plan, you can skip this step
Here, you can choose 1 of 2 options for domain configuration:
- Option 1: Connect via CloudFlare
- Option 2: Directly connect, not via CloudFlare
To connect your domain with Merchize, we recommend you connect via CloudFlare. By this way, your store can be managed and protected by CloudFlare which can help to reduce the risk of store loosing, Ddos, and also increase the site speed in some cases. Moreover, the DNS lookup process that doesn’t go through CloudFare can take up to 24 hours, quite long.
- Firstly, you move your domain to CloudFlare by creating an account at: https://www.cloudflare.com/
- After that, click on the “Add A Site” button.
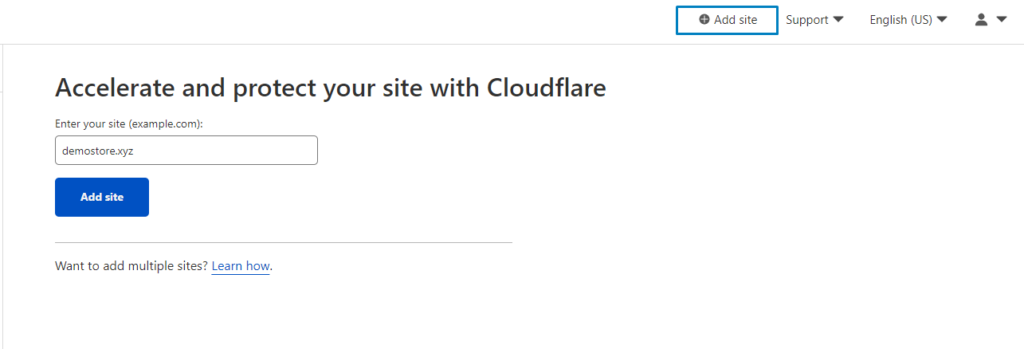
- Fill your domain store in
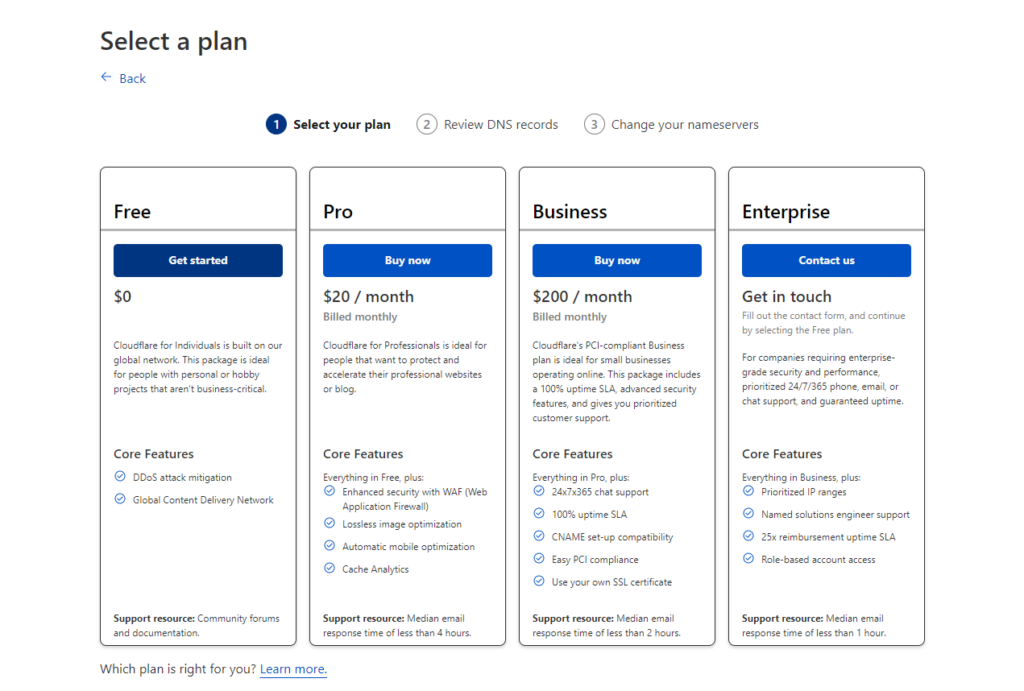
- CloudFlare will ask you for a pricing plan, you can choose the Free plan
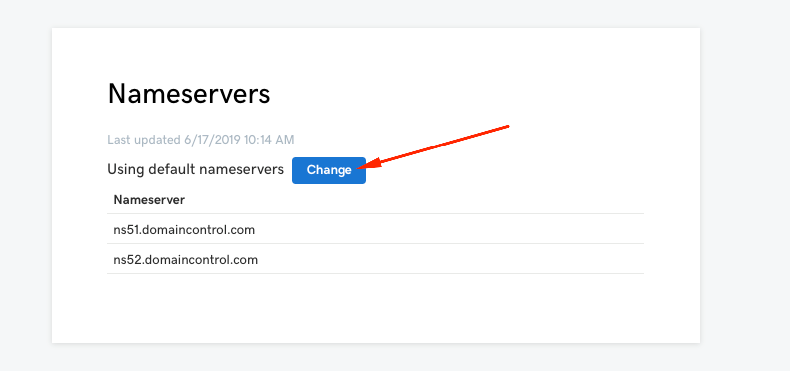
1.2. Change the nameserver to suit with CloudFlare
- After that, you can see the guideline of changing Name Server to complete domain migration to CloudFlare. You have to change the current Name Server to the Name Serve same as in the guideline. For example:
- Next, log in to the domain manager of your domain service provider, change Name Server setting of domain and point to Name Server of CloudFlare which has the form: xxx.ns.cloudflare.com.
+ If you are using NameCheap, you will see like that:
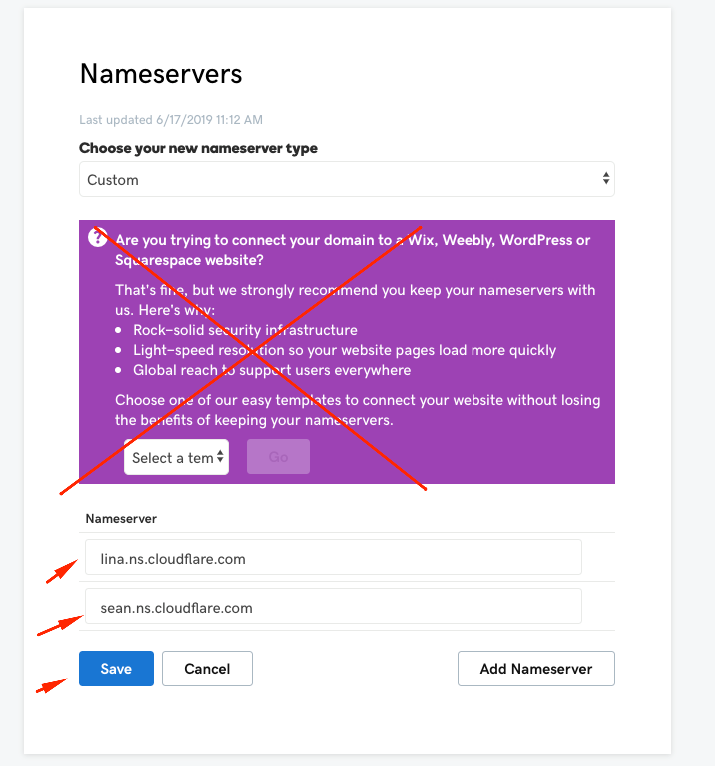
+ If you are using Godaddy, the changing Nameserver management will be like that:
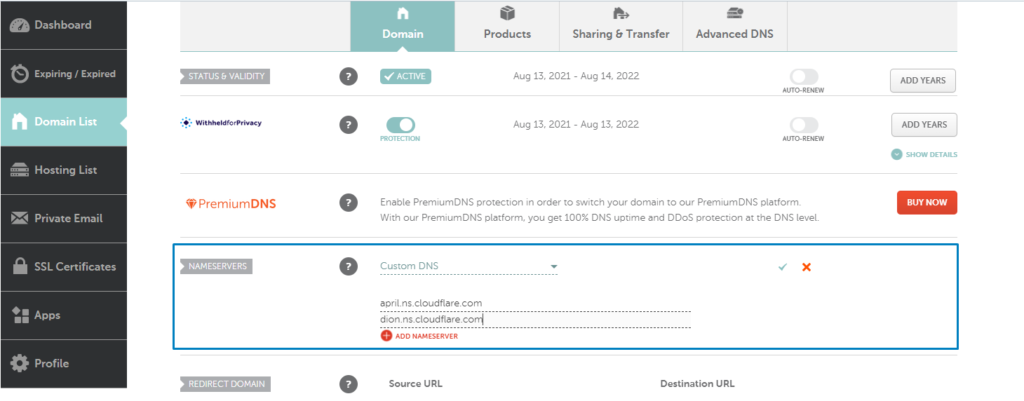
Click on Change, choose name server type is Custom. After that copy and paste name server link which is provided by CloudFlare (Godaddy may ask you to connect with Wix, Weebly, WordPress or something else, you no need to answer). Finally, you click on SAVE to finish.
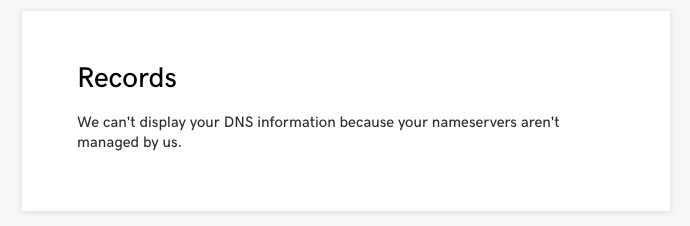
After changing Nameserver successfully, the DNS appearance of Godaddy will notice that they cannot display DNS information since this DNS isn’t managed by them. It means your change is successed.
The Nameserver changing process may take up 30 minutes to 1 hour for CloudFlare to officially manage your domain. After this process, you can see the status of your domain on CloudFlare is Active instead of Pending
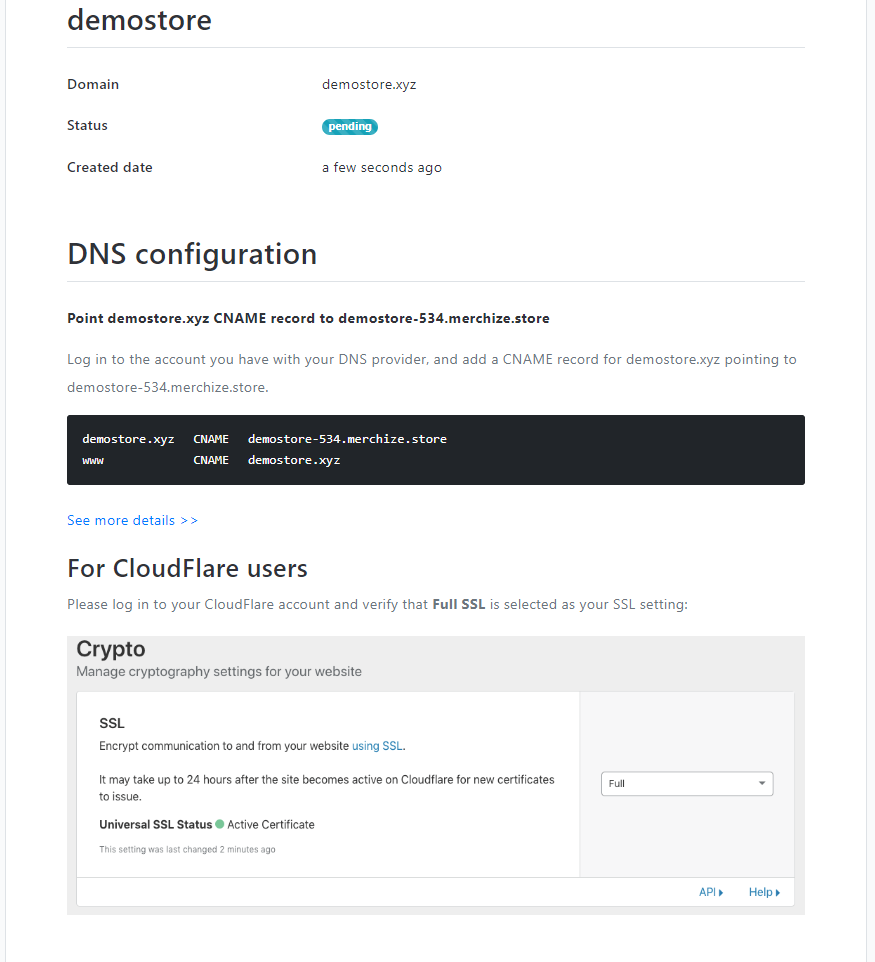
1.3. Update DNS on CloudFlare according to the Configure DNS page
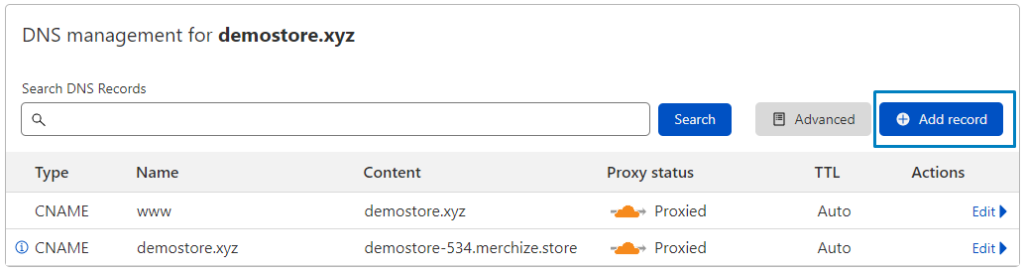
Log in your CloudFlare account, go to DNS management and add 2 records with the values as written in the Configure DNS page of the store on Merchize.
In this step, if it has any records of type A, you can also delete them to be sure.
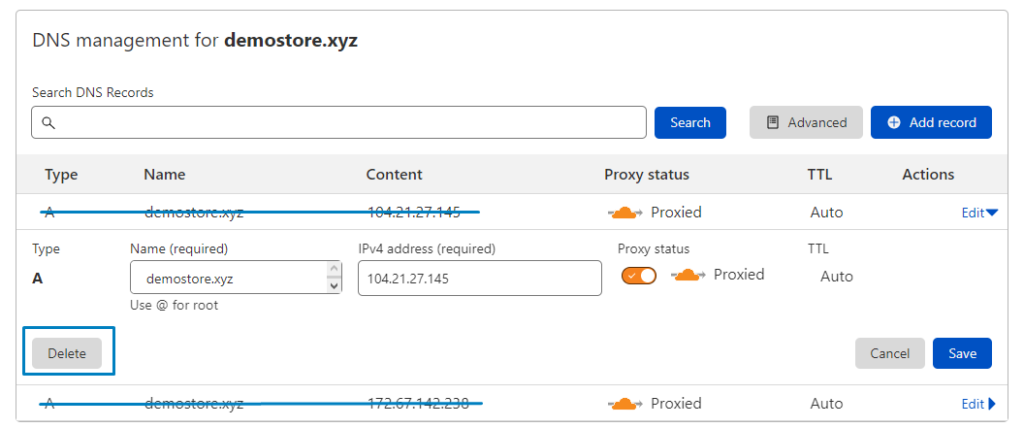
For instance, we will create 2 records form CNAME with value:
- Record 1: name: demostore.xyz, value: demostore.merchize.store
- Record 2: name: www, value: demostore.xyz (or @).
These 2 records have TTL value is Automatic TTL and status is Traffic go through CloudFlare (the orange cloud).
1.4. Choose SSL Full
Next, the last step is going to Tab Crypto, choosing FFL is full.
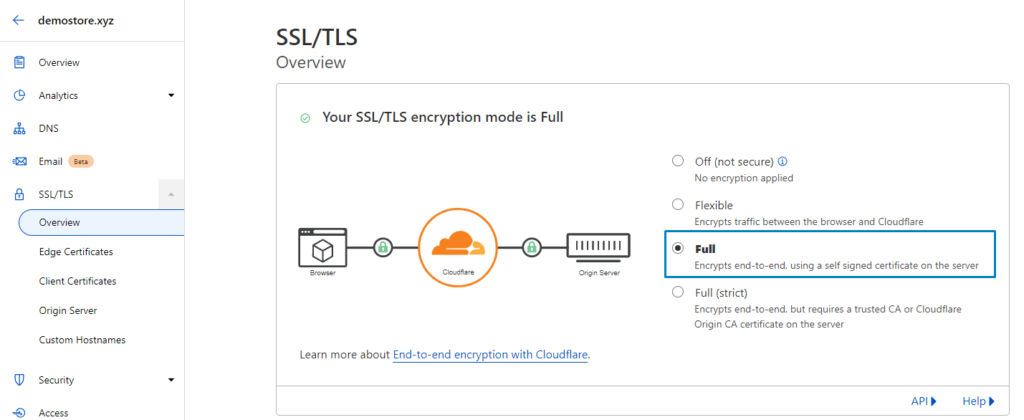
After 10-15 minutes your site can be accessed.
Option 2: Direct connect, not via CloudFlare
Since this option takes a lot of time for the DNS process, and it is not secure as going through CloudFlare, Merchize does not recommend this option.
2.1. Log in to the domain manager of your domain provider.
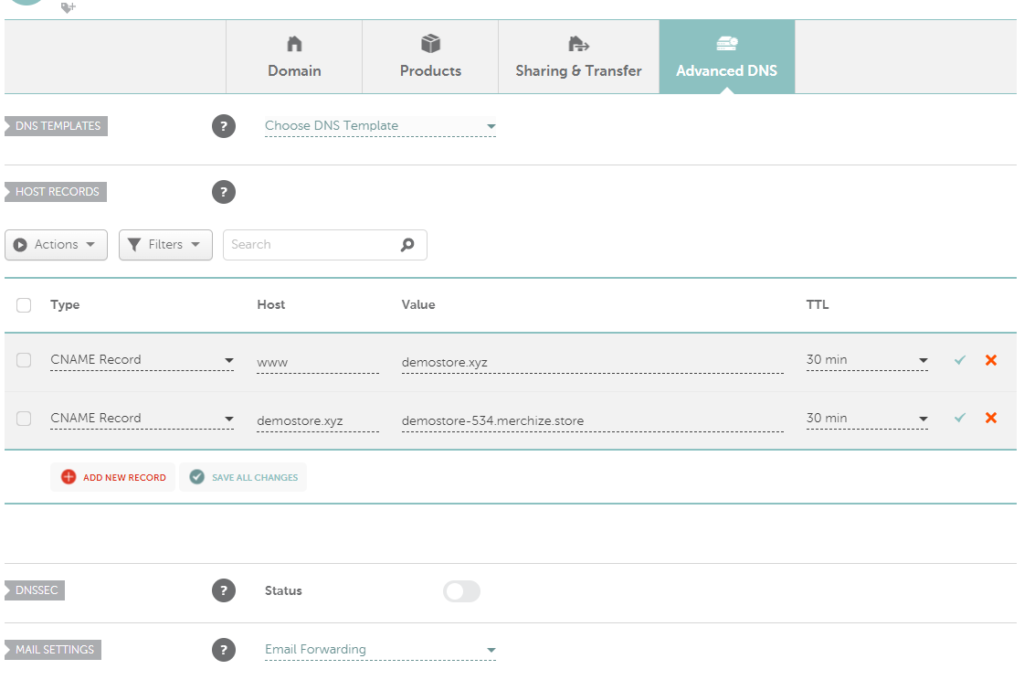
Go to the DNS manager: For example, with service of Namecheap, you can see as below (the other domain providers have the same manipulations):
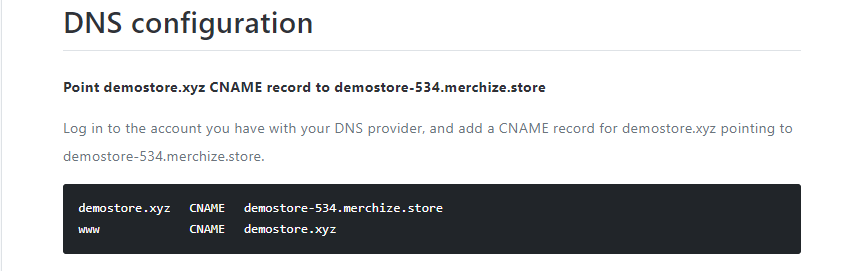
2.2. Change the record of CNAME type as the guideline on the Configure DNS page on Merchize.
To make the site can run, you need to create 2 records as below: (based on your store that “demostore” value can be changed. You need to check in your Configure DNS part again.)2
To do this, you only need to create the new record with the value for each is CNAME and fill the respective values:
- The server: demostore.xyz (remember to change based on your store)
- Point to: demostore-534.merchize.store (remember to change based on your store)
Now, you have domain configuration but cannot access your domain immediately. You need to wait 24-48 hours for the DNS process. So, we do not recommend you use this option. For the fastest, you should use CloudFlare.
Step 4: Additional: Add WWW for your store.
Basically, when you have done step 3, you can access your store at your domain in form https://your-store-address.com.
Though, if you add WWW before your domain, it will get error 404 – default backend when you access. This is because you do not set up WWW.
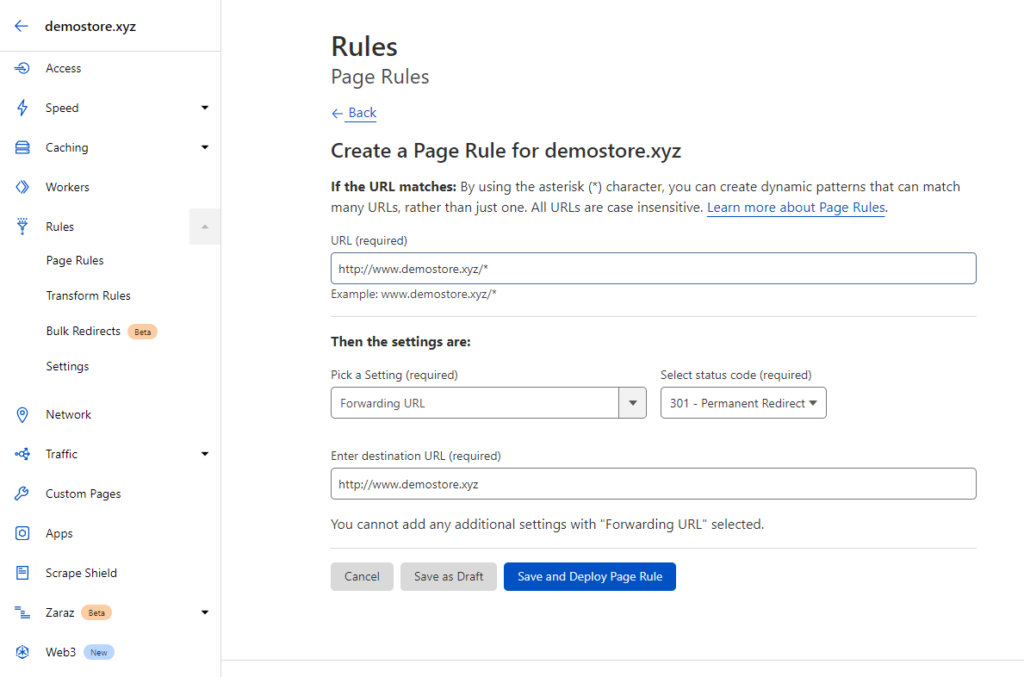
It’s very simple to setup WWW:
- Go to Page Rules on CloudFlare.
- Choose Create Page Rules
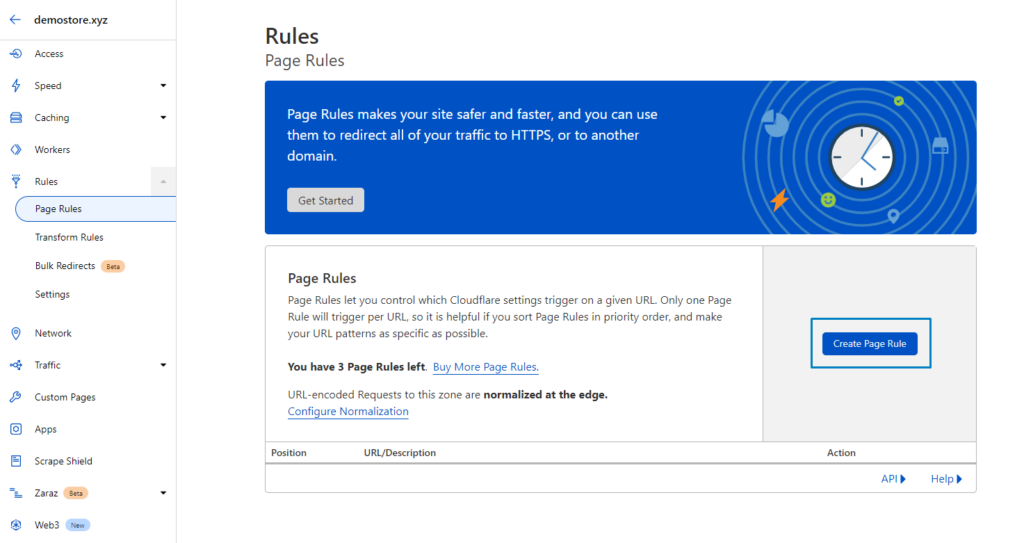
- Fill the information as below:
+ “If the URL matches” item: you fill domain with WWW and /* behind. For example, my store is demostore.xyz, I will fill http://www.demostore.xyz/*
+ “Then the settings are: “ item: choose Forwarding URL and 301-Permanent Redirect
+ Under, you fill your domain. For example: https://demostore.xyz
+ After that, choose Save and deploy