Guideline to Merchize Payment
Merchize currently supports the following payment methods for fulfillment cost billing:
- Balance – Your prepaid Merchize balance (topped up via PayPal, Payoneer, or Pingpong).
- PayPal – A connected PayPal account that supports auto-payment for fulfillment costs and storefront fees (transaction fees, subscription fees).
How to add funds to your Balance
To add funds to your balance, from the Billing Page, click Topup in the Credit section.
Note: Permissions to top up balance apply only to the owner or manager role of the store.
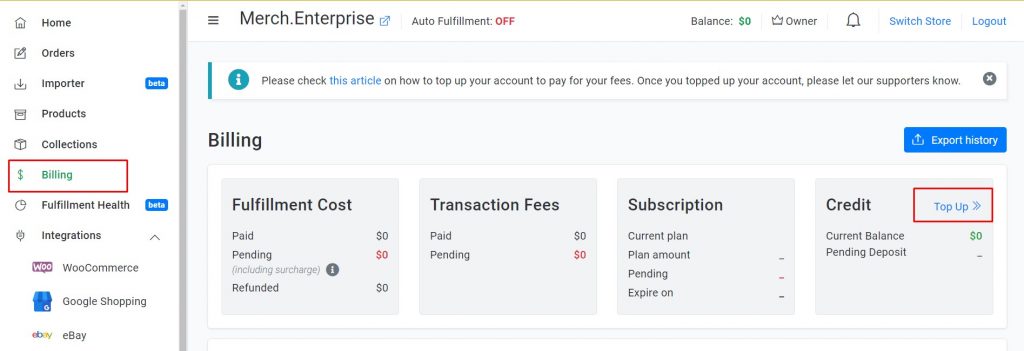
A pop-up dialog will appear — follow the steps for your chosen payment method below.
Add funds to your balance via PayPal
Merchize accepts three types of PayPal transfers, each with different fees and processing times:
Payment Type | Transaction Fee | Processing Time |
Instant Deposit | 4.4% (deducted before funds are added) | Typically within minutes |
Standard Transfer – Mass Payment | 0% | Typically within one business day |
Standard Transfer – Goods & Services | 4.4% (deducted before funds are added) | Typically within one business day |
Instant Deposit
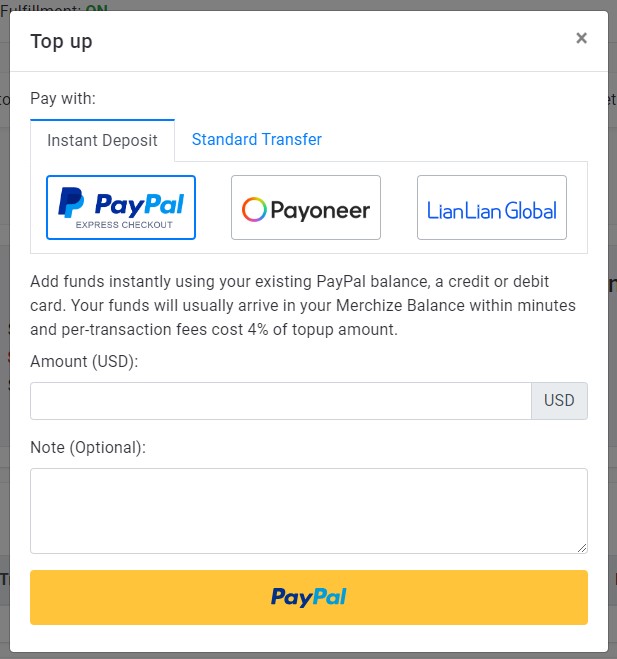
1. In the Top Up dialog, choose Instant Deposit
2. Fill out the Topup submission form
– Amount: Enter full payment amount (top up amount includes transaction fee).
Your actual balance reported in your account will be automatically reduced by 4.4% on the charged amount.
(e.g. Suppose you want to add $50 to your balance, you need to deposit & submit $52.4 in total)
– Note (optional)
- Choose a payment method
> Paypal – Selecting Paypal will bring up pop up to Paypal’s website. Follow the website’s procedure to complete the payment.
> Credit/Debit Card – Selecting the Debit or Credit Card option will prompt the manager for their card and billing information. Enter the information to complete the payment.
Standard Transfer
- Transfer the payment with Mass Payment or Good & Services to [email protected]
- Fill out the Topup submission form in the Standard Transfer tab (in the pop-up dialog when you navigate to Admin > Billing > Topup).
– Amount: Enter full payment amount (top up amount includes transaction fee).
Your actual balance reported in your account will be automatically reduced by 4.4% on the charged amount (with Good & Services payment) or 0% (with Mass Payment payment).
– Note (optional)
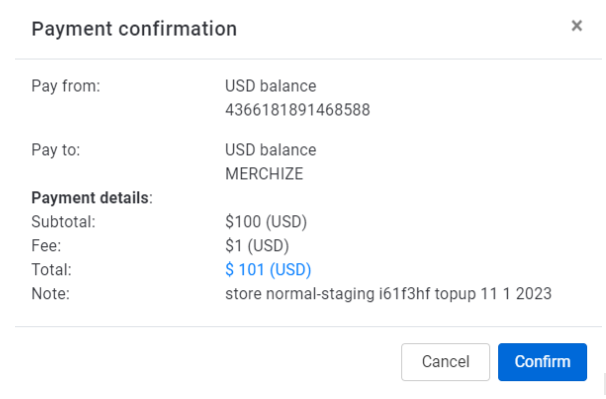
Then click Submit.
>>> Once the transaction is completed, the funds will be available in your balance.

Mass Payment (free processing fee, PayPal business account required) via PayPal: [email protected]
Goods & Services (processing fee is 4.4%) via PayPal: [email protected]
Add funds to your balance via Payoneer
Payoneer payment supports order fulfillment and all service fees. The following payment options are available for depositing money to your balance: Instant Deposits Add funds instantly from your linked Payoneer account – Your funds will usually arrive in your Merchize Balance within minutes and per-transaction fees cost 1%. Standard Transfer Transfer funds manually & then fill the topup form – Your funds will typically be available in your Merchize Balance within hours, at no extra cost. |
Once you have a Payoneer account, you can proceed through the following steps:
Instant Deposits
- Sign in to your Merchize account.
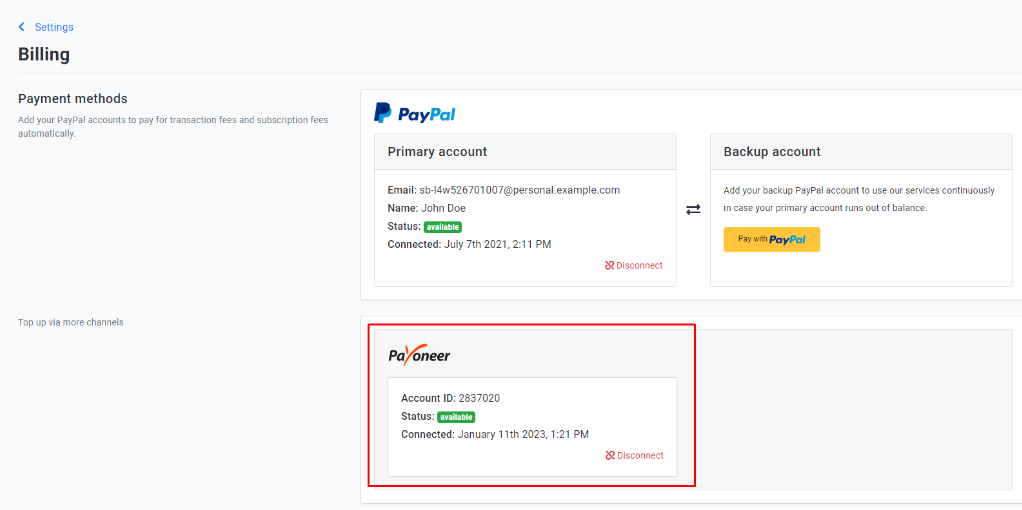
- In the sidebar menu, click Setting, then Billing.
- Click the “Payoneer” logo to connect to your Payoneer account (here you can set up new or change the Deposit accounts). Follow Payoneer’s prompts to authorize an integration agreement.
(Connect successfully as screenshot below).
- To deposit funds straight into your Merchize account using Payoneer Balance:
From the Billing Page, click Topup in the Credit section.
- Choose “Instant Deposit”.
- Choose “Payoneer”.
- Enter Amount: Enter full payment amount (top up amount includes transaction fee).
Your actual balance reported in your account will be automatically reduced by 1% on the charged amount.
(e.g. Suppose you want to add $50 to your balance, you need to deposit & submit $50.5 in total).
- Enter Note (optional).
- Click Submit, then Confirm.
- Enter a code sent via text to verify the transaction.
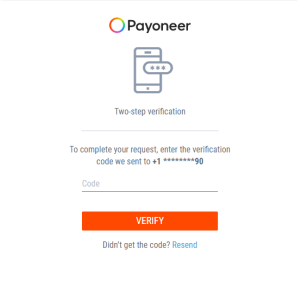
Once the transaction is completed, the funds will be available in your balance.

Standard Transfer
- Transfer the payment to [email protected]
- From the Billing Page of your Merchize account, click Topup in the Credit section.
- Fill out the Topup submission form.
- Enter Amount.
- Enter Note (optional).
- Double-check all key information then submit the form
- Once the transaction is approved, the funds will be available in your balance.
In order to Merchize can quickly verify your payment, please follow the instructions and fill in the full information as above. Avoiding the situation of transferring via Payoneer but not filling the top-up form will cause difficulties in the verifying process.
Adds funds to balance via Pingpong
Pingpong Transfer:
To transfer top-up via Pingpong, please do as follows:
- Copy the code provided in the Note (PingPong Payment Reference) section of the top-up form.
![]()
- Make a transfer to this account: [email protected]. Paste the code copied from Merchize into the Payment reference field in PingPong.

- Save your Transaction ID
- Fill in the remaining fields in the top-up form:
– Amount
– PingPong account/client ID
– Transaction ID: Enter the transaction ID
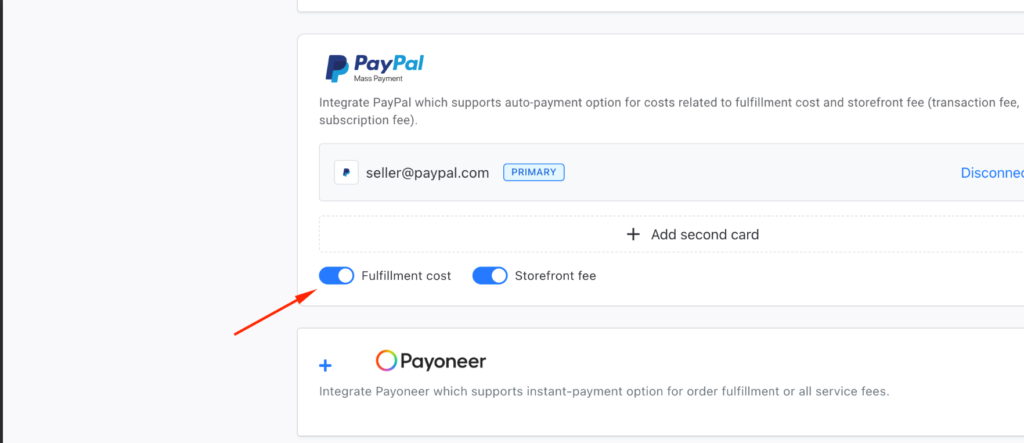
How to add PayPal for Auto payment
With this option, you can connect a PayPal account that supports auto-payment for fulfillment costs, transaction fees, and subscription fees.
1. Go Merchize menu > Settings > Billing
2. Under the Payment Methods section, click the Pay with PayPal button to connect your PayPal account
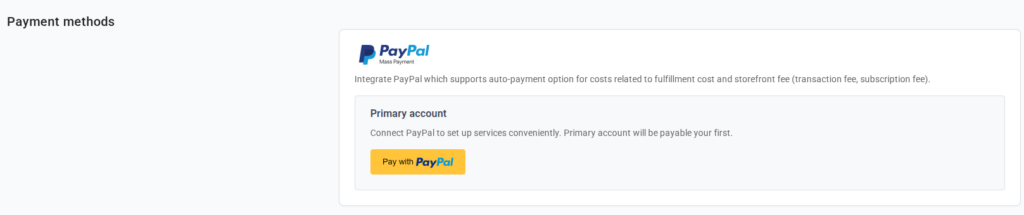
3. Complete your integration.
4. Turn on the “Fulfillment cost” and/or “Storefront fee” toggles to allow auto-payment for your fulfillment and storefront fees, respectively.
How To Manage Payment Priority
You can define the order in which Merchize charges your payment methods when an order is fulfilled. The system will attempt to charge the first method in your priority list, and automatically fall back to the next method if it fails.
This gives you greater flexibility and control over how your billing is handled automatically.
Default priority order: Balance → PayPal
To change your payment priority:
- Go to Settings > Billing in your Merchize dashboard.
- In the Payment Priority section, drag and drop the payment methods to reorder them according to your preference.
- Click Save Changes to apply.
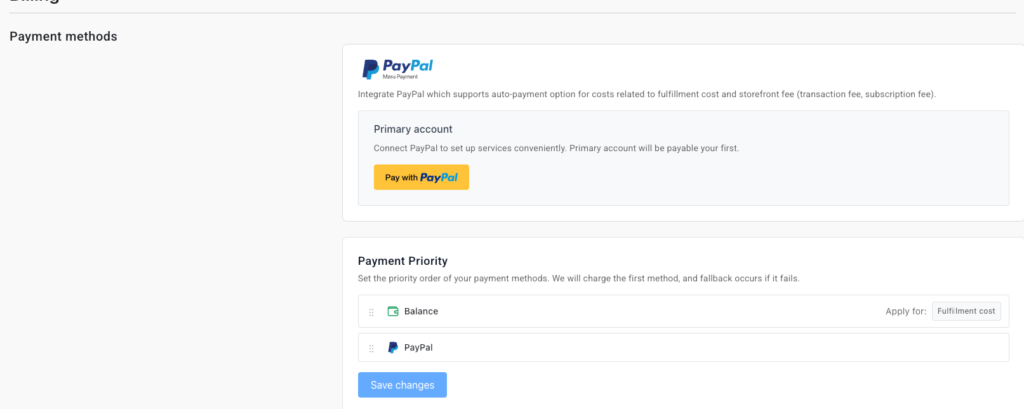
Note: The Apply for column next to each payment method indicates which types of fees that method covers:
- Fulfillment cost – Covers order fulfillment charges and surcharges.
- Storefront fee – Covers transaction fees and subscription fees (applicable to Storefront plan stores only).