Merchize Customer Management
There are 4 ways you can add your subscribers to Merchize account:
- Manually adding a single contact
- Importing from a CSV file
- Directly retrieving customer information from your Merchize storefront (see all plans)
- Syncing customer information via API and other integrated
We’ll only cover the top two in this guide:
1. Add a single contact:
Type or paste information about an individual contact and create the new contact’s details manually
Steps:
- From your Merchize admin, go to Customers.
- Click ‘Add customer’ in the upper right corner.
- Fill out the customer information fields as completely as possible. For the ‘Customer overview’ section, fill at least one of these information: email, phone number, full name.
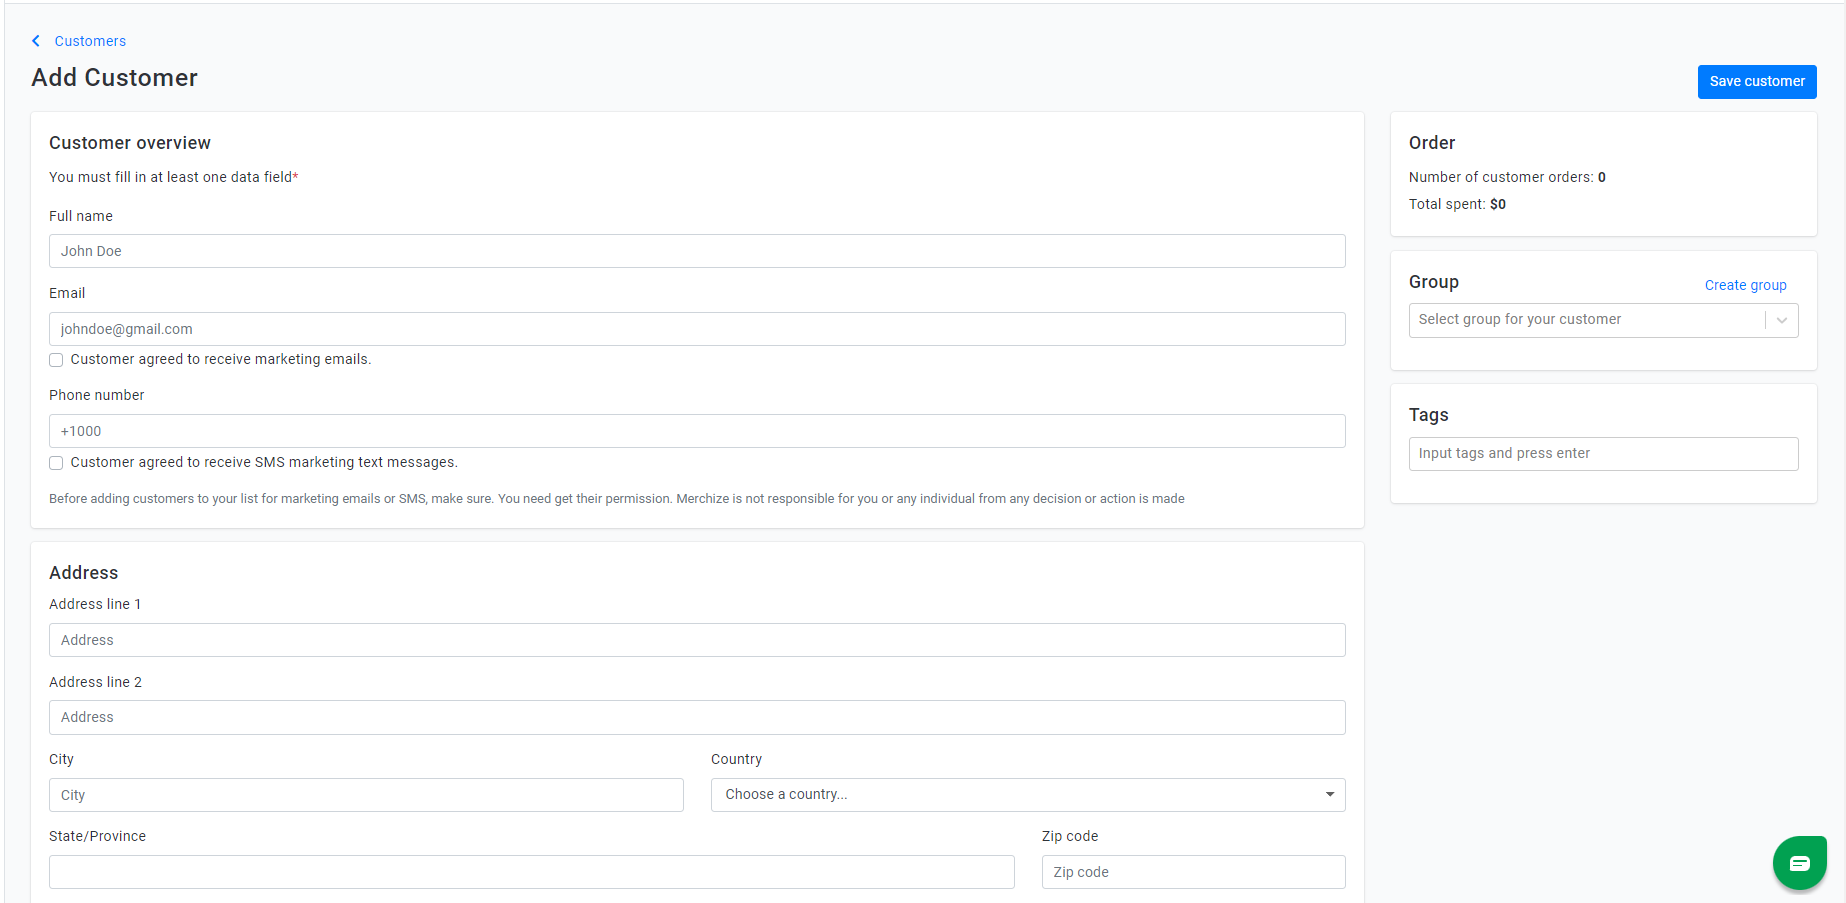
- Tick “Customer accepts marketing when they agree to receive marketing emails or sms“.
- If you want to include additional information, you can add “Groups” and “Tags” (Don’t forget to always hit your enter button after completing tag text. This way, you will always convert the text into a tag).
- Once you have completed the form, click the blue “Save customer” button.
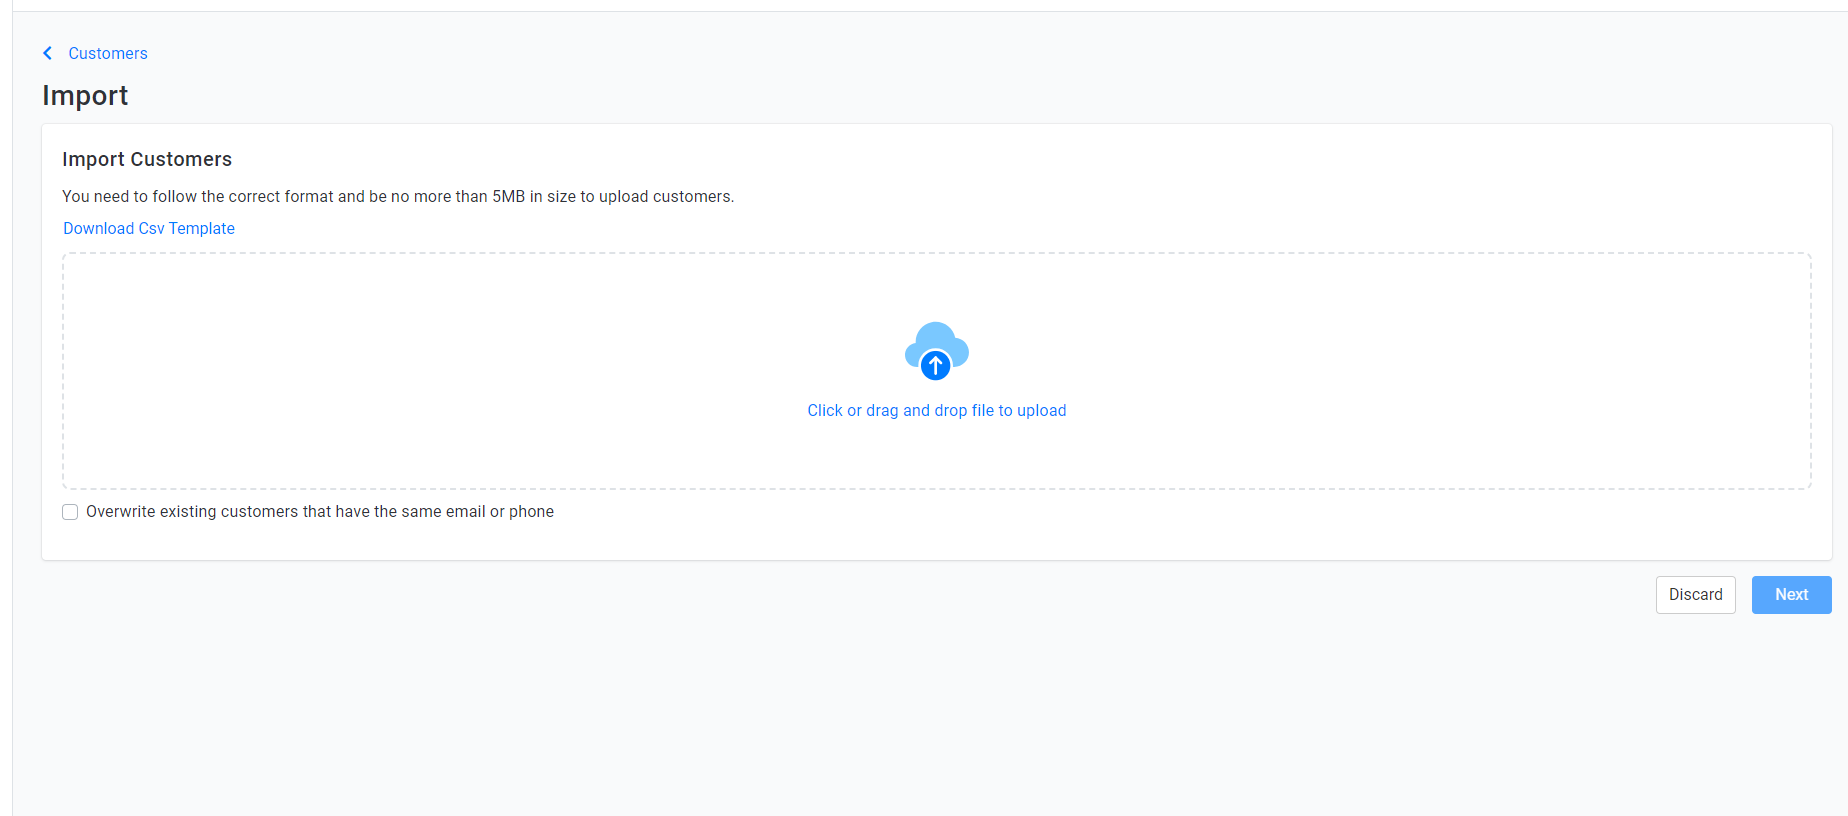
2. Import contact list in bulk:
- Take a spreadsheet file (CSV) of contacts, must follow our format >> Download the sample template.
- Add a handful of contacts and their details manually by copying and pasting into your contact record.
- Then import it into your account.
The following tables give the list of supported fields in the Merchize Customer Modules along with their description.
| Column | Description |
| Full Name | The full name of the customer. |
| The email address of the customer. | |
| Accepts Email Marketing | Sets whether or not the customer agrees to subscribe to email marketing, such as a newsletter. Valid entries are approval or disapproval. |
| Accepts SMS Marketing | Sets whether or not the customer agrees to subscribe to SMS marketing, such as discount offers. Valid entries are approval or disapproval. |
| Phone | The customer’s phone number. |
| Address1 | The first line of the customer’s address. |
| Address2 | The second line of the customer’s address, if necessary. |
| City | The city the customer lives in. |
| Country | The country the customer lives in. |
| State | The state the customer lives in. |
| Province | The province the customer lives in. If you enter information into this column, then you must also enter the information for the Province Code. |
| Zip Code | The postal or zip code for the customer’s address. |
| Tags | A comma-separated list of tags used to tag the customer (for example, tag1,tag2,tag3). |
| Groups | A comma-separated list of groups used to categorize the customer (for example, group1,group2,group3). |
| Consumption | The customer’s amount spent. Valid entries are in numeric format and must not have a currency symbol included. (The default value is in USD) |
Contacts can be imported directly into your account to either add new contacts to your account or to update your existing contacts with new information. (Go to the “Update, manage & export existing contacts" Section to follow the rules)
1. Create/update groups:
* Create a new group
Groups can be used when sending campaigns, to trigger flows, and to keep track of how your audience is growing over time. It’s important to add contacts to a new list when pulling them from another email service provider.
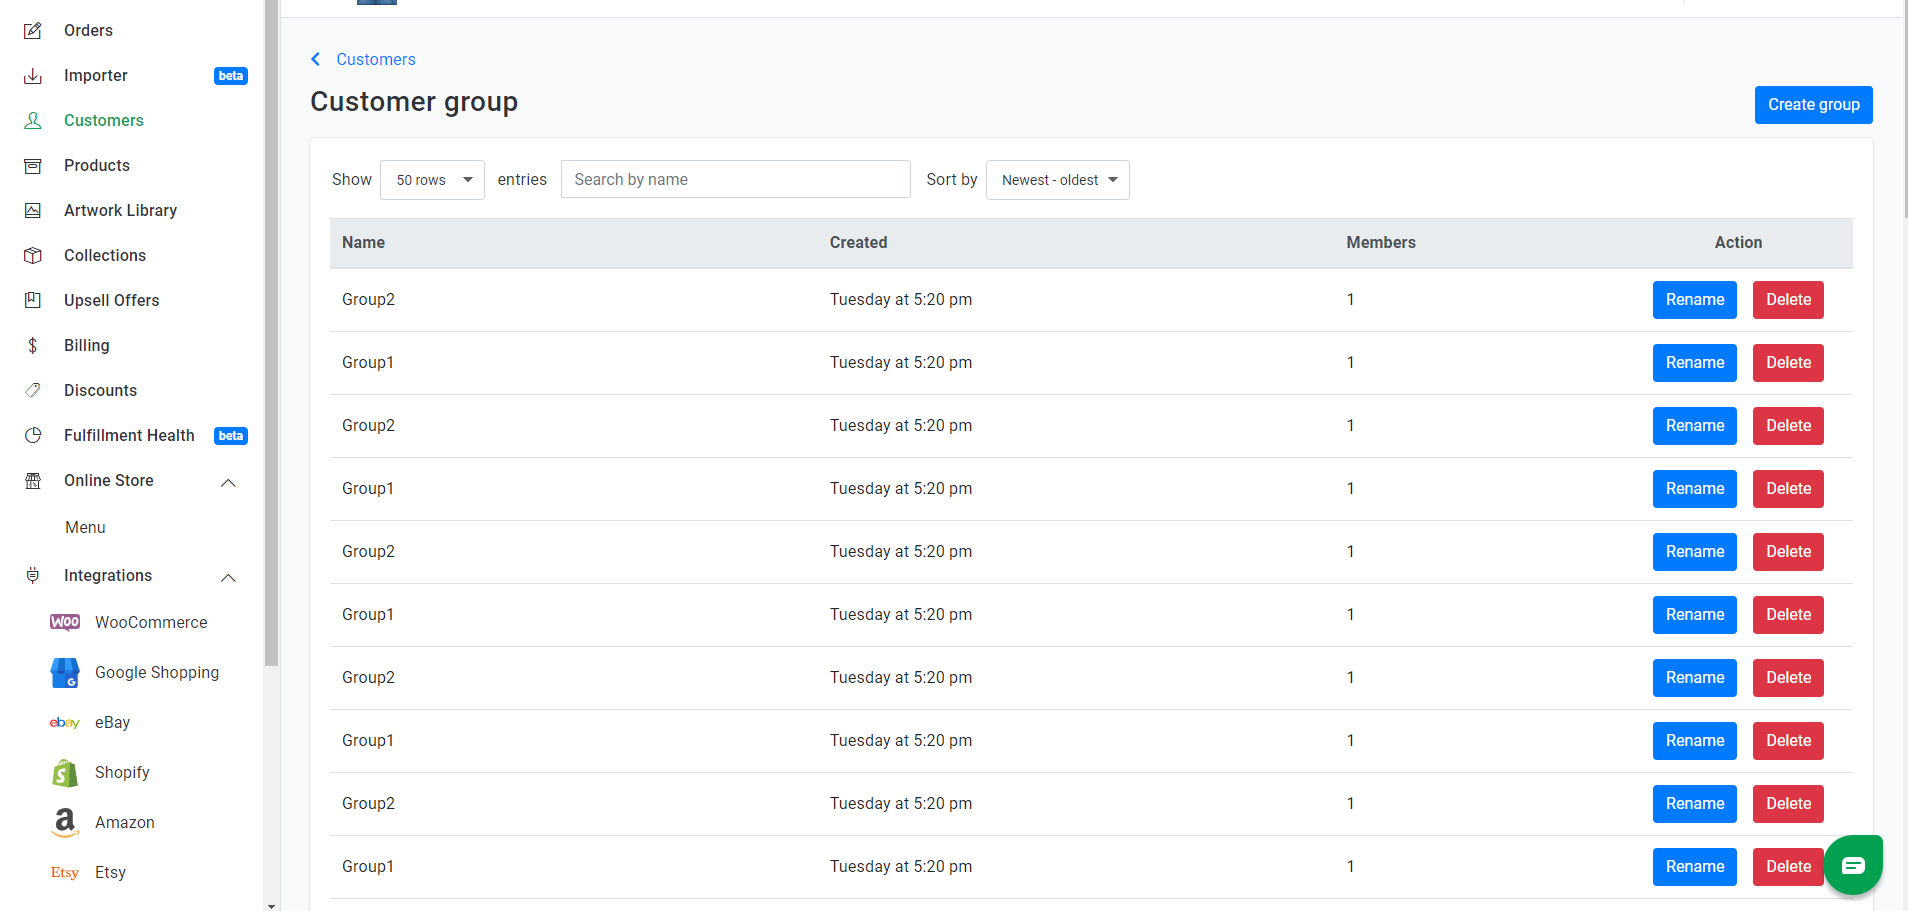
- Navigate to Customer > Customer Group.
- Click Create Group in the upper right corner.
- Give your group a name > then Create.
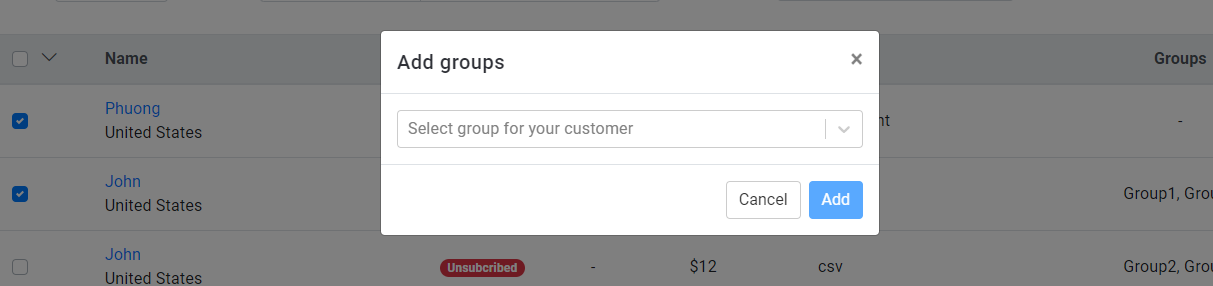
* Create groups in bulk
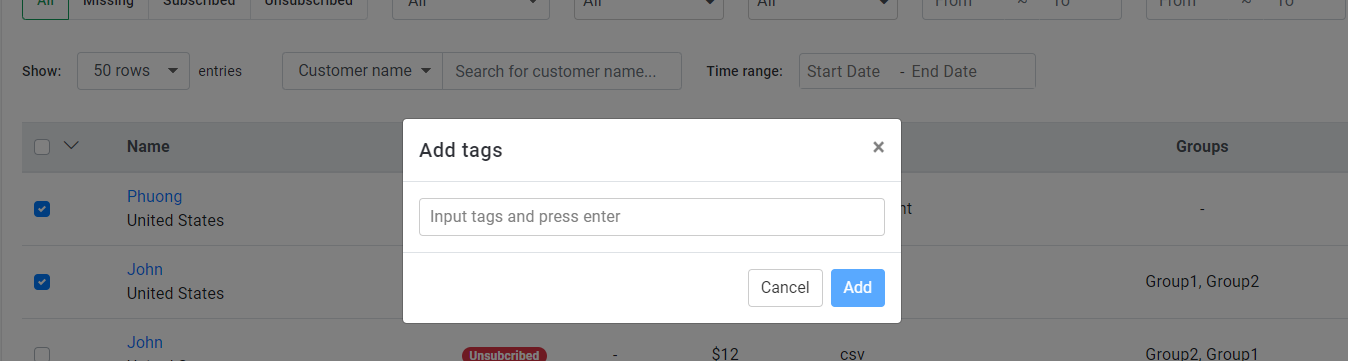
Select multiple Contacts at once and clicking the “Add groups" button in the dropdown “![]() " menu.
" menu.
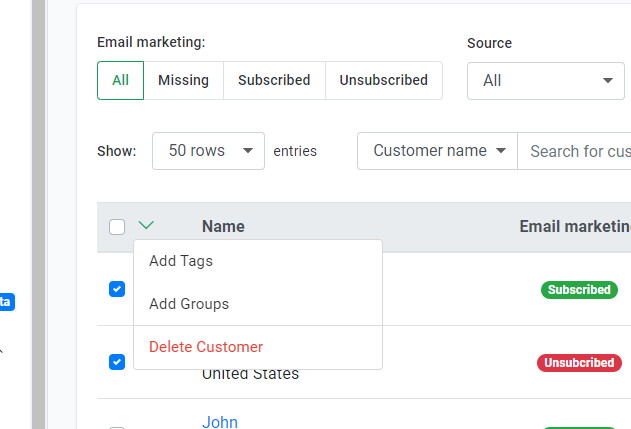
Type the name of your Group, and click Add.
You can also rename, or delete group data.
2. Create/update tags:
* Create new tags for single contact
In the individual contact page, there is a Tag section on the right panel, then you can create & assign multiple tags.
* Create new tags for multiple contacts
+ To add tags to many audiences, check the box to the left of each contact you want to add the tag in the Customer page then click the drop-down. Type the name of your tag, and click Add.
+ You can also add Tags to the contacts imported from .CSV file by inputting in theTags column a comma-separated list of tags used to tag the customer (for example, tag1,tag2,tag3).
1. Update contacts:
You can update an existing customer profile in a single contact page or using the CSV import option to bulk update.
To import updates:
- Select .Csv file to upload
- Choose the import method:
Make sure to click on the option “Overwrite existing customers…“.
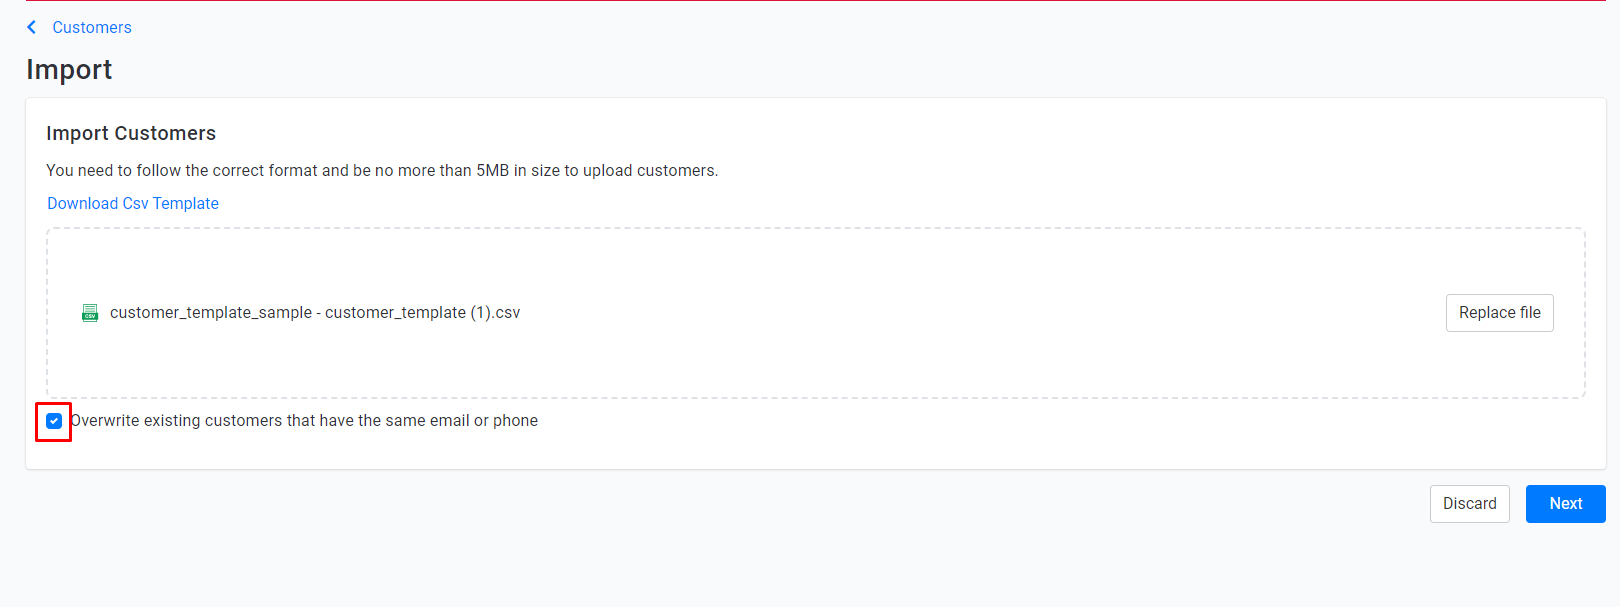
If the contact exactly matches with one of these contact fields (Email/ Phone number/ and combine Name + Address), then the contacts will not duplicate this way. Only new fields would be added to already existing contacts, or the contents of the fields would be modified with new ones. New contacts will be added, including new fields.
* In case you don’t check the box “Overwrite existing customers…”, then the system with check these fields (Email/ Phone number/ and combine Name + Address), if they exist in your customer database then the contact will not be imported.
2. Export contacts:
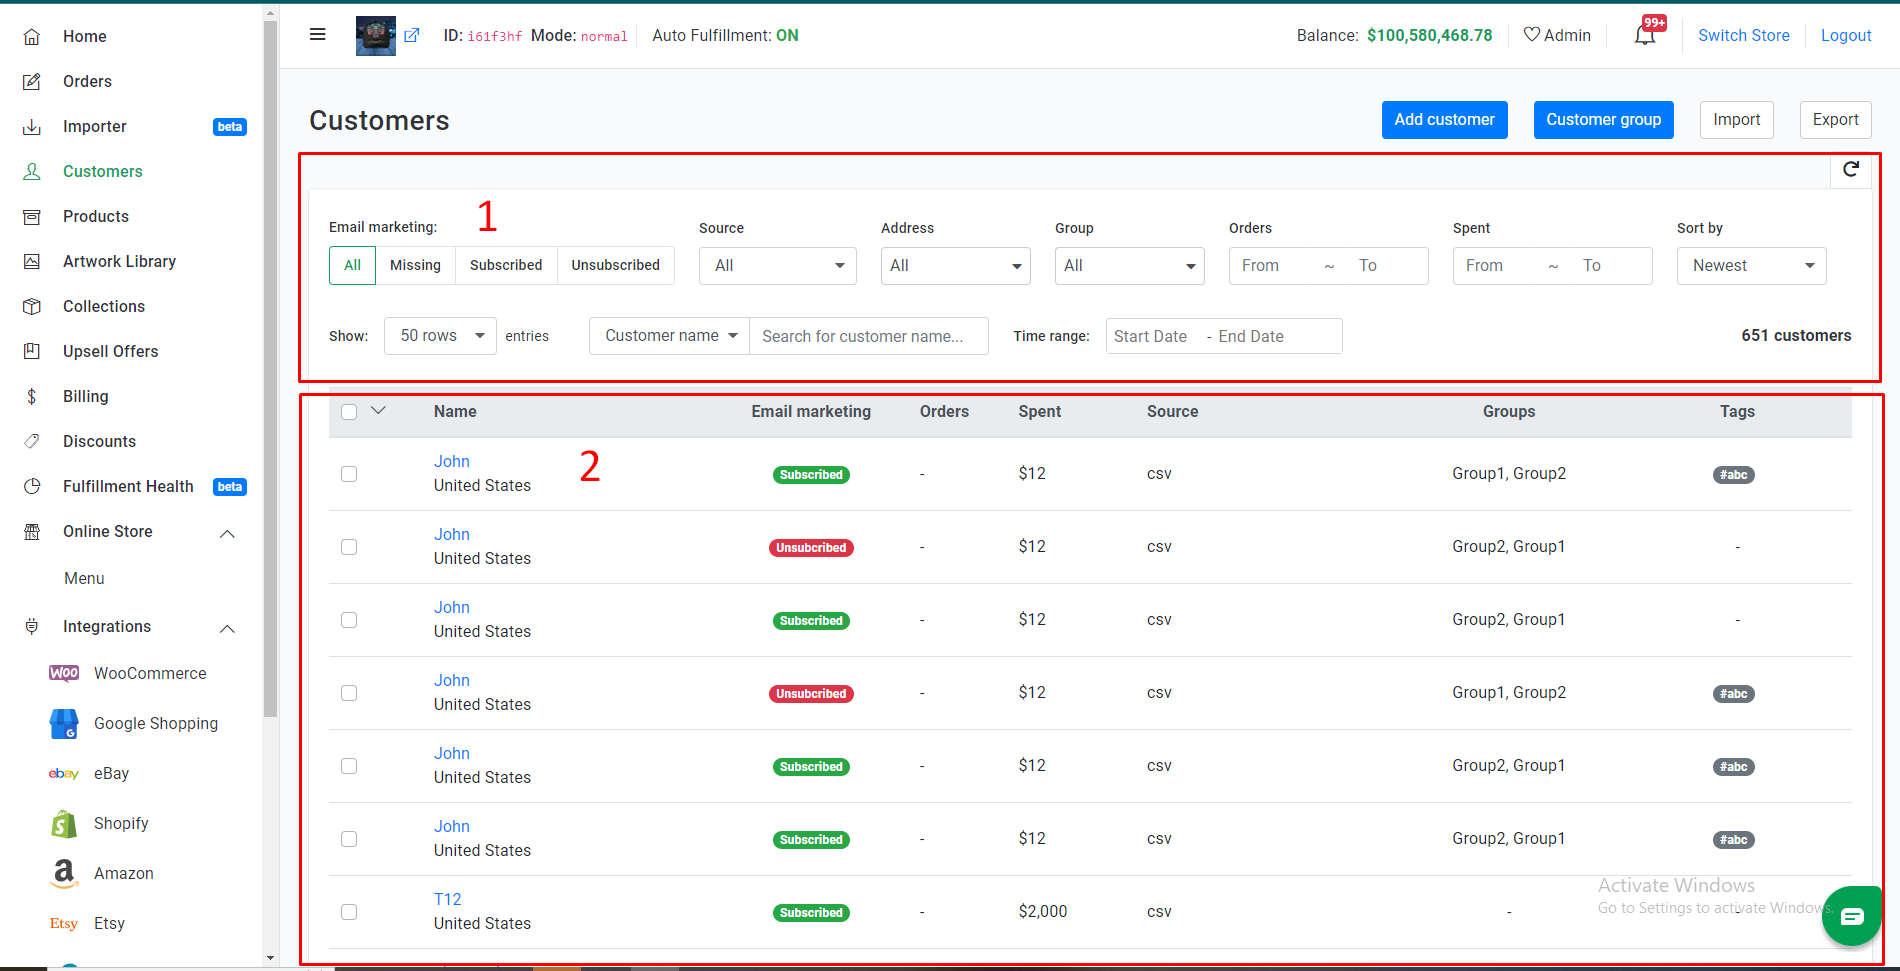
- Go to Customers.
- Choose, filter or search for contacts within All contacts.
- Select your current contact list by clicking the checkbox at the top left of the table.
- Click Export.

All the Segmenting Options you’ve added to contacts display on the overall contact table.
You can use audience and contact information to target and filter contacts into segments. Our segmentation options are extensive, so you can choose a single condition or combine multiple conditions to target the right contacts:
Create & add customer data
There are 4 ways you can add your subscribers to Merchize account:
- Manually adding a single contact
- Importing from a CSV file
- Directly retrieving customer information from your Merchize storefront (see all plans)
- Syncing customer information via API and other integrated
We’ll only cover the top two in this guide:
1. Add a single contact:
Type or paste information about an individual contact and create the new contact’s details manually
Steps:
- From your Merchize admin, go to Customers.
- Click ‘Add customer’ in the upper right corner.
- Fill out the customer information fields as completely as possible. For the ‘Customer overview’ section, fill at least one of these information: email, phone number, full name.
- Tick “Customer accepts marketing when they agree to receive marketing emails or sms“.
- If you want to include additional information, you can add “Groups” and “Tags” (Don’t forget to always hit your enter button after completing tag text. This way, you will always convert the text into a tag).
- Once you have completed the form, click the blue “Save customer” button.
2. Import contact list in bulk:
- Take a spreadsheet file (CSV) of contacts, must follow our format >> Download the sample template.
- Add a handful of contacts and their details manually by copying and pasting into your contact record.
- Then import it into your account.
The following tables give the list of supported fields in the Merchize Customer Modules along with their description.
| Column | Description |
| Full Name | The full name of the customer. |
| The email address of the customer. | |
| Accepts Email Marketing | Sets whether or not the customer agrees to subscribe to email marketing, such as a newsletter. Valid entries are approval or disapproval. |
| Accepts SMS Marketing | Sets whether or not the customer agrees to subscribe to SMS marketing, such as discount offers. Valid entries are approval or disapproval. |
| Phone | The customer’s phone number. |
| Address1 | The first line of the customer’s address. |
| Address2 | The second line of the customer’s address, if necessary. |
| City | The city the customer lives in. |
| Country | The country the customer lives in. |
| State | The state the customer lives in. |
| Province | The province the customer lives in. If you enter information into this column, then you must also enter the information for the Province Code. |
| Zip Code | The postal or zip code for the customer’s address. |
| Tags | A comma-separated list of tags used to tag the customer (for example, tag1,tag2,tag3). |
| Groups | A comma-separated list of groups used to categorize the customer (for example, group1,group2,group3). |
| Consumption | The customer’s amount spent. Valid entries are in numeric format and must not have a currency symbol included. (The default value is in USD) |
Contacts can be imported directly into your account to either add new contacts to your account or to update your existing contacts with new information. (Go to the “Update, manage & export existing contacts" Section to follow the rules)
Categorize and label contacts
1. Create/update groups:
* Create a new group
Groups can be used when sending campaigns, to trigger flows, and to keep track of how your audience is growing over time. It’s important to add contacts to a new list when pulling them from another email service provider.
- Navigate to Customer > Customer Group.
- Click Create Group in the upper right corner.
- Give your group a name > then Create.
* Create groups in bulk
Select multiple Contacts at once and clicking the “Add groups" button in the dropdown “![]() " menu.
" menu.
Type the name of your Group, and click Add.
You can also rename, or delete group data.
2. Create/update tags:
* Create new tags for single contact
In the individual contact page, there is a Tag section on the right panel, then you can create & assign multiple tags.
* Create new tags for multiple contacts
+ To add tags to many audiences, check the box to the left of each contact you want to add the tag in the Customer page then click the drop-down. Type the name of your tag, and click Add.
+ You can also add Tags to the contacts imported from .CSV file by inputting in theTags column a comma-separated list of tags used to tag the customer (for example, tag1,tag2,tag3).
Update, manage & export existing contacts
1. Update contacts:
You can update an existing customer profile in a single contact page or using the CSV import option to bulk update.
To import updates:
- Select .Csv file to upload
- Choose the import method:
Make sure to click on the option “Overwrite existing customers…“.
If the contact exactly matches with one of these contact fields (Email/ Phone number/ and combine Name + Address), then the contacts will not duplicate this way. Only new fields would be added to already existing contacts, or the contents of the fields would be modified with new ones. New contacts will be added, including new fields.
* In case you don’t check the box “Overwrite existing customers…”, then the system with check these fields (Email/ Phone number/ and combine Name + Address), if they exist in your customer database then the contact will not be imported.
2. Export contacts:
- Go to Customers.
- Choose, filter or search for contacts within All contacts.
- Select your current contact list by clicking the checkbox at the top left of the table.
- Click Export.
View or filter by contact fields
All the Segmenting Options you’ve added to contacts display on the overall contact table.
You can use audience and contact information to target and filter contacts into segments. Our segmentation options are extensive, so you can choose a single condition or combine multiple conditions to target the right contacts: