Categories
-
Ordering & Fulfillment
- Complete Guide: How to get started & set up fulfillment on Merchize
- Create a Manual Order in Merchize
- How To Import Order to Merchize Manually
- How To Create Products And Campaigns At Merchize
- Create & Import orders for FBA Fulfillment
- How to set up Merchize x Order Desk Integration
- F.A.Q About Fulfillment Procedure On Merchize
- General Introduction to Merchize Store Administration
- How To Add Sub Account To Your Store
- How To Connect PayPal Account To Pay Subscription & Transaction Fee Automatically.
- How To Contact Merchize Support
- Connect Merchize to Shopify API via a Custom App
- Brand Packaging Kit & Thank-you Card Features I Setup Guides
- Verify US Shipping Address
- How to cancel orders and items
- Set up custom fulfillment workflow with conditional logic
- How to Process TikTok Shop Orders With Merchize
- Instructions for Update Artwork
- How to Bulk Import Artwork via CSV and API
- How to Track and Manage Packages in Shipment Status
- Guide to Order Tracking and Management on Orders page
- How to Process Walmart Orders with Merchize
- Show all articles7 Collapse Articles
-
Integrations
- Connect Merchize to Shopify API via a Custom App
- How to set up Merchize x Order Desk Integration
- Create & Sync Products from Merchize to Shopify
- Create & Sync Products from Merchize to Etsy
- Create & Sync Products from Merchize to WooCommerce
- Create & Sync Products from Merchize to Ebay
- Amazon Integration: Connect & Fulfill Orders Automatically
- eBay Integration: Connect & Fulfill Orders Automatically
- How to configure and sync your Etsy orders to Merchize?
- Google Shopping Custom Label User Guide
- Guideline To Integrate Email Marketing Klaviyo Solution On Your Merchize Store.
- How to sync orders automatically and fulfill from Shopify
- Integrate & Fulfill Orders From ShopBase
- Integrate WooCommerce Fulfill with Merchize
- Integration with Google Shopping
- Connect Customily and Merchize for Product Personalization
- Integrate TeeinBlue and enjoy personalized fulfilment with Merchize
- Connect Merchize to Shopify API via a Custom App With Client ID and Secret ID
- Show all articles3 Collapse Articles
-
Print & Mockup Guidelines
-
Payment & Billing
- How to take payments with PayPal
- Guideline to Merchize Payment
- General Introduction to Merchize Store Administration
- How To Connect PayPal Account To Pay Subscription & Transaction Fee Automatically.
- Set Up Payment In Merchize Setting - To Receive Payment From Customers
- F.A.Q About Fulfillment Procedure On Merchize
- How To Contact Merchize Support
- Account Suspension and Restoration
- How to take payments with Payoneer
- How to take payments with LianLian
-
Delivery & Shipping
-
Storefront Setup
- How to create a storefront on Merchize and configure domain to connect to Merchize
- Add WWW To Your Store
- Bulk Import Products
- Bulk Add Tags For Multiple Products (Bulk Add Tags) Guideline
- General Introduction to Merchize Store Administration
- General Settings In Settings > General of Merchize
- Google Shopping Custom Label User Guide
- Guideline To Integrate Email Marketing Klaviyo Solution On Your Merchize Store.
- How To Add Product Review
- How To Add Promotion Bar For Your Storefront
- How To Add Sub Account To Your Store
- How To Bulk Edit Description
- How To Connect PayPal Account To Pay Subscription & Transaction Fee Automatically.
- How To Contact Merchize Support
- How To Create and Edit Pages on Merchize Storefront
- How To Create Products And Campaigns At Merchize
- How To Create Free Shipping Code For Built-in Payment Store
- How To Edit Store Homepage on Merchize
- How To Fix The Price of a Series of Products
- How To Get Bing Site Verification Code
- How To Get Facebook Pixel ID
- How To Get Google Analytics Tracking ID
- How To Get Google Conversion Tracking Code
- How To Get Google Site Verification Code
- How To Get Google Tag Manager Container ID
- How To Get Store Sitemap Link
- How To Import Bulk Of Products From Shopify To Your Merchize Store
- How To Insert Code Into GTM To Change CSS Store
- How To Install Multi-pixel Using GTM
- How To Integrate The Feature Of Adding Multiple Facebook Pixel ID
- How To Manage And Create New Discount For Store On Marchize
- How To Prevent DDOS Attack By Using Cloudflare
- How To Set Up Facebook Conversion Api
- How To Set Up Free Shipping From $Xx On Merchize
- How To Set Up Shipping Rates With Merchize
- How To Use Product Gallery
- Launching Upsell And Cross-Selling Features V1
- Set Up Payment In Merchize Setting - To Receive Payment From Customers
- Setting up the Menu Navigation Management feature for Store
- How to Generate Facebook Product Feed Files with Merchize Storefront
- Merchize Customer Management
- Connect Customily and Merchize for Product Personalization
- Integrate TeeinBlue and enjoy personalized fulfilment with Merchize
- Show all articles28 Collapse Articles
-
Features & Store Management
-
Other Functionalities & Settings
How To Create Mockups and Product Campaigns With Merchize’s Mockup Generator
This tool helps you quickly visualize your ideas by generating true-to-life images of your designs on products. You can easily create multiple products with the same design.
Note:
If you can’t find the product you want to create, then use the “Create Regular Product” feature and generate mockups from PSD files included in each product link. We are continuously updating our product catalog.
How to use Mockup Generator
Step 1: Logging into your Merchize account.
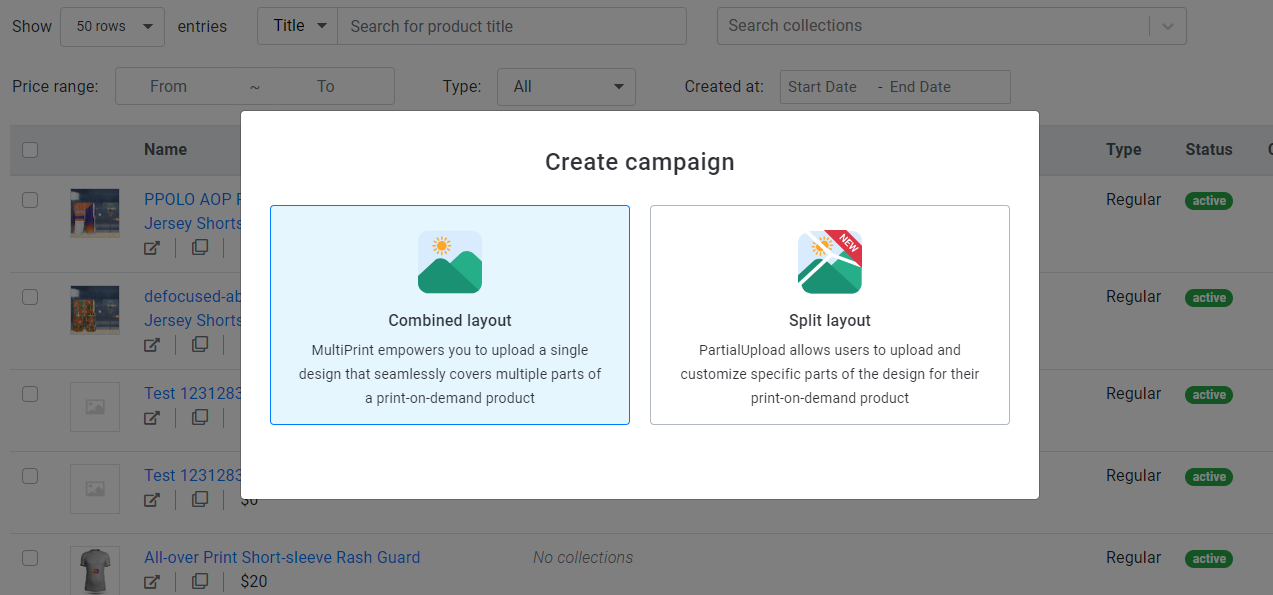
Step 2: Navigate to the Products page and click “Create Campaign” to start designing.
Step 3: Select to create your mockup with “Combined Layout” or “Split Layout”
Combined layout | Split layout | |
Types of products |
|
|
How to use | Use Merchize’s PSD templates to create product designs on other external design tools (Photoshop, Photopea), then upload them to mockup generation to create mockup images. | Create design directly on Merchize’s mockup generator tools. |
Interface | A single view that shows all garment parts together. | Segmented view with individual parts of the garment. |
Features |
|
|
Who should use it? | Best for advanced users and designers who are familiar with external tools and software like Photoshop and can use Merchize’s PSD template to create designs. | Suitable for beginners or users looking for a simpler, quicker, more straightforward tool to create designs and mockups. |
Step 4: Select your product.
Step 5: Select product variants (For Split layout).
Step 6: Upload your print-ready files (for Combined layout) or upload designs and elements (for Split layout).
Step 7: Set up the product information.
Step 6: Publish your product.
This is a simple instruction on how to use our mockup generator to create mockup images. For specific guidelines, read and follow the detailed instructions below.
I. Combined Layout:
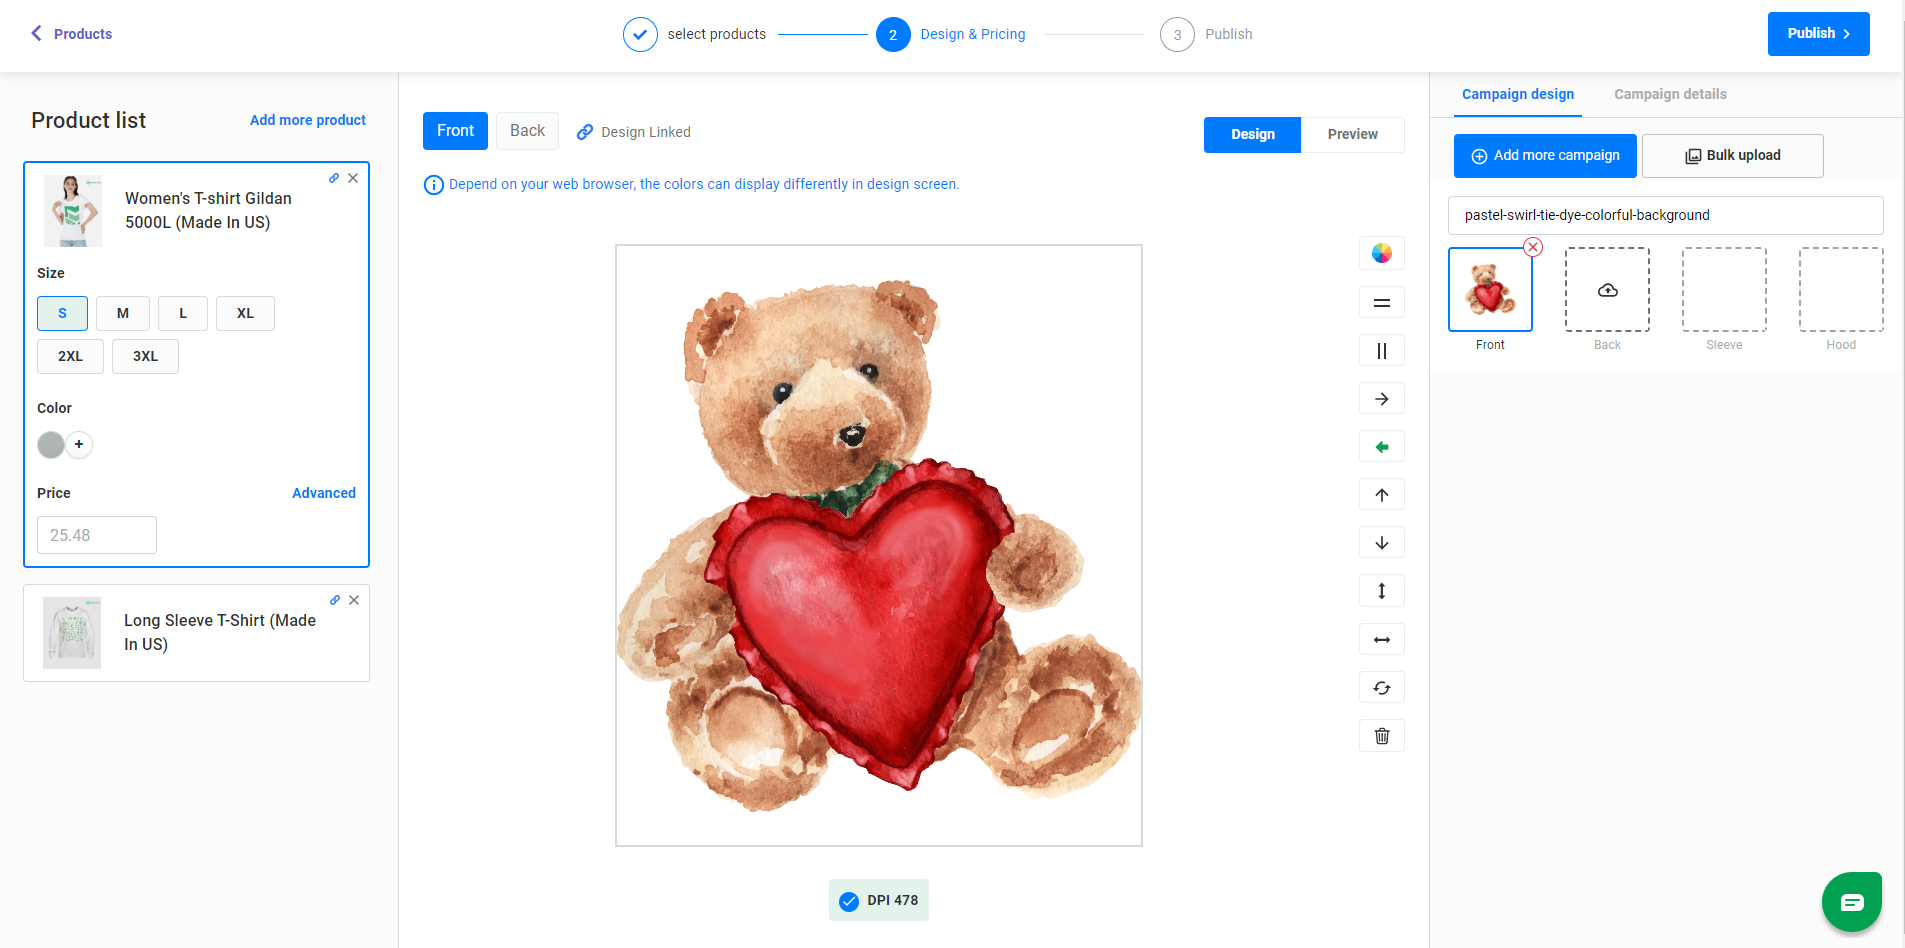
1. Choose the Products
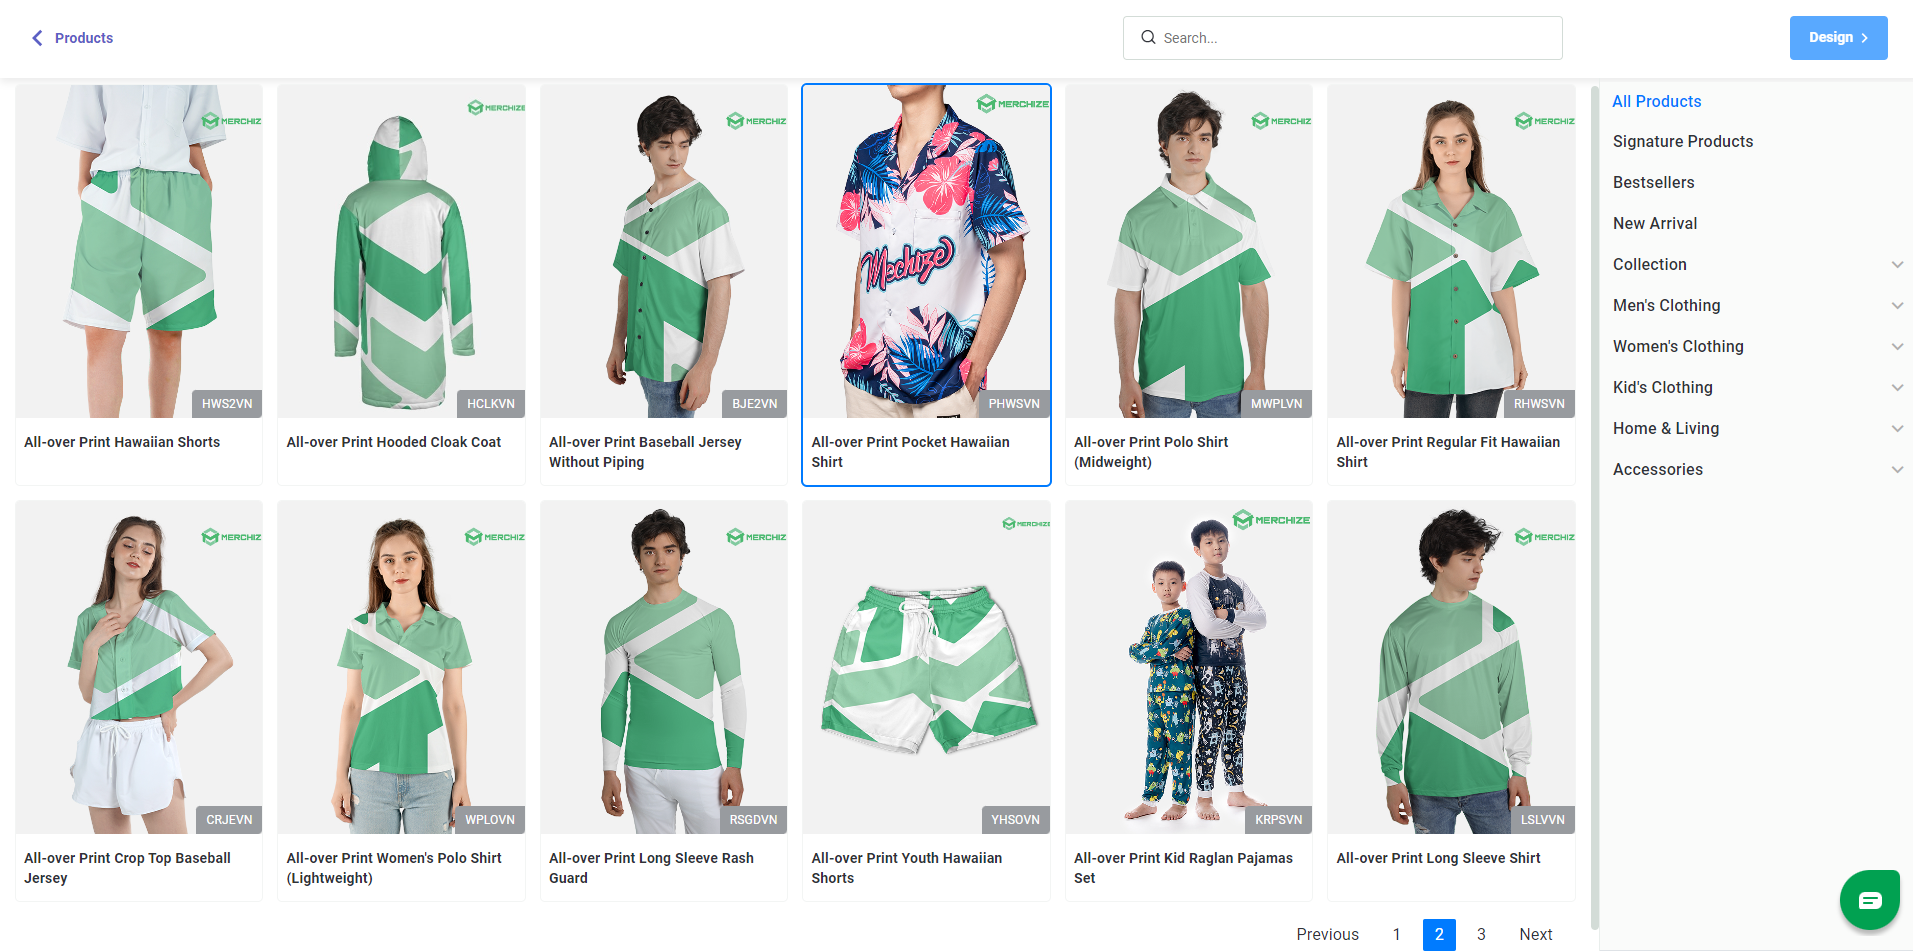
When you click on “Combined Layout” in the popup panel, the product catalog will appear:
- Choose one product to:
- Create a single campaign (product link) from one product type.
- Create multiple campaigns (product links) from one product type in bulk.
- Choose multiple products to:
- Create a single campaign (product link) from different product types.
- Create multiple campaigns (product links) from different product types in bulk. Then, if you choose to sync the product to your sales channels such as Shopify, WooCommerce, Etsy, eBay, etc., the product link will include various product type attributes along with their respective variations under a single listing.
Select the product to load all variants & default information set up for this product.
2. Upload Your Print Files
- If you want to apply the same design to multiple product type variations, choose products that have the same dimensions and print specifications; for example, T-shirt, Hoodie, Sweatshirt, Tote Bag, etc.
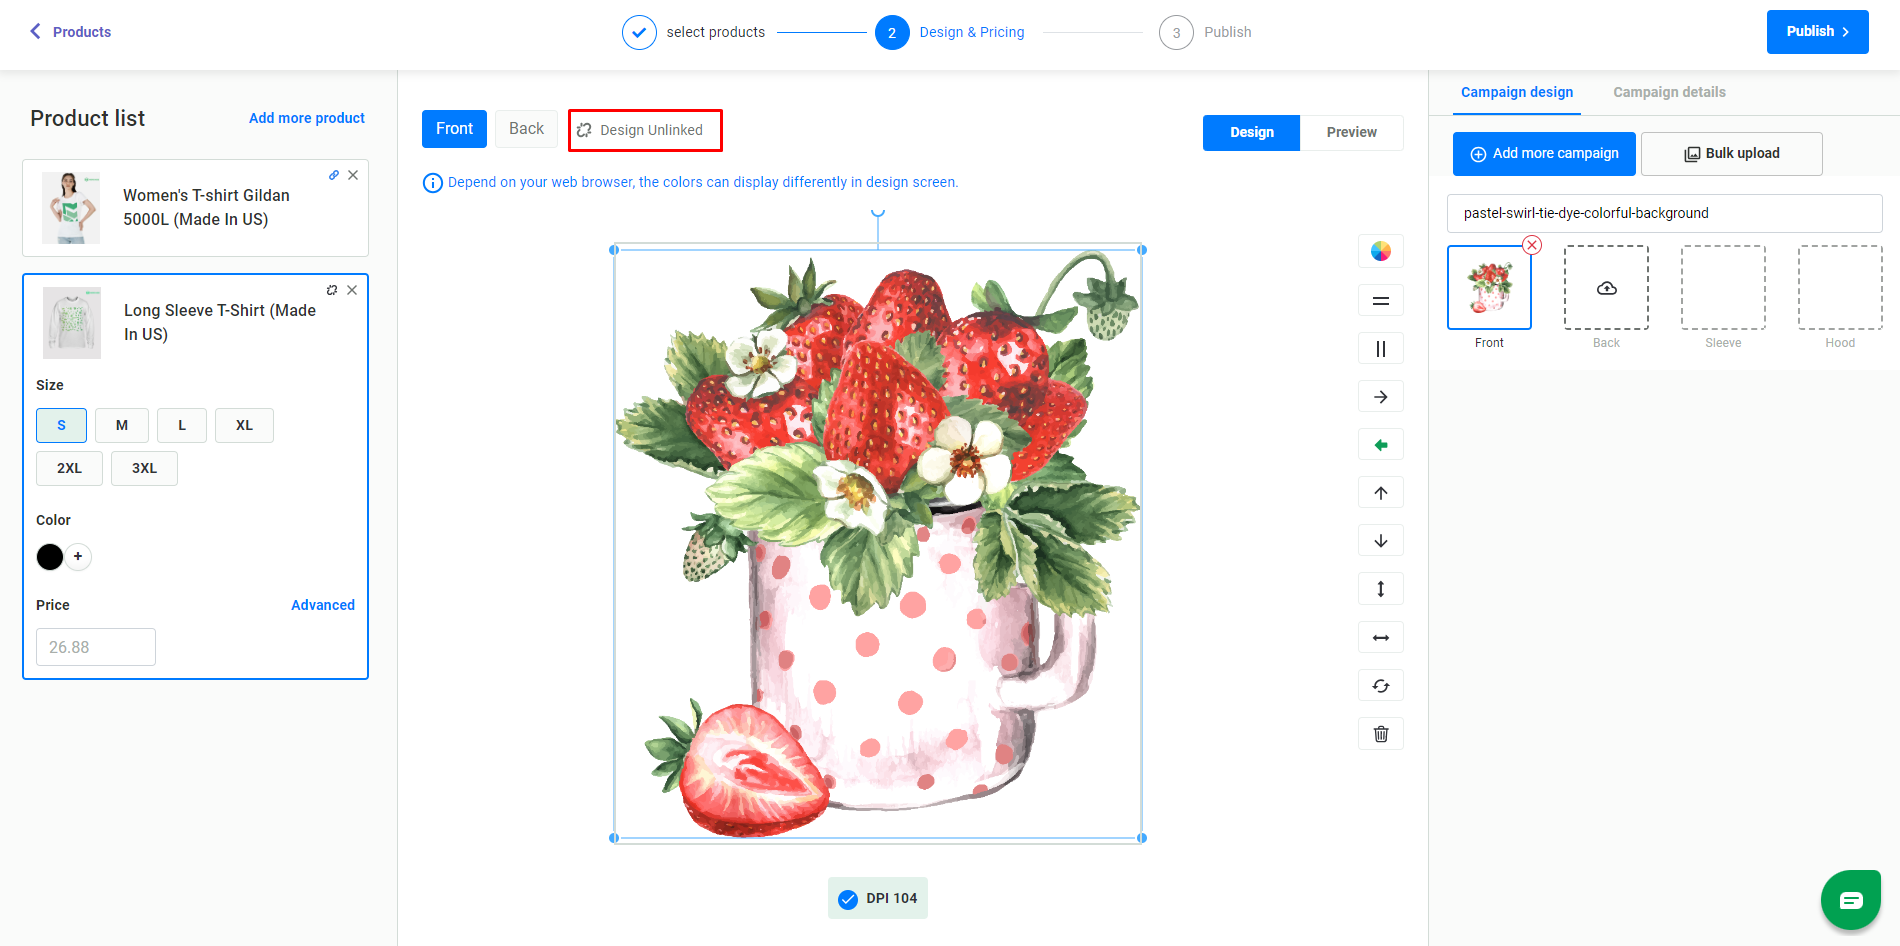
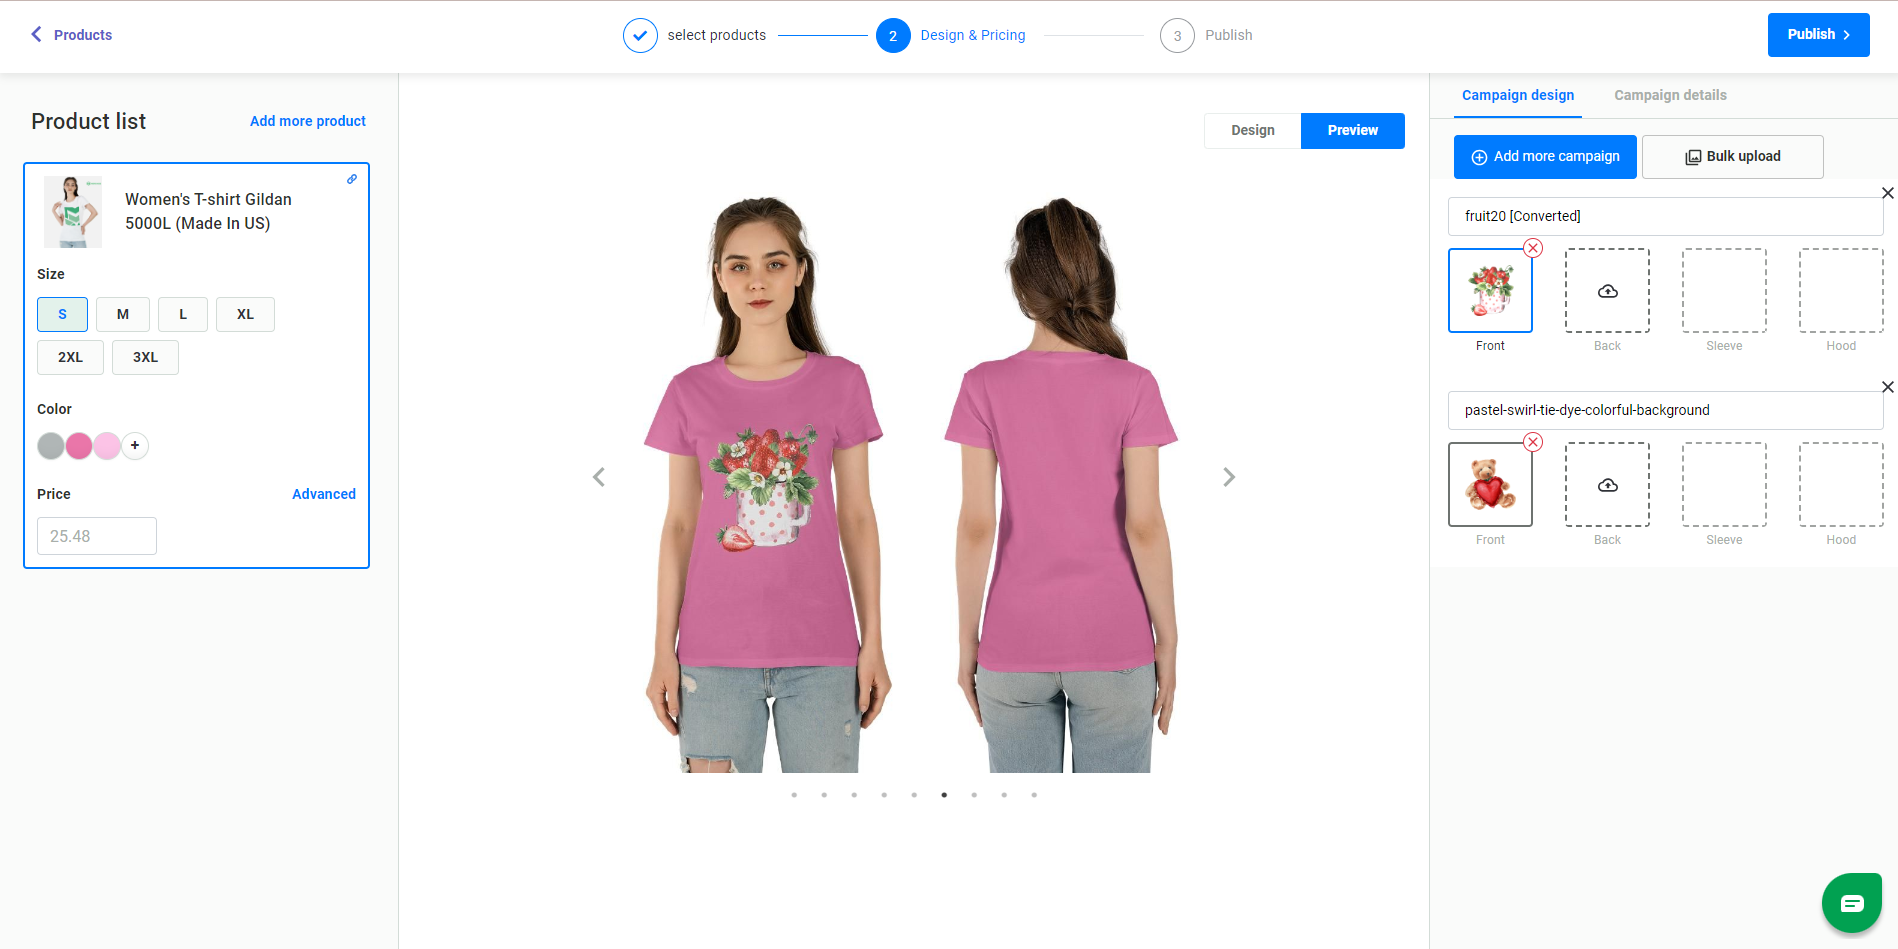
- If you want to apply different designs to multiple product type variations, click “Design Linked" to unlink variants.
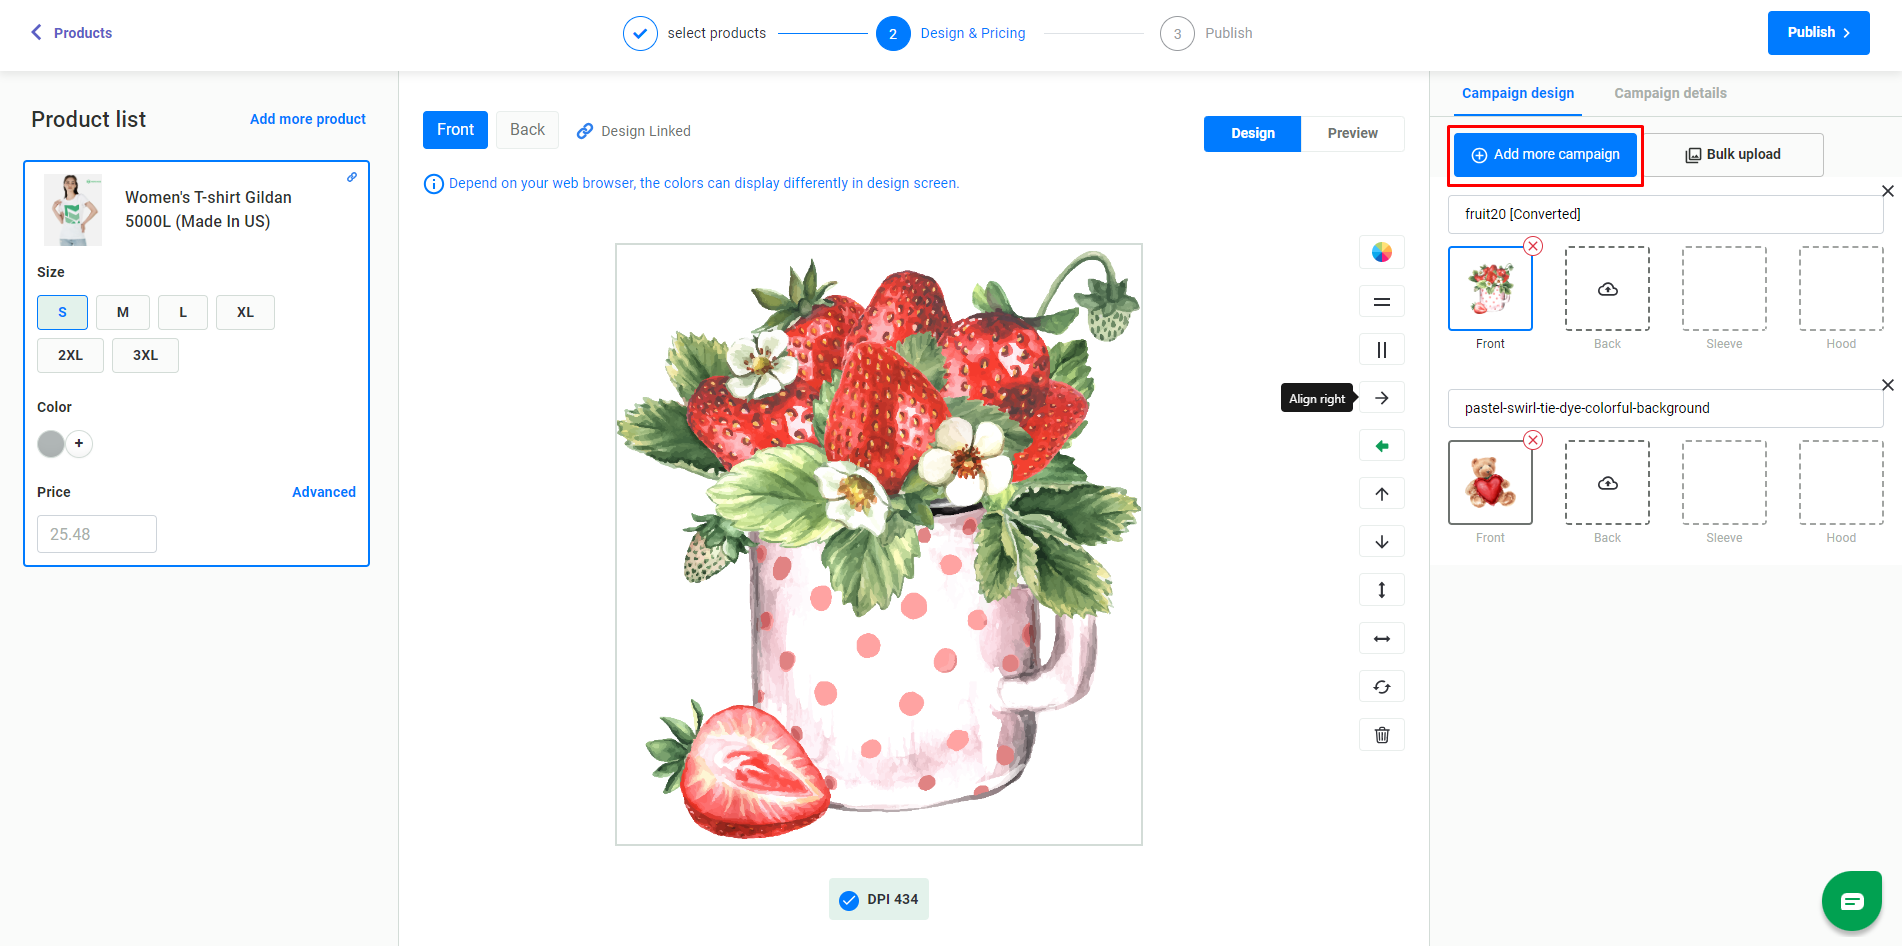
- If you want to create multiple campaigns from one product type at once, click “Add More Campaign" to add different designs.
(* ) JPG, JPEG, and PNG file types are accepted.
3. Generate Your Product Mockups
Click “Preview” to generate product mockups.
4. Set Up the Product Information
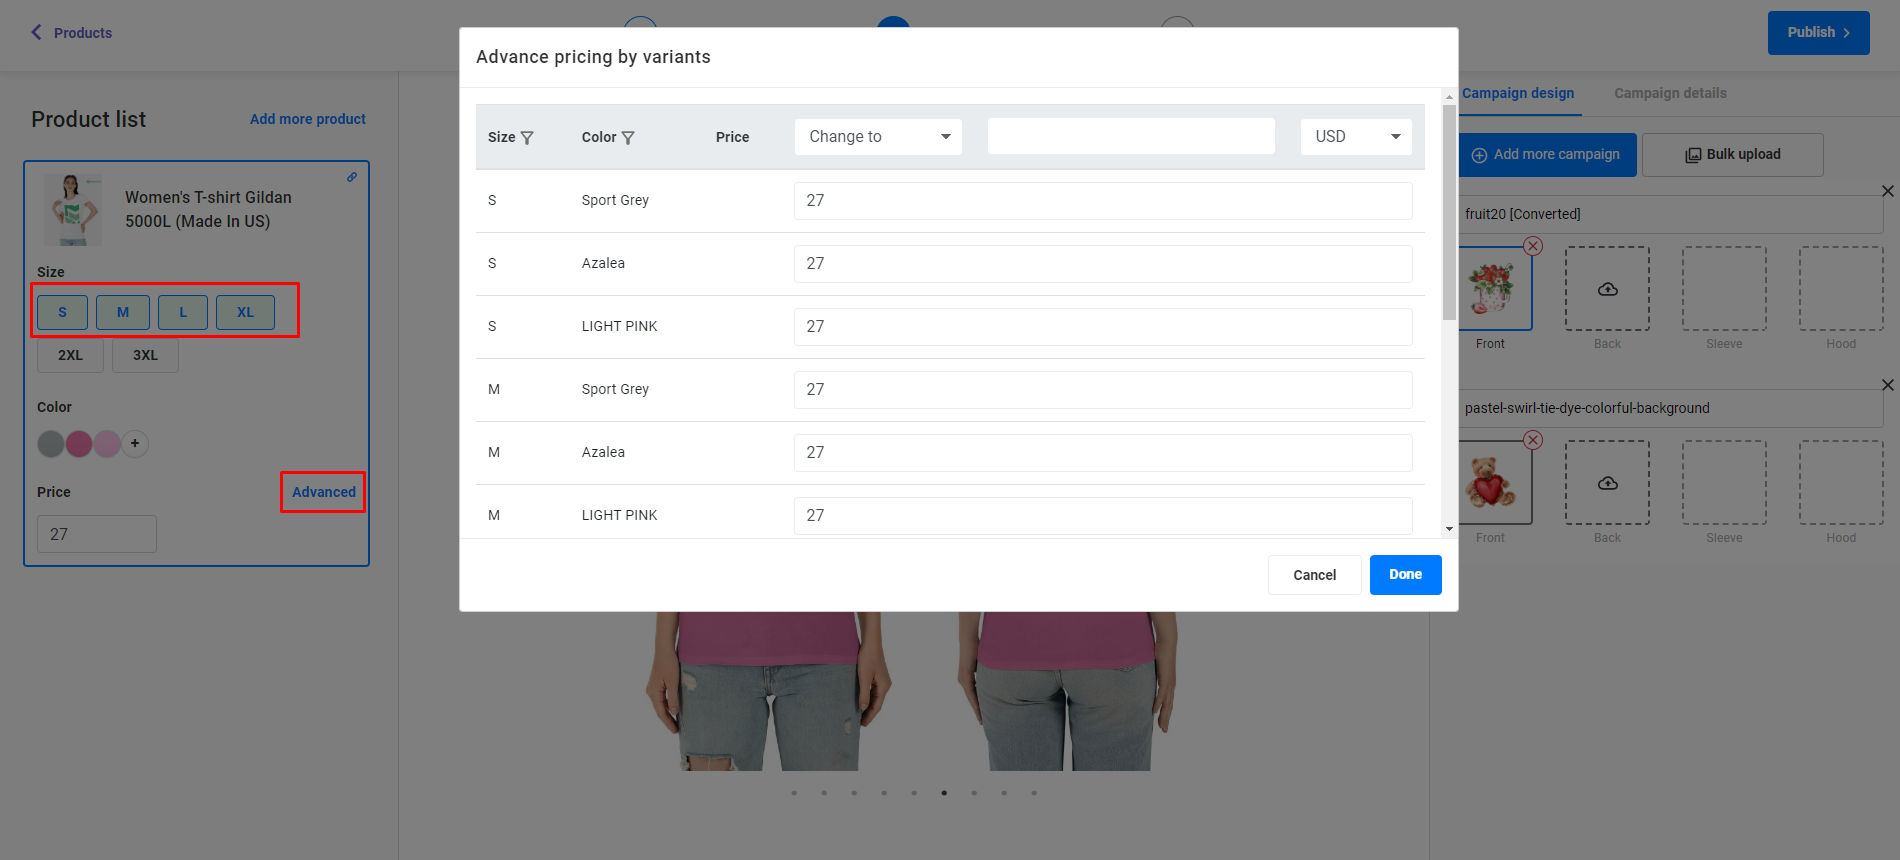
Click and select Variants, then enter the Price or change the Price for each variant in the “Advanced" Dialog.
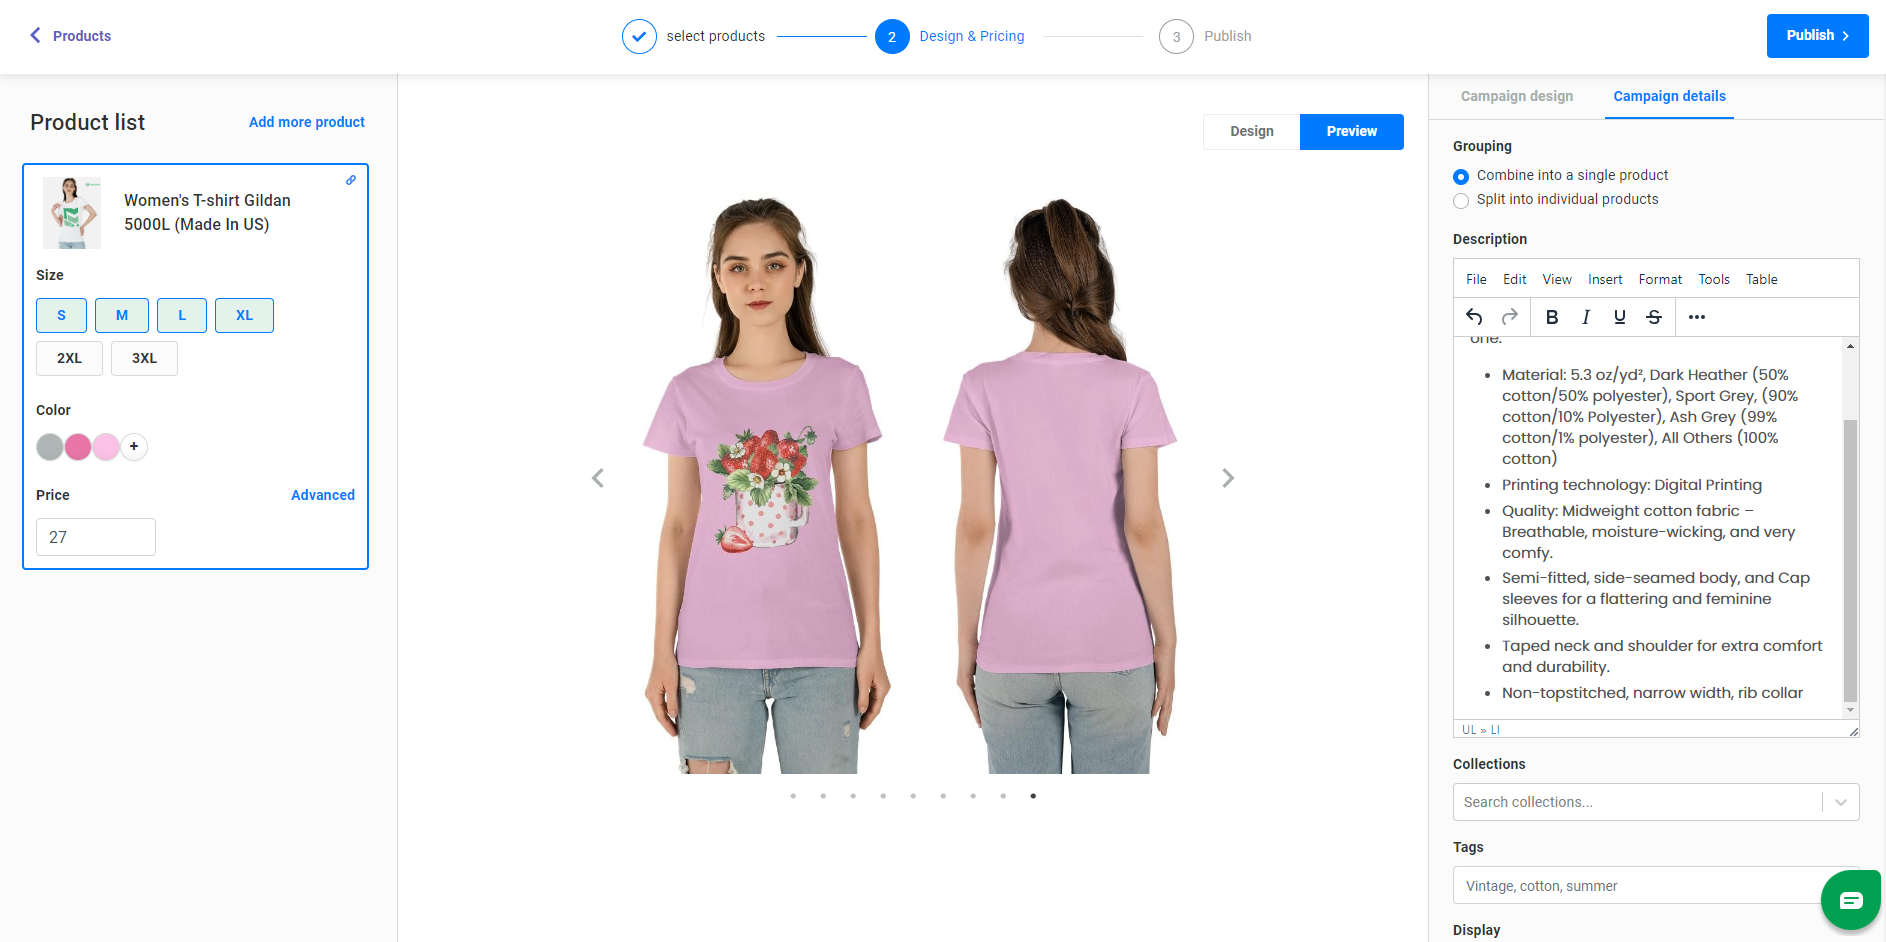
Enter the Product Title, and add Description in the “Campaign details" tab.
5. Publish Your Product
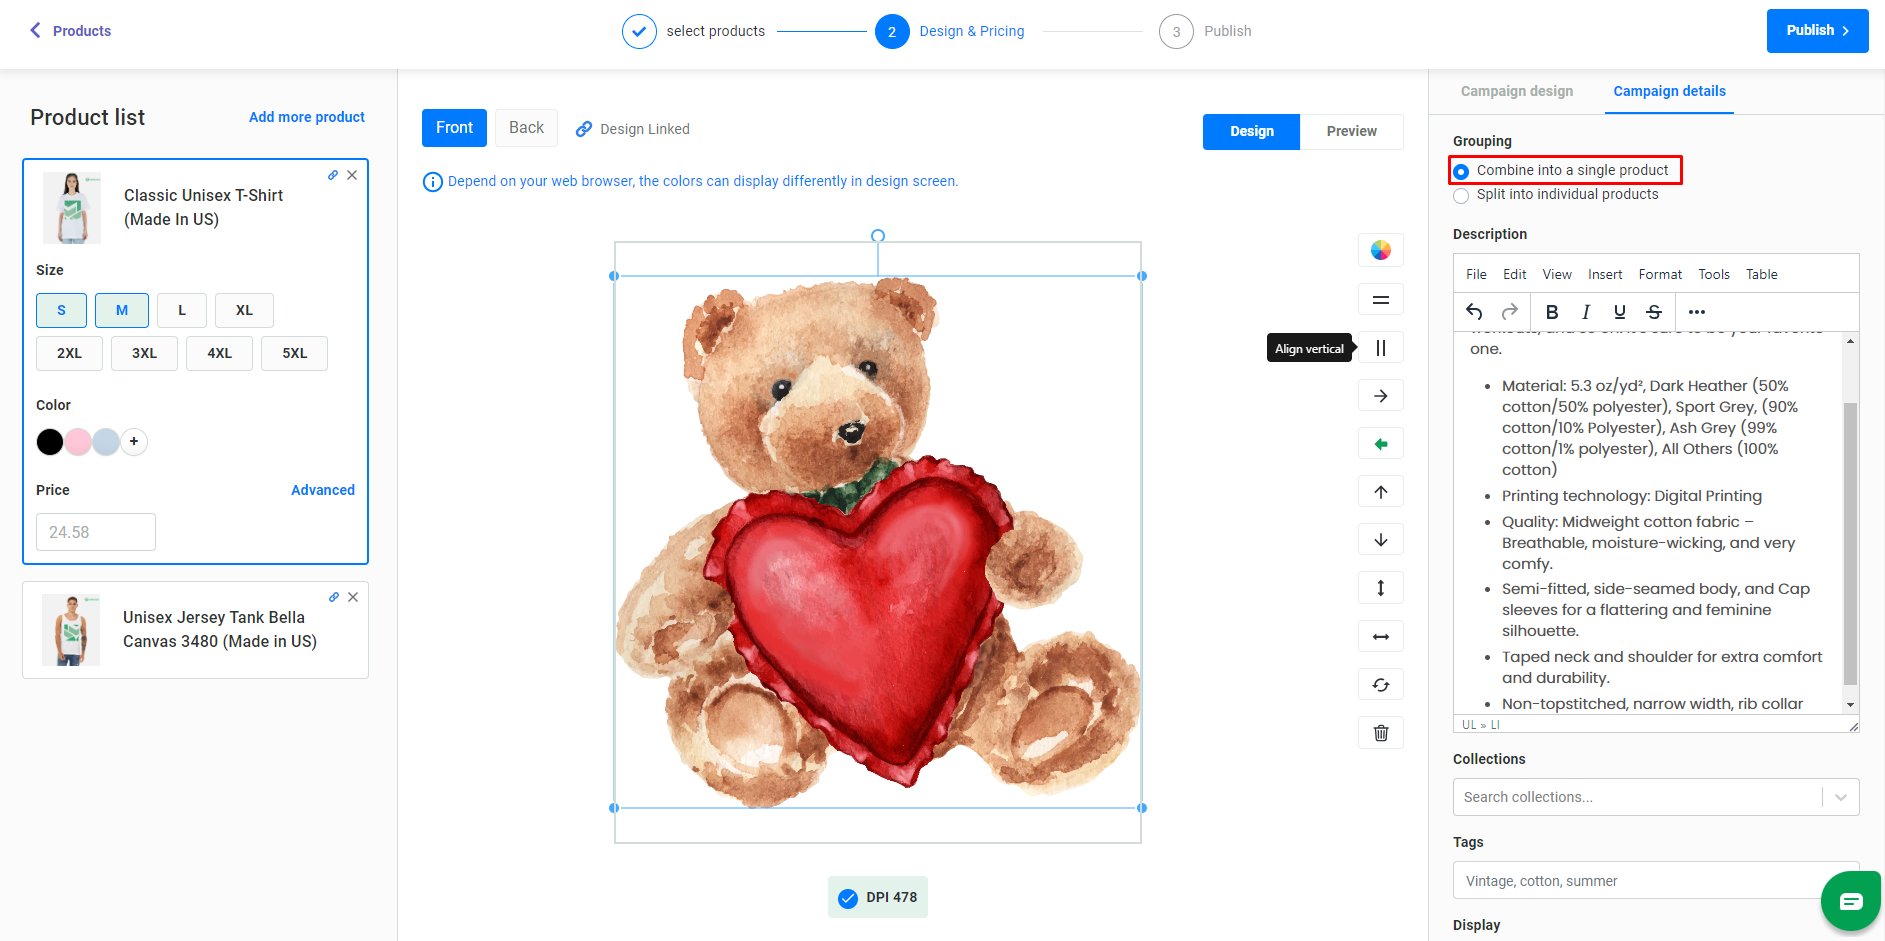
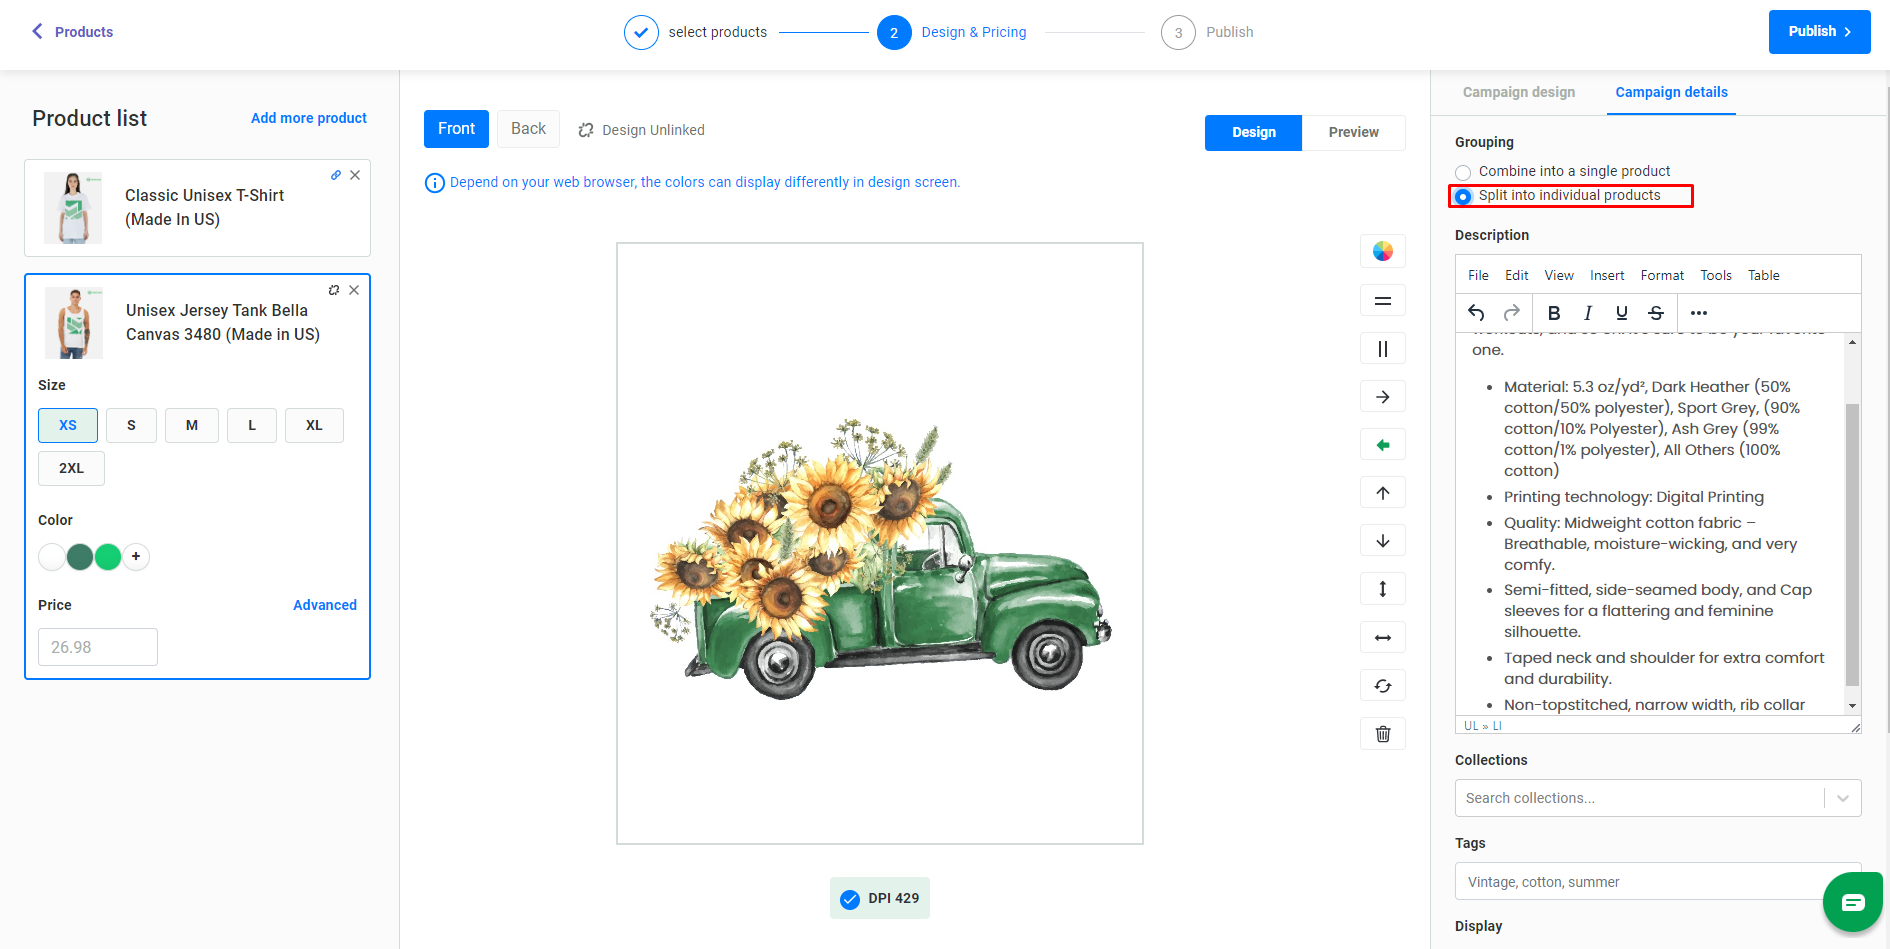
Before clicking “Publish”, make sure in the Campaign details tab, you choose the option:
- “Combine into a single product” for creating a single campaign.
- “Split into individual products” for creating multiple campaigns in bulk.
II. Split Layout:
1. Choose the Products
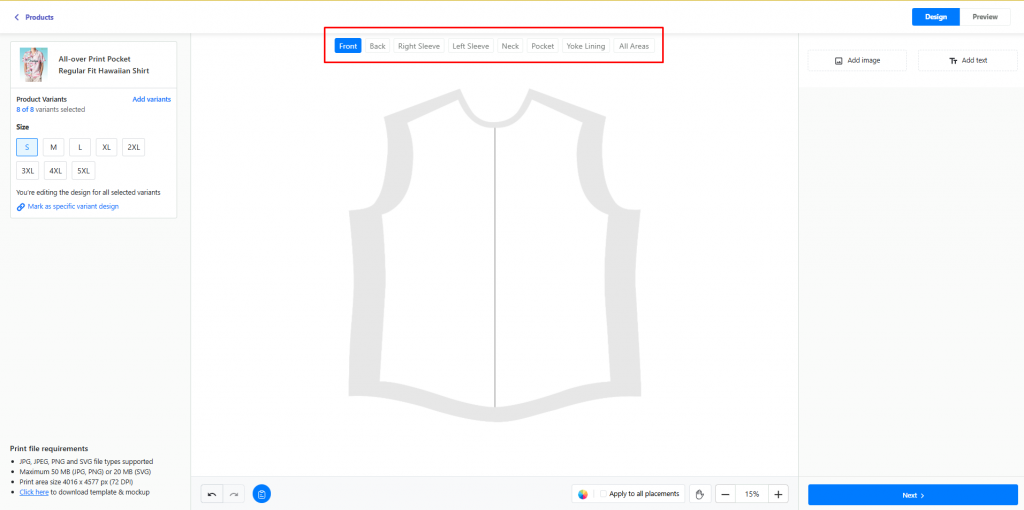
Upon selecting “Split Layout” from the popup panel, the product catalog will be displayed. Select the product you wish to customize and click “Design“.
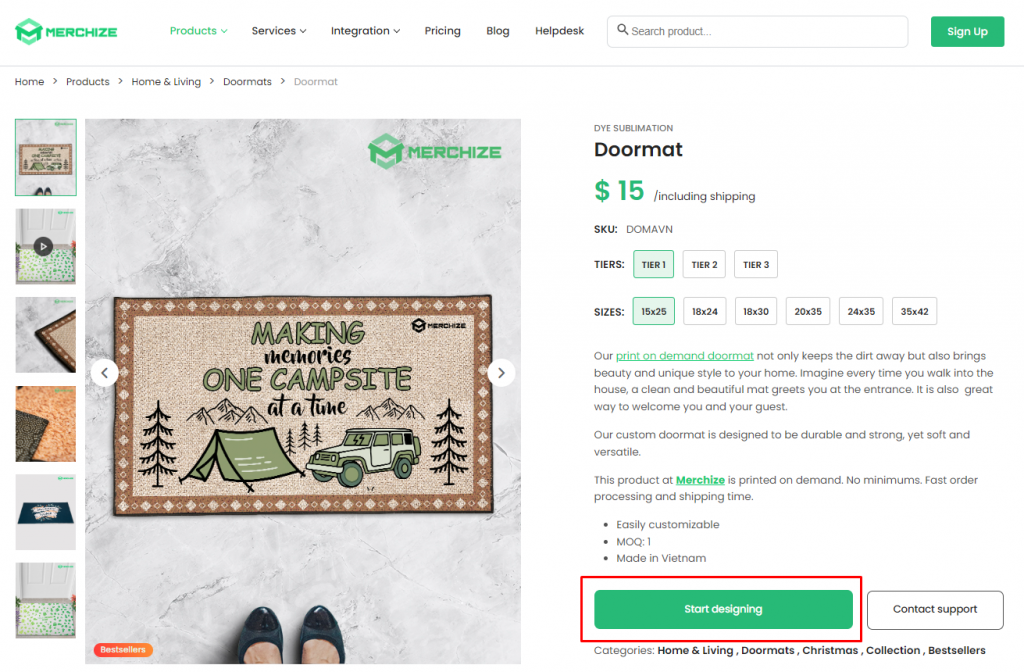
In addition, on product pages on our website merchize.com, you can click on the “Start Designing" button to start making your mockup with “Split Layout".
2. Add Product Variants
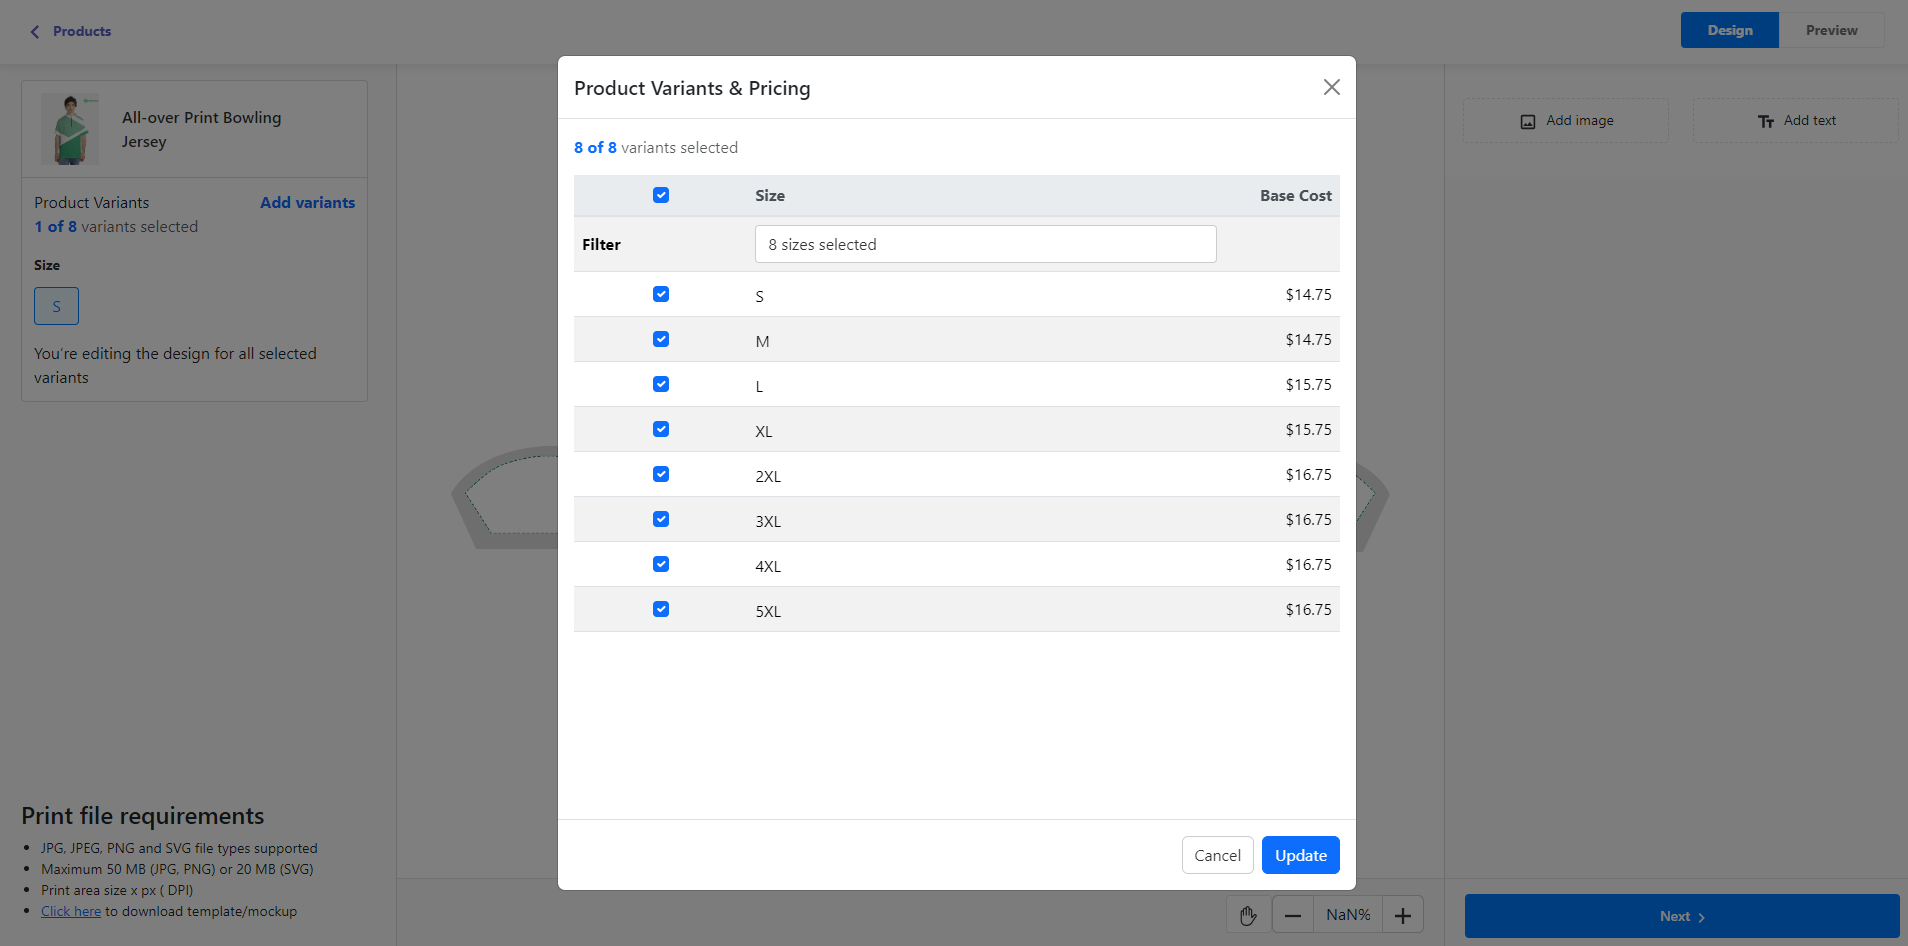
In the product box on the top left panel, click “Add Variants” to include additional sizes and color options for your product.
By default, your design will be applied to all variants. To tailor a design for a specific variant, click on that variant and then select “Mark as Specific Variant Design.”
3. Upload Your Designs and Elements
In the design editor, you can:
1, Choose design placement: Select a segment of a product and add designs specifically for that part.
2, Add elements to your design: Upload a design/design elements that you want to see in your mockup images for each design section.
3, Adjust your design elements: Use the available design tools to adjust and refine your designs.
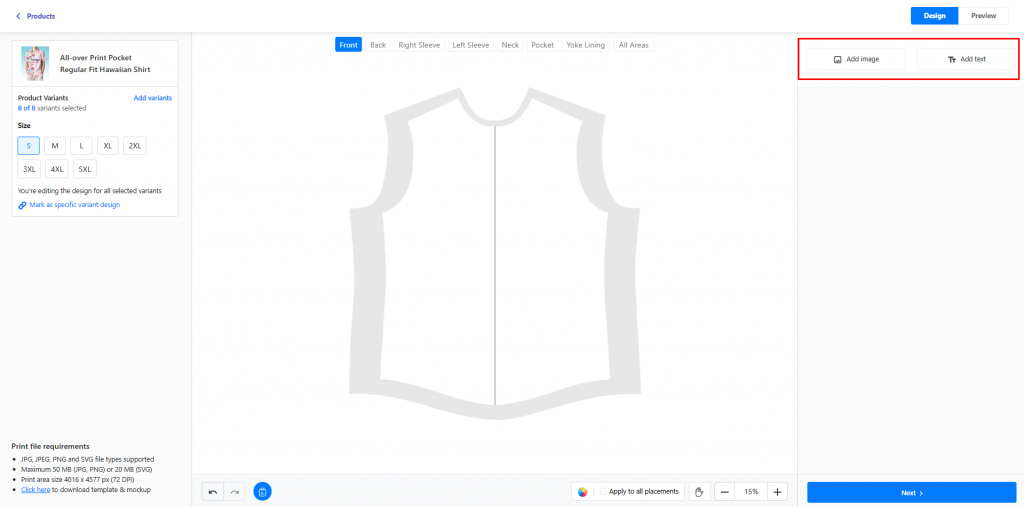
Image editor tools: Click “Add Image” to upload your design.
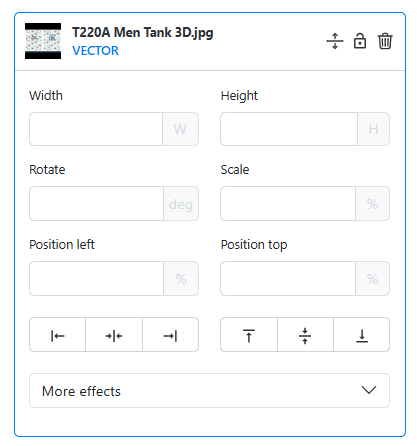
On the right-side panel, for each image, you can adjust:
- Adjust Dimensions (Width & Height): View and adjust the image’s width and height.
- Rotate: Enter degrees to adjust the image angle.
- Scale: Resize by entering a percentage of the original size.
- Position Precisely (Position left & Position top): Fine-tune placement with exact values for horizontal (Left) and vertical (Top) positions.
- Align Easily: Use quick buttons to align left, center, right, top, or bottom.
- Check DPI: Ensure the image resolution meets print quality requirements
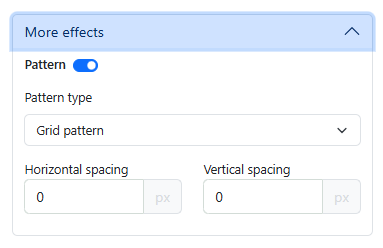
- Create pattern: Open “More Effects”, and turn on “Pattern” to create a pattern with this element. You can select a Pattern type and adjust horizontal and vertical spacing for your pattern.
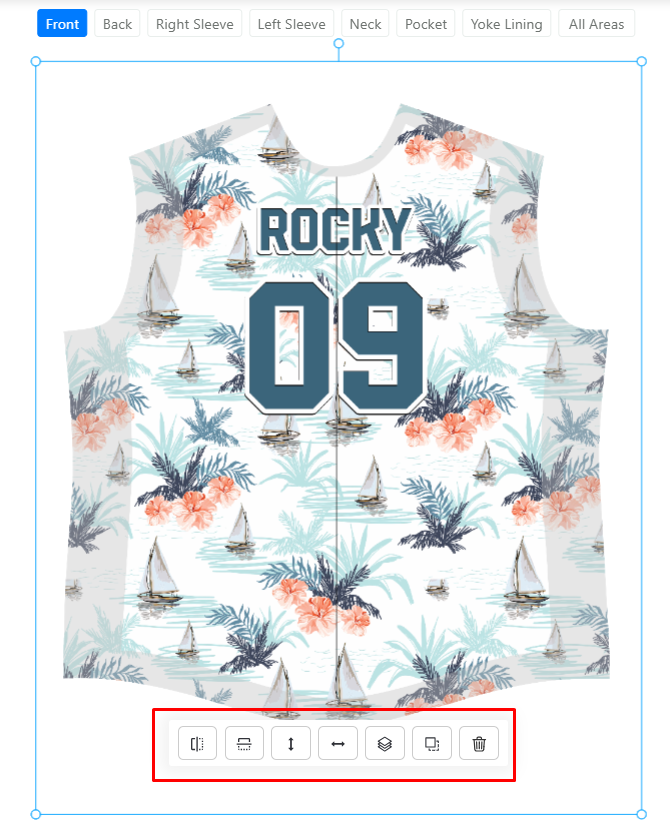
Besides, when clicking a specific image, you can also see the options to do the following actions (describe in order from left to right):
- Flip Horizontally/Vertically: Mirror the image or text left-right or up-down.
- Fit to Width/Height: Automatically resize to match the product’s width or height.
- Duplicate to All Sides: Copy the design element across all segments of the product.
- Duplicate: Create an identical copy of the element in the current position.
- Delete: Delete this image.
Note:
- Ensure your files adhere to the recommended dimensions and resolution.
- Accepted image file formats are JPG, JPEG, PNG, and SVG.
- The design library has a 10GB storage limit. If you’re close to or exceeding this limit, delete old or unnecessary files to make room for new uploads.
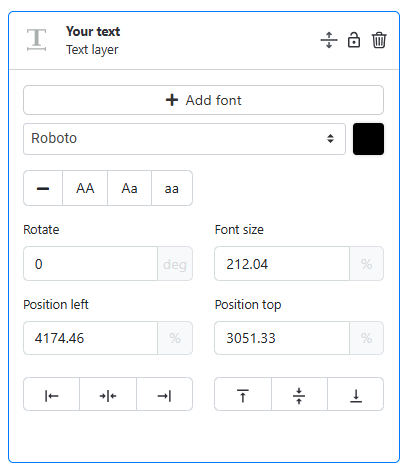
Text editor tools: Click “Add Text” to add customizable text.
To edit your text in the mockup generator, follow these options:
- Add Font: Choose or upload a font for your text.
- Select Font: Select a font from our Font Library. You can search for font family or sort by language.
- Change font color: Select from the given palette or use hex code to pick a color for the text
- Change text format: Choose among these four options: As typed, Uppercase, Lowercase, Capitalize
- Rotate text: Enter degrees to tilt your text.
- Adjust Font Size: Increase or decrease font size.
- Adjust text position: Fine-tune left and top positioning with numerical values.
- Align & Flip: Align text vertically to left, center, or right. Align text horizontally to the top, center, or bottom.
Note:
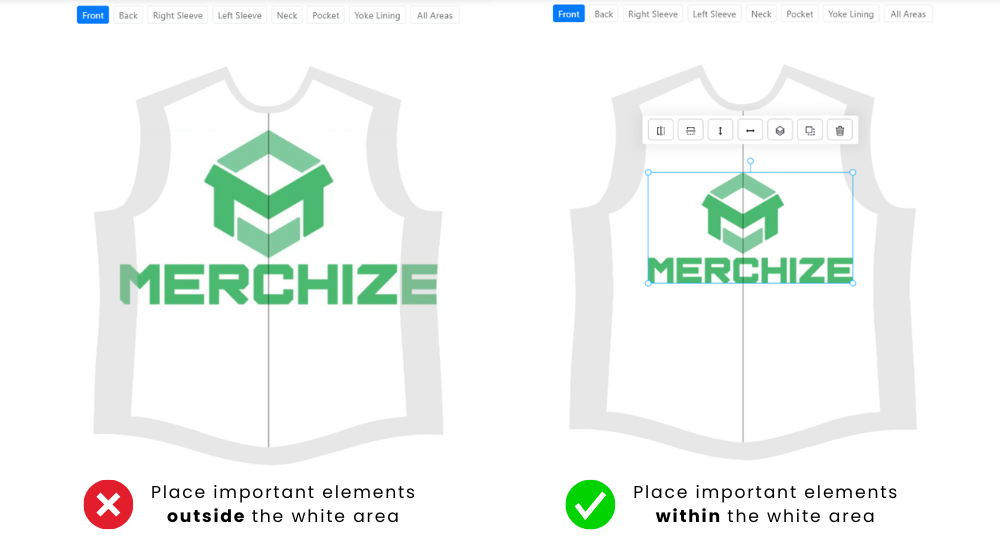
- Ensure that all important elements, such as text and key graphics, are placed within the white area (or Safe Print Area). This white area represents the smallest size. Design elements placed within this area will be fully displayed across all product sizes.
- Any design elements placed outside the white area (in the grey area or Bleed area) might be cut off in larger sizes during production.
- Extend the background and non-essential parts of the design to cover the entire gray “Bleed Area." This provides a full-coverage print effect, ensuring there are no blank edges on any size.
- Click the Document icon (near the Undo/Redo button) to read the full Mockup Guideline.
Other design tools:
- Color Picker: Use the color picker to adjust the background color of different parts.
- Apply to All Placements: This option allows you to apply the same selected background color to all segments if you want a design element or color to appear consistently.
- Zoom and Navigation Controls: Zoom in or out to focus on details.
- Drag editor: Move your editor workspace with this tool
- Undo/Redo: Utilize the Undo and Redo buttons to correct or repeat actions without losing progress.
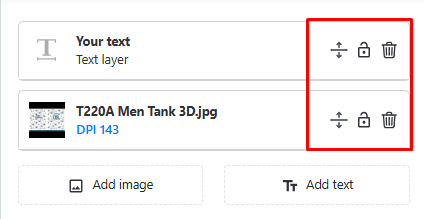
Each text and image added is treated as a layer. With each layer, you can:
- Adjust layer order by dragging them up and down
- Lock layers
- Delete layers
4. Generate Your Product Mockups
Click “Preview” to view the generated product mockups. Should you need to download the mockup, either immediately or later, this can be done in Preview mode by clicking the “Download Mockup" button.
5. Set Up the Product Information
Within the Product Variants & Pricing screen set the price for all variants or individually. Input the Title and Description in the Campaign details tab.
6. Publish Your Product
Before publishing, you may select a featured image for your product in the Mockup Image Preview tab.
Create mockup images on the Merchize website:
1. Simply select a product from Merchize’s Product Catalog, click “Start Designing" (currently available for select products), add your design and product information, then click “Publish.”
2. You will be prompted to log in to your Merchize account.
3. View your newly created products in the “Products" tab in your Admin panel.
*Note that: If you have not yet signed up with Merchize, the product you created will automatically be saved in your browser for 2 days.
- You can register using your email or Google account. Click “Create New Store," then select the Fulfillment plan (if you are using it for order fulfillment only).
- Next, create a store with your own store name.
- Contact Merchize support (via Live Chat or the website) to activate and guide you in setting up your store correctly.
