Categories
-
Ordering & Fulfillment
- Complete Guide: How to get started & set up fulfillment on Merchize
- Create a Manual Order in Merchize
- How To Import Order to Merchize Manually
- How To Create Products And Campaigns At Merchize
- Create & Import orders for FBA Fulfillment
- How to set up Merchize x Order Desk Integration
- F.A.Q About Fulfillment Procedure On Merchize
- General Introduction to Merchize Store Administration
- How To Add Sub Account To Your Store
- How To Connect PayPal Account To Pay Subscription & Transaction Fee Automatically.
- How To Contact Merchize Support
- Connect Merchize to Shopify API via a Custom App
- Brand Packaging Kit & Thank-you Card Features I Setup Guides
- Verify US Shipping Address
- How to cancel orders and items
- Set up custom fulfillment workflow with conditional logic
- How to Process TikTok Shop Orders With Merchize
- Instructions for Update Artwork
- How to Bulk Import Artwork via CSV and API
- How to Track and Manage Packages in Shipment Status
- Guide to Order Tracking and Management on Orders page
- How to Process Walmart Orders with Merchize
- Show all articles7 Collapse Articles
-
Integrations
- Connect Merchize to Shopify API via a Custom App
- How to set up Merchize x Order Desk Integration
- Create & Sync Products from Merchize to Shopify
- Create & Sync Products from Merchize to Etsy
- Create & Sync Products from Merchize to WooCommerce
- Create & Sync Products from Merchize to Ebay
- Amazon Integration: Connect & Fulfill Orders Automatically
- eBay Integration: Connect & Fulfill Orders Automatically
- How to configure and sync your Etsy orders to Merchize?
- Google Shopping Custom Label User Guide
- Guideline To Integrate Email Marketing Klaviyo Solution On Your Merchize Store.
- How to sync orders automatically and fulfill from Shopify
- Integrate & Fulfill Orders From ShopBase
- Integrate WooCommerce Fulfill with Merchize
- Integration with Google Shopping
-
Print & Mockup Guidelines
-
Payment & Billing
- How to take payments with PayPal
- Guideline to Merchize Payment
- General Introduction to Merchize Store Administration
- How To Connect PayPal Account To Pay Subscription & Transaction Fee Automatically.
- Set Up Payment In Merchize Setting - To Receive Payment From Customers
- F.A.Q About Fulfillment Procedure On Merchize
- How To Contact Merchize Support
- Account Suspension and Restoration
- How to take payments with Payoneer
- How to take payments with LianLian
-
Delivery & Shipping
-
Storefront Setup
- How to create a storefront on Merchize and configure domain to connect to Merchize
- Add WWW To Your Store
- Bulk Import Products
- Bulk Add Tags For Multiple Products (Bulk Add Tags) Guideline
- General Introduction to Merchize Store Administration
- General Settings In Settings > General of Merchize
- Google Shopping Custom Label User Guide
- Guideline To Integrate Email Marketing Klaviyo Solution On Your Merchize Store.
- How To Add Product Review
- How To Add Promotion Bar For Your Storefront
- How To Add Sub Account To Your Store
- How To Bulk Edit Description
- How To Connect PayPal Account To Pay Subscription & Transaction Fee Automatically.
- How To Contact Merchize Support
- How To Create and Edit Pages on Merchize Storefront
- How To Create Products And Campaigns At Merchize
- How To Create Free Shipping Code For Built-in Payment Store
- How To Edit Store Homepage on Merchize
- How To Fix The Price of a Series of Products
- How To Get Bing Site Verification Code
- How To Get Facebook Pixel ID
- How To Get Google Analytics Tracking ID
- How To Get Google Conversion Tracking Code
- How To Get Google Site Verification Code
- How To Get Google Tag Manager Container ID
- How To Get Store Sitemap Link
- How To Import Bulk Of Products From Shopify To Your Merchize Store
- How To Insert Code Into GTM To Change CSS Store
- How To Install Multi-pixel Using GTM
- How To Integrate The Feature Of Adding Multiple Facebook Pixel ID
- How To Manage And Create New Discount For Store On Marchize
- How To Prevent DDOS Attack By Using Cloudflare
- How To Set Up Facebook Conversion Api
- How To Set Up Free Shipping From $Xx On Merchize
- How To Set Up Shipping Rates With Merchize
- How To Use Product Gallery
- Launching Upsell And Cross-Selling Features V1
- Set Up Payment In Merchize Setting - To Receive Payment From Customers
- Setting up the Menu Navigation Management feature for Store
- How to Generate Facebook Product Feed Files with Merchize Storefront
- Merchize Customer Management
- Show all articles26 Collapse Articles
-
Features & Store Management
-
Other Functionalities & Settings
How to Use Merchize’s 3D Design Preview Feature & Sync Products To Your Sales Channels
Step 1: Browse products with 3D Design preview
1. Go to Merchize’s website > Products
2. From the filter panel on the left side, for the Design Preview filter, select 3D to access Merchize’s list of products available with 3D Design Preview.
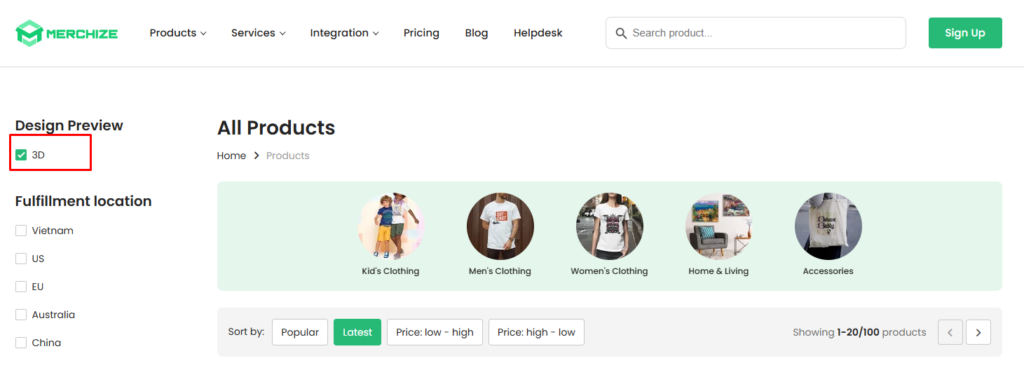
3. Click the product you want to view.
4. On the product page, click Start designing.
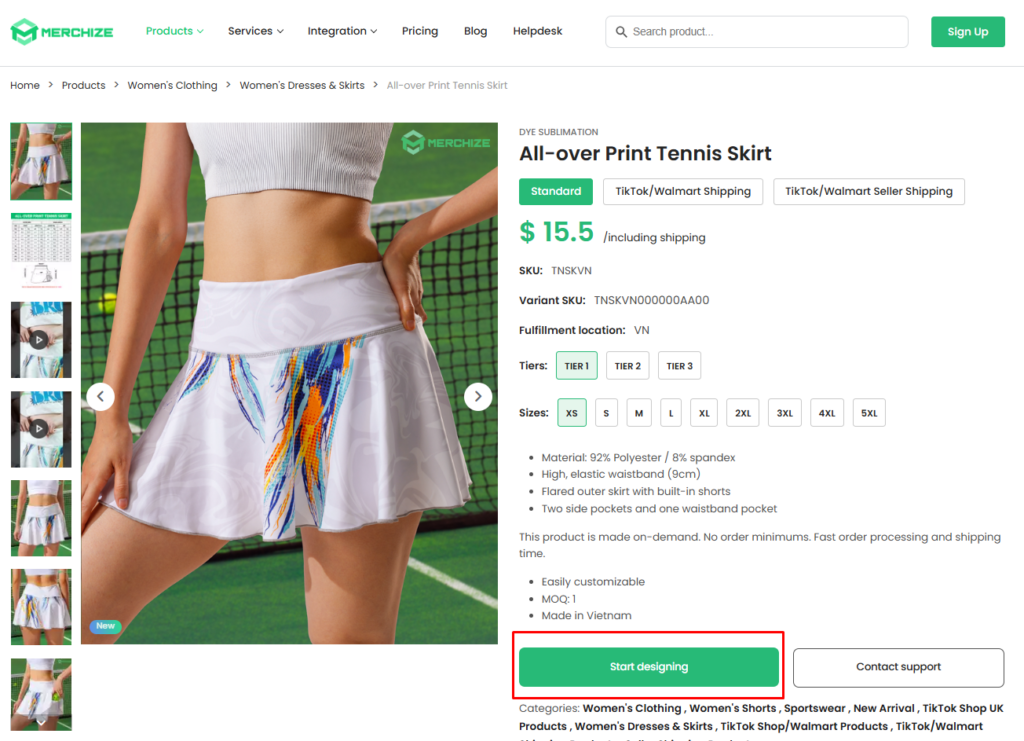
Now, you can take a tour to explore Merchize’s design tools. If you want to know more details about how to create a design with these tools, read our detailed guidelines here.
5. On the left side panel, select the 3D tab to see the 3D Preview model of your product design.
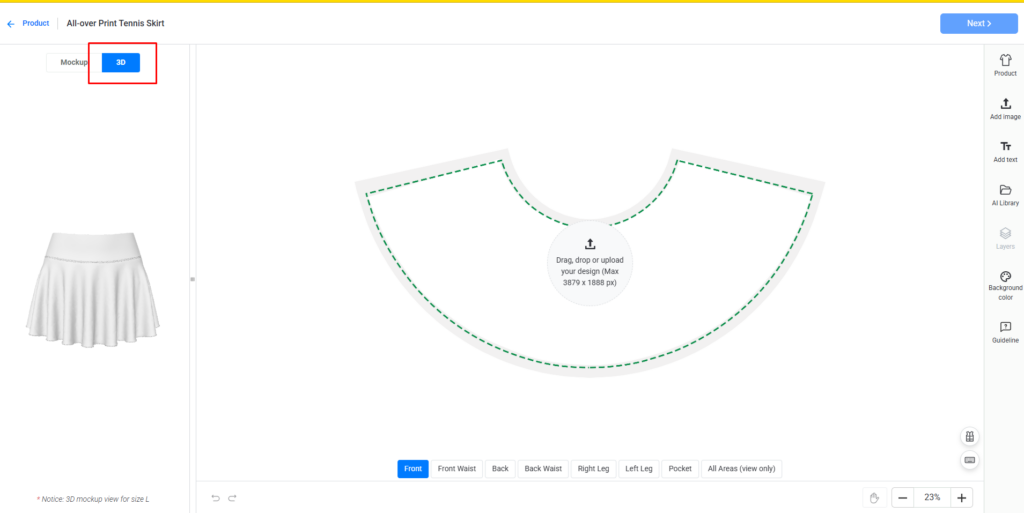
Now you can start creating your design and previewing all the changes on the product in real-time with Merchize’s 3D model.
Step 2: Create your design with Merchize
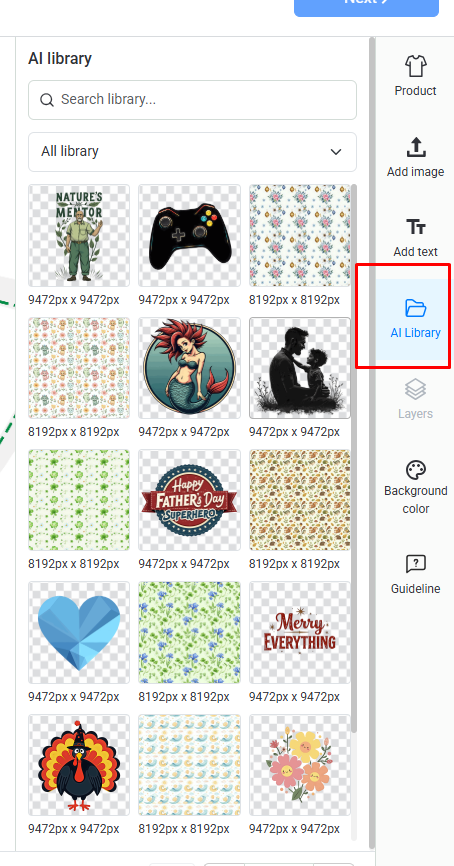
1. Upload your images and design elements to the workspace.
Or you can use Merchize’s AI Library with over 2000+ patterns and elements categorized into various categories, suitable for various niches.
2. Edit your design for each section with the built-in design tool.
Click here to fully explore all the features of Merchize’s built-in design tool.
Tips: If you want to apply the same artwork to all sections of your products, click Apply to all areas from the quick tool panel.
3. Select All Areas (view only) to preview all sections
4. If you are happy with your design, click Next
While editing your design, you can check the 3D model on the right to:
- Preview products with a realistic 3D model from a 360-degree view
- Adjust your design and preview changes in real time
Note:
- Merchize currently offers a 3D Design Preview for selected products. We are developing 3D models for more products, and this 3D Design Preview feature will cover our full catalog soon.
- The preview model represents the design preview of size L only. Other sizes might appear different from the 3D model preview.
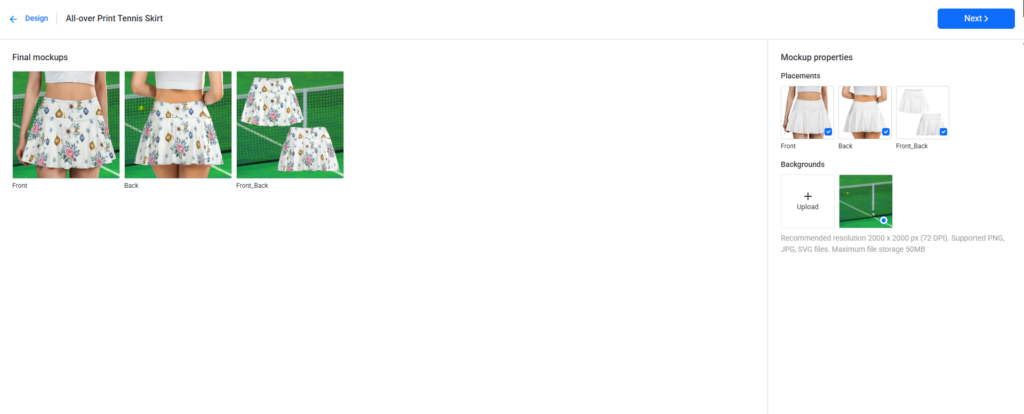
Step 4: Generate Mockup images
1. After you have created your design, wait for the system to generate mockup images for your product.
2. Once your mockup images are generated, you can:
Click Download to download mockup images if you want to.
Change the mockup background by uploading your own background
3. Click Next to proceed to create listings for your products.
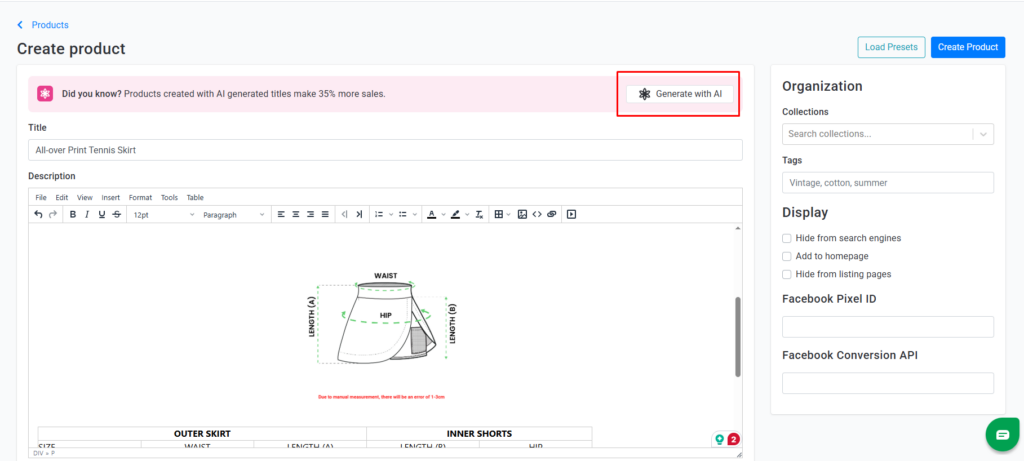
Step 3: Create & Edit Product Listings with AI Assistance
After creating the designs and mockup for your product, you will start editing the product information.
- Title: Write a captivating title
- Product description: Write an informative, compelling description.
- Product gallery: The gallery includes mockup images generated by Merchize, or you can upload your own mockup.
- Artwork: This section includes the design file(s) that you have created.
- Product variant & Pricing: Edit your product pricing.
- Organization: Categorize your listings to make it easier to find or access.
To create an optimized copy for your listing, you can use Merchize’s AI-enhanced tools to generate a unique title and description for your listing.
1. Click Generate with AI
2. Fill in the keywords and information
- Enter the keyword you want to highlight in your listing
- Select Tone of voice from three options: Professional, Friendly, or Sell.
3. Click Generate. AI assistant will generate a listing title and description based on your input.
4. Review the AI-generated description to make sure the information is corrected and suitable for your product. If you are happy with the result, click Apply to listing.
Step 4: Publish your listings to your connected platforms
1. Review your listing to ensure accuracy.
2. Click Confirm and Publish.
If you just want to save, not publish your listings, just hit the Save product button.
3. Select a channel from the drop-down
4. Select the store(s) you want to publish your listing to
Merchize currently allows syncing products from your Merchize store to Shopify, WooCommerce, and Etsy only.
5. Hit Publish
Your listing will be automatically synced and published to your selected store. Now, you are ready to sell your products and get sales. Just let Merchize handle the products and shipping for you!