Categories
-
Ordering & Fulfillment
- Complete Guide: How to get started & set up fulfillment on Merchize
- Create a Manual Order in Merchize
- How To Import Order to Merchize Manually
- How To Create Products And Campaigns At Merchize
- Create & Import orders for FBA Fulfillment
- How to set up Merchize x Order Desk Integration
- F.A.Q About Fulfillment Procedure On Merchize
- General Introduction to Merchize Store Administration
- How To Add Sub Account To Your Store
- How To Connect PayPal Account To Pay Subscription & Transaction Fee Automatically.
- How To Contact Merchize Support
- Connect Merchize to Shopify API via a Custom App
- Brand Packaging Kit & Thank-you Card Features I Setup Guides
- Verify US Shipping Address
- How to cancel orders and items
- Set up custom fulfillment workflow with conditional logic
- How to Process TikTok Shop Orders With Merchize
- Instructions for Update Artwork
- How to Bulk Import Artwork via CSV and API
- How to Track and Manage Packages in Shipment Status
- Guide to Order Tracking and Management on Orders page
- How to Process Walmart Orders with Merchize
- Show all articles7 Collapse Articles
-
Integrations
- Connect Merchize to Shopify API via a Custom App
- How to set up Merchize x Order Desk Integration
- Create & Sync Products from Merchize to Shopify
- Create & Sync Products from Merchize to Etsy
- Create & Sync Products from Merchize to WooCommerce
- Create & Sync Products from Merchize to Ebay
- Amazon Integration: Connect & Fulfill Orders Automatically
- eBay Integration: Connect & Fulfill Orders Automatically
- How to configure and sync your Etsy orders to Merchize?
- Google Shopping Custom Label User Guide
- Guideline To Integrate Email Marketing Klaviyo Solution On Your Merchize Store.
- How to sync orders automatically and fulfill from Shopify
- Integrate & Fulfill Orders From ShopBase
- Integrate WooCommerce Fulfill with Merchize
- Integration with Google Shopping
- Connect Customily and Merchize for Product Personalization
- Integrate TeeinBlue and enjoy personalized fulfilment with Merchize
- Connect Merchize to Shopify API via a Custom App With Client ID and Secret ID
- Show all articles3 Collapse Articles
-
Print & Mockup Guidelines
-
Payment & Billing
- How to take payments with PayPal
- Guideline to Merchize Payment
- General Introduction to Merchize Store Administration
- How To Connect PayPal Account To Pay Subscription & Transaction Fee Automatically.
- Set Up Payment In Merchize Setting - To Receive Payment From Customers
- F.A.Q About Fulfillment Procedure On Merchize
- How To Contact Merchize Support
- Account Suspension and Restoration
- How to take payments with Payoneer
- How to take payments with LianLian
-
Delivery & Shipping
-
Storefront Setup
- How to create a storefront on Merchize and configure domain to connect to Merchize
- Add WWW To Your Store
- Bulk Import Products
- Bulk Add Tags For Multiple Products (Bulk Add Tags) Guideline
- General Introduction to Merchize Store Administration
- General Settings In Settings > General of Merchize
- Google Shopping Custom Label User Guide
- Guideline To Integrate Email Marketing Klaviyo Solution On Your Merchize Store.
- How To Add Product Review
- How To Add Promotion Bar For Your Storefront
- How To Add Sub Account To Your Store
- How To Bulk Edit Description
- How To Connect PayPal Account To Pay Subscription & Transaction Fee Automatically.
- How To Contact Merchize Support
- How To Create and Edit Pages on Merchize Storefront
- How To Create Products And Campaigns At Merchize
- How To Create Free Shipping Code For Built-in Payment Store
- How To Edit Store Homepage on Merchize
- How To Fix The Price of a Series of Products
- How To Get Bing Site Verification Code
- How To Get Facebook Pixel ID
- How To Get Google Analytics Tracking ID
- How To Get Google Conversion Tracking Code
- How To Get Google Site Verification Code
- How To Get Google Tag Manager Container ID
- How To Get Store Sitemap Link
- How To Import Bulk Of Products From Shopify To Your Merchize Store
- How To Insert Code Into GTM To Change CSS Store
- How To Install Multi-pixel Using GTM
- How To Integrate The Feature Of Adding Multiple Facebook Pixel ID
- How To Manage And Create New Discount For Store On Marchize
- How To Prevent DDOS Attack By Using Cloudflare
- How To Set Up Facebook Conversion Api
- How To Set Up Free Shipping From $Xx On Merchize
- How To Set Up Shipping Rates With Merchize
- How To Use Product Gallery
- Launching Upsell And Cross-Selling Features V1
- Set Up Payment In Merchize Setting - To Receive Payment From Customers
- Setting up the Menu Navigation Management feature for Store
- How to Generate Facebook Product Feed Files with Merchize Storefront
- Merchize Customer Management
- Connect Customily and Merchize for Product Personalization
- Integrate TeeinBlue and enjoy personalized fulfilment with Merchize
- Show all articles28 Collapse Articles
-
Features & Store Management
-
Other Functionalities & Settings
Add WWW To Your Store
Content Manager
< All Topics
Table of Contents
🇻🇳 Click here for Vietnamese version.
Basically, when you complete the 3 steps in the guide to creating a store, you can access your store at your domain in the form https://your-store-address.com.
However, if you add WWW before the domain, you will get a 404 error – default backend when accessing. This is because the WWW has not been set up yet.
To set up WWW, it’s very simple:
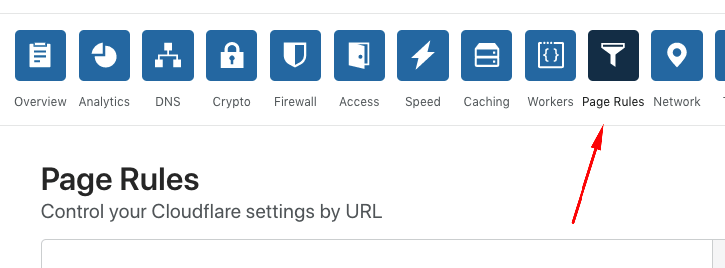
- Go to the Page Rules section in CloudFlare
- Select Create Page Rule.
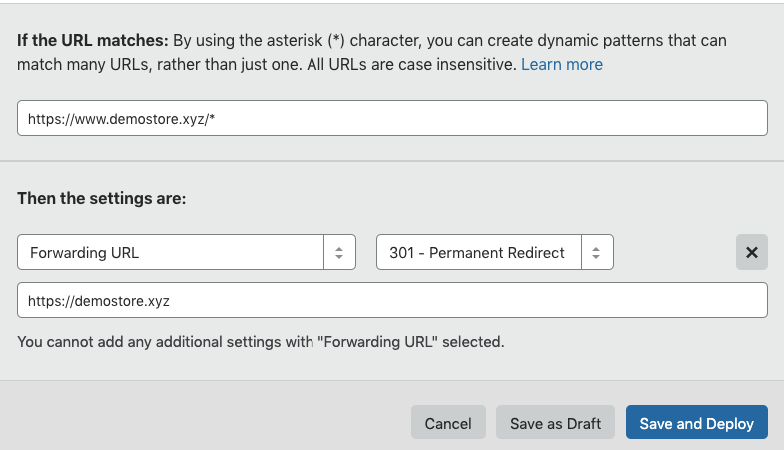
- Fill in the setting information according to the following instructions:
- In the If the Url Matches section, enter the domain with WWW and followed by /*. For example, here my store is demostore.xyz, it will be filled in as https://www.demostore.xyz/*.
- Then the settings are: Select Forwarding URL and 301 – Permanent Redirect.
- Below enter your domain, for example: https://demostore.xyz.
- Then select Save and Deploy.
That’s it, when accessing https://WWW.your-store-address.com, your store will still show up instead of 404 error – default backend.


