Categories
-
Ordering & Fulfillment
- Complete Guide: How to get started & set up fulfillment on Merchize
- Create a Manual Order in Merchize
- How To Import Order to Merchize Manually
- How To Create Products And Campaigns At Merchize
- Create & Import orders for FBA Fulfillment
- How to set up Merchize x Order Desk Integration
- F.A.Q About Fulfillment Procedure On Merchize
- General Introduction to Merchize Store Administration
- How To Add Sub Account To Your Store
- How To Connect PayPal Account To Pay Subscription & Transaction Fee Automatically.
- How To Contact Merchize Support
- Connect Merchize to Shopify API via a Custom App
- Brand Packaging Kit & Thank-you Card Features I Setup Guides
- Verify US Shipping Address
- How to cancel orders and items
- Set up custom fulfillment workflow with conditional logic
- How to Process TikTok Shop Orders With Merchize
- Instructions for Update Artwork
- How to Bulk Import Artwork via CSV and API
- How to Track and Manage Packages in Shipment Status
- Guide to Order Tracking and Management on Orders page
- How to Process Walmart Orders with Merchize
- Show all articles7 Collapse Articles
-
Integrations
- Connect Merchize to Shopify API via a Custom App
- How to set up Merchize x Order Desk Integration
- Create & Sync Products from Merchize to Shopify
- Create & Sync Products from Merchize to Etsy
- Create & Sync Products from Merchize to WooCommerce
- Create & Sync Products from Merchize to Ebay
- Amazon Integration: Connect & Fulfill Orders Automatically
- eBay Integration: Connect & Fulfill Orders Automatically
- How to configure and sync your Etsy orders to Merchize?
- Google Shopping Custom Label User Guide
- Guideline To Integrate Email Marketing Klaviyo Solution On Your Merchize Store.
- How to sync orders automatically and fulfill from Shopify
- Integrate & Fulfill Orders From ShopBase
- Integrate WooCommerce Fulfill with Merchize
- Integration with Google Shopping
- Connect Customily and Merchize for Product Personalization
- Integrate TeeinBlue and enjoy personalized fulfilment with Merchize
- Show all articles2 Collapse Articles
-
Print & Mockup Guidelines
-
Payment & Billing
- How to take payments with PayPal
- Guideline to Merchize Payment
- General Introduction to Merchize Store Administration
- How To Connect PayPal Account To Pay Subscription & Transaction Fee Automatically.
- Set Up Payment In Merchize Setting - To Receive Payment From Customers
- F.A.Q About Fulfillment Procedure On Merchize
- How To Contact Merchize Support
- Account Suspension and Restoration
- How to take payments with Payoneer
- How to take payments with LianLian
-
Delivery & Shipping
-
Storefront Setup
- How to create a storefront on Merchize and configure domain to connect to Merchize
- Add WWW To Your Store
- Bulk Import Products
- Bulk Add Tags For Multiple Products (Bulk Add Tags) Guideline
- General Introduction to Merchize Store Administration
- General Settings In Settings > General of Merchize
- Google Shopping Custom Label User Guide
- Guideline To Integrate Email Marketing Klaviyo Solution On Your Merchize Store.
- How To Add Product Review
- How To Add Promotion Bar For Your Storefront
- How To Add Sub Account To Your Store
- How To Bulk Edit Description
- How To Connect PayPal Account To Pay Subscription & Transaction Fee Automatically.
- How To Contact Merchize Support
- How To Create and Edit Pages on Merchize Storefront
- How To Create Products And Campaigns At Merchize
- How To Create Free Shipping Code For Built-in Payment Store
- How To Edit Store Homepage on Merchize
- How To Fix The Price of a Series of Products
- How To Get Bing Site Verification Code
- How To Get Facebook Pixel ID
- How To Get Google Analytics Tracking ID
- How To Get Google Conversion Tracking Code
- How To Get Google Site Verification Code
- How To Get Google Tag Manager Container ID
- How To Get Store Sitemap Link
- How To Import Bulk Of Products From Shopify To Your Merchize Store
- How To Insert Code Into GTM To Change CSS Store
- How To Install Multi-pixel Using GTM
- How To Integrate The Feature Of Adding Multiple Facebook Pixel ID
- How To Manage And Create New Discount For Store On Marchize
- How To Prevent DDOS Attack By Using Cloudflare
- How To Set Up Facebook Conversion Api
- How To Set Up Free Shipping From $Xx On Merchize
- How To Set Up Shipping Rates With Merchize
- How To Use Product Gallery
- Launching Upsell And Cross-Selling Features V1
- Set Up Payment In Merchize Setting - To Receive Payment From Customers
- Setting up the Menu Navigation Management feature for Store
- How to Generate Facebook Product Feed Files with Merchize Storefront
- Merchize Customer Management
- Connect Customily and Merchize for Product Personalization
- Integrate TeeinBlue and enjoy personalized fulfilment with Merchize
- Show all articles28 Collapse Articles
-
Features & Store Management
-
Other Functionalities & Settings
How To Import Order to Merchize Manually
🇻🇳 Click here for Vietnamese version.
This guide will show you how to import multiple orders at a time with a CSV file.
Step 1: Download the template file
- Go to Dashboard > Orders > CSV Import
- Select the suitable options and click the respective links to download the right template:
- Merchize: Regular orders
- Order with label (TikTok, Walmart): Orders from TikTok, Walmart, or any other options that require a shipping label.
- FBA: FBA orders
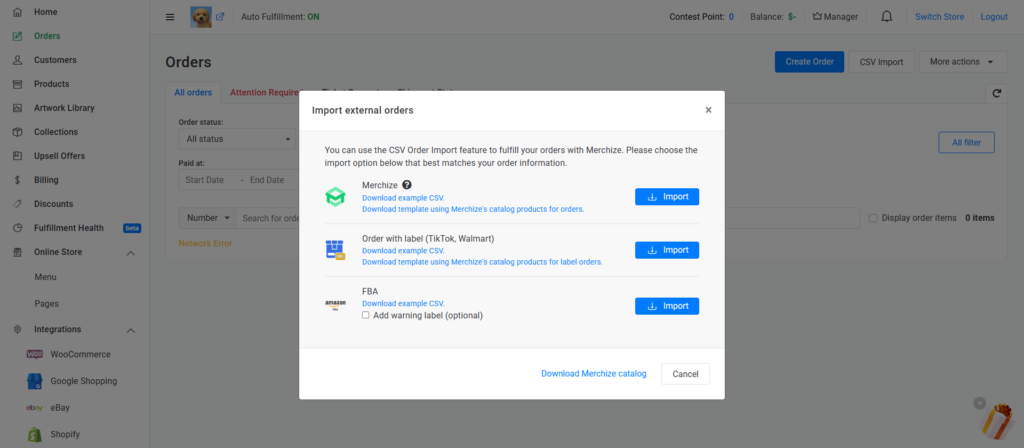
Note: For the Merchizem and Order with label import options, you have two template files:
- Download example CSV: Required specific details about each order’s product title, types, colors, and sizes to import orders.
- Download template using Merchize’s catalog products for orders: Required Merchize SKU to map your orders to the product from Merchize’s catalog precisely.
Step 2: Fill in the order information
Regular template (from Download example CSV options)
Here is a list of the data you need for the CSV import. You have to enter the information in the Required fields and can leave the Optional fields blank.
- mockUpFront (required)/ mockUpback/…: Link to the preview image.
Note: Your mockup files should be smaller than 4Mb. If your mockup file is larger than 4Mb, orders will fail to be imported.
- designFront/ designBack…: Link to the printable file. This should be in the form of a URL image link (PNG or JPEG file). You can use any cloud services (for example, Google Drive, Dropbox, etc). Please make sure you have adjusted your settings to allow us to gain access to the file (Or you can upload it later on the order details page).
- type (required): Example: T-shirt; Mug,…
- title (required): Example: Women Black T-shirt; …
- SKU (optional): For your reference only (Example: A unique identifier of the product).
- size (required): Size of the particular line item.
- color (required): Color of the particular line item (For products with no color base, for example, AOP products, you can add “White" to this field).
- orderNumber (required): set custom order numbers in Merchize stores.
- PrintingMethod (optional): Specify the preferred printing methods. This field is optional, and only applicable for products available with two printing options: DTG and DTF. You can only enter either “DTG" or “DTF" for each cell.
Notes:
- tag (optional): categorize orders using custom tags.
- quantity (required): Quantity of the particular line item.
- name, address1, city, state, country, postalCode (required): delivery recipient information.
- address2, phone, email, tax (optional): additional delivery recipient information.
- thankcard, brandkitA5clothes, brandkitA5, brandkitA6 (optional): Link to the Brand Kit design. Each column represents a Brand Kit option. Only provide Brand Kit design links for orders that apply Brand Kit.
Merchize SKU template (from Download template using Merchize’s catalog products for orders)
This template will require the following fields:
- orderNumber (required)
- merchizeSKU (required)
- quantity (required)
- quantity (required): Quantity of the particular line item.
- name, address1, city, state, country, postalCode (required): delivery recipient information.
- address2, phone, email, tax (optional): additional delivery recipient information.
- thankcard, brandkitA5clothes, brandkitA5, brandkitA6 (optional): Link to the Brand Kit design. Each column represents a Brand Kit option. Only provide Brand Kit design links for orders that apply Brand Kit.
Step 3: Import orders
- Go to Admin Dashboard > Orders > Click CSV Import
- Click “Import” button for the type of order you want to import (regular orders, orders with labels, or FBA orders)
- Select the CSV file you have completed using the available templates.
- Check the result.
Go to Order > More actions > Order import log to see if your order is successfully imported.

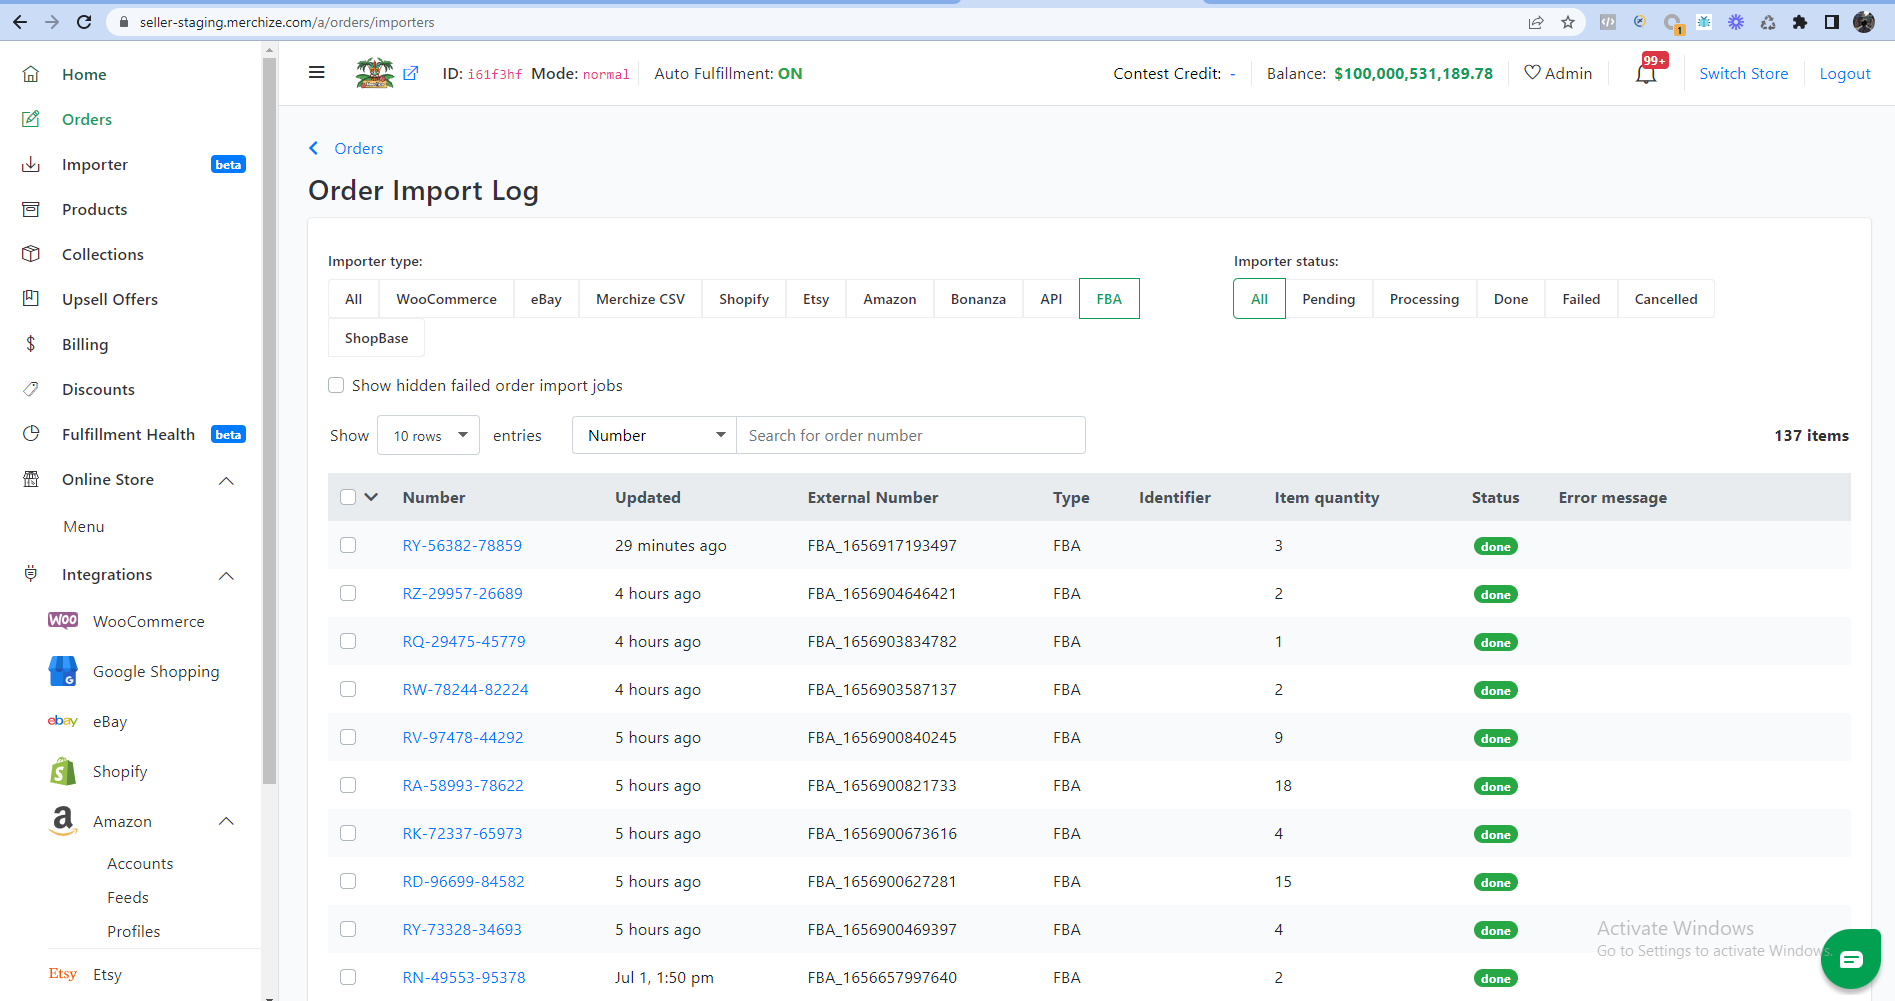
If you have an errored order, you will see it appear under the Failed tab.
Go to Orders > Click on the “Order number” to see the order details
