Merchize Shopify App: Seller Getting Started Guide
This guide walks you through everything you need to do as a new seller to get your Shopify store connected to Merchize and start fulfilling print-on-demand orders.
What You Will Need
- An active Shopify store with admin access (permission to install apps)
- A Merchize Fulfillment Platform account — create one free at merchize.com
- At least one product in your Shopify store that you want Merchize to fulfill
How It All Works
Merchize is a print-on-demand (POD) fulfillment platform. The Merchize Shopify App is the bridge that connects your Shopify storefront to the Merchize production and shipping system. Once connected, the end-to-end flow looks like this:
| 1 | Customer places an order on your Shopify store |
| 2 | The order automatically syncs to Merchize |
| 3 | Merchize identifies the correct product and artwork from your mapping |
| 4 | You confirm payment for production inside Merchize |
| 5 | The factory produces and ships the order |
| 6 | Tracking is automatically sent back to Shopify — your customer is notified |
| Key concept: Mapping
Mapping is the step that links each product variant in your Shopify store to the correct base product (blank) in the Merchize catalog, along with the print artwork. Mapping should be completed before Merchize can fulfill an order for that variant. |
Section 1 — Install and Connect
Step 1: Install the Merchize App
The Merchize app is available on the Shopify App Store. Installation takes about two minutes.
1. Open the Shopify App Store and search for Merchize, or go directly to: https://apps.shopify.com/merchize-print-on-demand
2. Click Install on the Merchize listing page. Shopify may ask you to log in to your store first.
3. Review the app permissions Shopify displays (access to products, orders, and fulfillment settings), then click Install app to confirm. These permissions are required for the app to work and are used only for fulfillment.
| Note
Shopify will open the Merchize app inside your Admin automatically after installation. If it does not open, go to Shopify Admin > Apps and click Merchize to open it manually. |
Step 2: Log In to Your Merchize Account
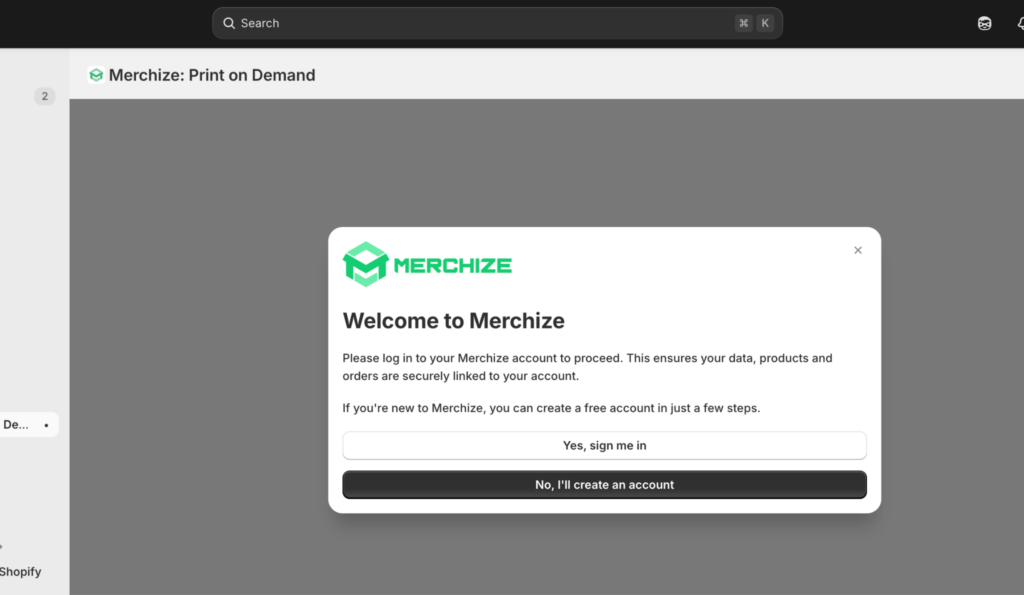
After installation, the Merchize app opens and displays a login screen.
- Already have a Merchize account? Click Yes, sign me in and enter your Merchize email and password.
- New to Merchize? Click No, I’ll create an account and follow the on-screen steps to register. You can return to this guide once your account is created.
Step 3: Connect Your Shopify Store to a Merchize Store
After logging in, you will see a list of stores (workspaces) in your Merchize account. This is the critical connection step — it determines where your products and orders will be routed inside Merchize.
1. Select the Merchize store you want to link to this Shopify store.
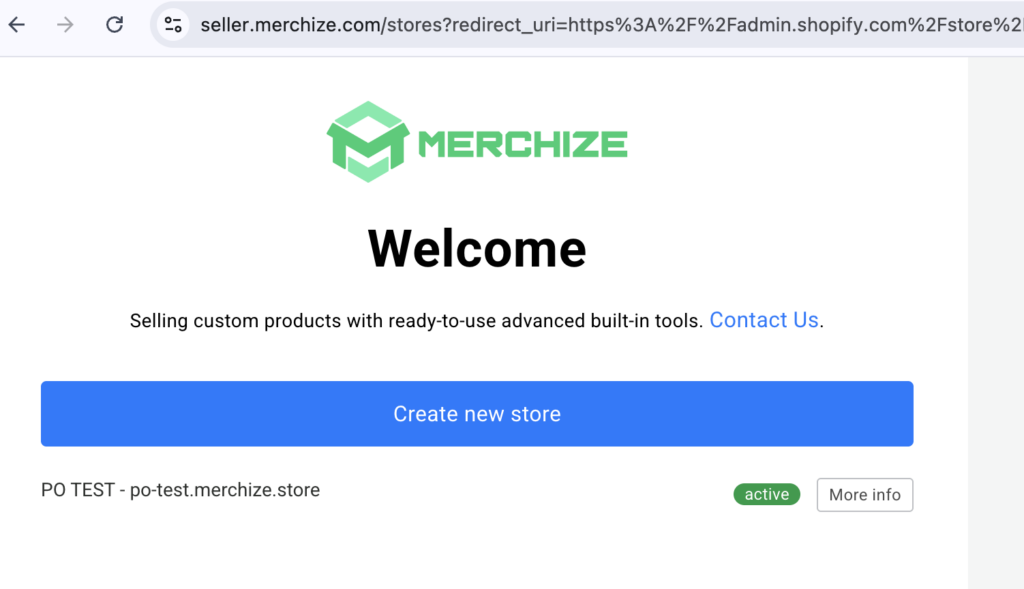
2. If you do not have a Merchize store yet, click Create new store and set one up.
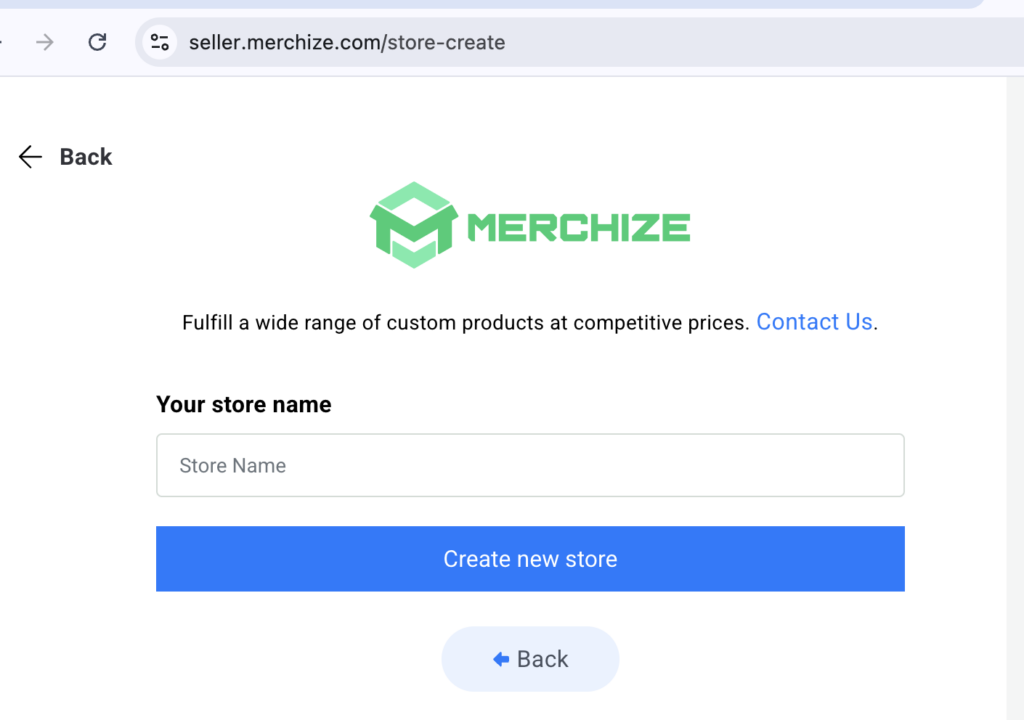
3. After selecting your store, you will be redirected to the Merchize App Dashboard inside Shopify Admin. The connection is now active.
| Important
Each Shopify store should connect to exactly one Merchize store. Connecting to the wrong store will cause products and orders to be routed incorrectly. If you need to change this later, go to Settings inside the app. |
Verify the Connection
Confirm the connection is working before moving on:
- Open the Merchize app from your Shopify Admin sidebar — the Dashboard should load without errors.
- Go to Settings inside the app to see your sync configuration options.
Connection complete. Move on to Section 2 to set up your products.
Section 2 — Product Sync (Recommended First Step)
Before Merchize can fulfill any order, it needs to know which products you sell and which print-ready artwork goes on each one. This is done by syncing your products and then mapping them. This section covers both steps.
Step 4: Configure Product Sync Settings
Product sync determines which of your Shopify products flow into Merchize for mapping and fulfillment.
1. In the Merchize app, go to Settings > Product Sync Settings.
2. Choose one of the three options:
Option 1 (Default) — Auto sync all products
Automatically syncs all products from your Shopify store and sets Merchize as your inventory location. This process may take up to 24 hours, depending on your product count and the API rate limits of your Shopify plan.
Option 2 — Auto sync ONLY products with Merchize location
Only products with at least one variant assigned to Merchize as the location in Shopify will be synced. Unassigned variants will be excluded. To enable syncing, go to your Shopify product and set Merchize as the location for the variants you want to sync.
Option 3 — Disable product sync
Products from Shopify will not be synced to Merchize. Use this only if you are managing product sync by other means.
3. Click Save. Merchize will begin pulling products from Shopify.
| Tip for mixed stores
Choose Option 2 if you sell both Merchize and non-Merchize products. Before syncing, go to Shopify Admin > Products, open each Merchize product, and set its variant fulfillment location to Merchize. Unassigned variants will be excluded automatically. |
Step 5: Add Products — Choose Your Path
There are two ways to get products into Merchize. Choose the one that fits your situation:
| Path A — Push from Merchize to Shopify | Path B — Sync existing Shopify products to Merchize |
|---|---|
| Start inside Merchize. Configure the product there, then publish it to Shopify. | Start inside Shopify. Pull existing Shopify listings into Merchize for mapping. |
| Best for new products you have not listed on Shopify yet. | Best if you already have products on Shopify and want Merchize to fulfill them. |
| The product arrives in Shopify already mapped and ready. | Products arrive in Merchize with Unmapped status — you complete mapping afterward. |
Path A: Push from Merchize to Shopify (New Products)
Use this path when you want to design a product inside Merchize and then publish it to your Shopify store.
1. In the Merchize app, click Catalogs to browse Merchize’s range of printable base products (t-shirts, hoodies, mugs, and more).
2. Click the base product you want to sell to open the product configuration page.
3. Configure your product:
- Select variants — choose the colors, sizes, and other options you want to offer.
- Upload your artwork — use the Mockup Editor to place your design, or upload a print-ready file.
- Set the product title, description, and price as needed.
4. Click Save, then Publish to Shopify. The product will be created in your Shopify store with all variants and images already populated.
5. Go to Shopify Admin > Products to verify the new product appears with the correct variants, images, and price.
6. In Shopify, open each variant of the product and confirm the fulfillment location is set to Merchize only.
| Result
Return to the Merchize app > Products. The product you published should show a status of Mapped — it is ready to fulfill orders immediately. |
Path B: Sync Existing Shopify Products to Merchize
Use this path if you already have products in Shopify and want Merchize to handle fulfillment for them.
1. If you chose Option B (sync by Merchize location) in Step 4, first go to Shopify Admin > Products and set the fulfillment location to Merchize for each variant you want synced.
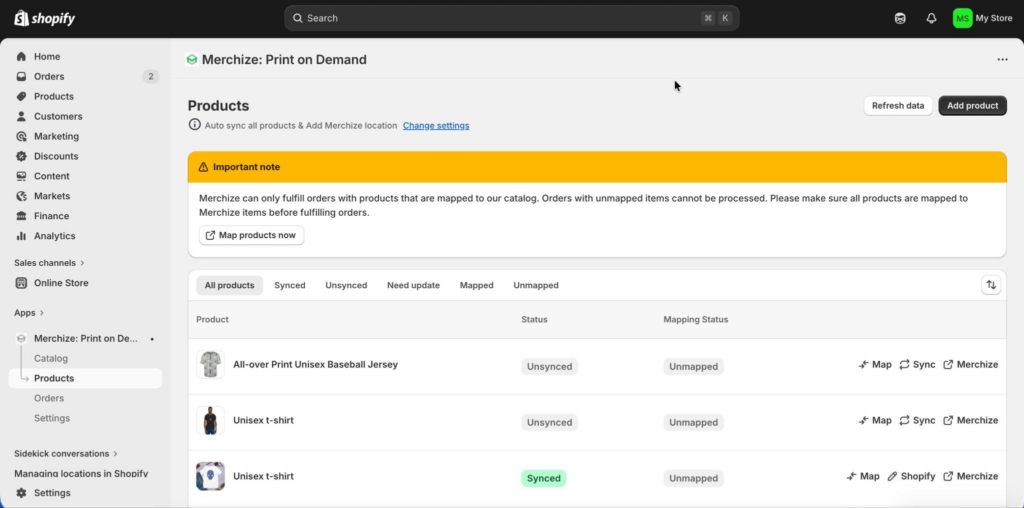
2. In the Merchize app, go to Products and click Refresh Data. Your Shopify products will appear in the list with a status of Unmapped.
3. Proceed to Step 6 to complete mapping for each product.
Step 6: Map Your Products
Mapping links each Shopify product variant to the correct Merchize catalog SKU and sets the print artwork. This must be done for every variant before Merchize can fulfill orders.
1. In the Merchize app, go to Products. Click on any product that shows status Unmapped.
2. Click Map to open the mapping interface.
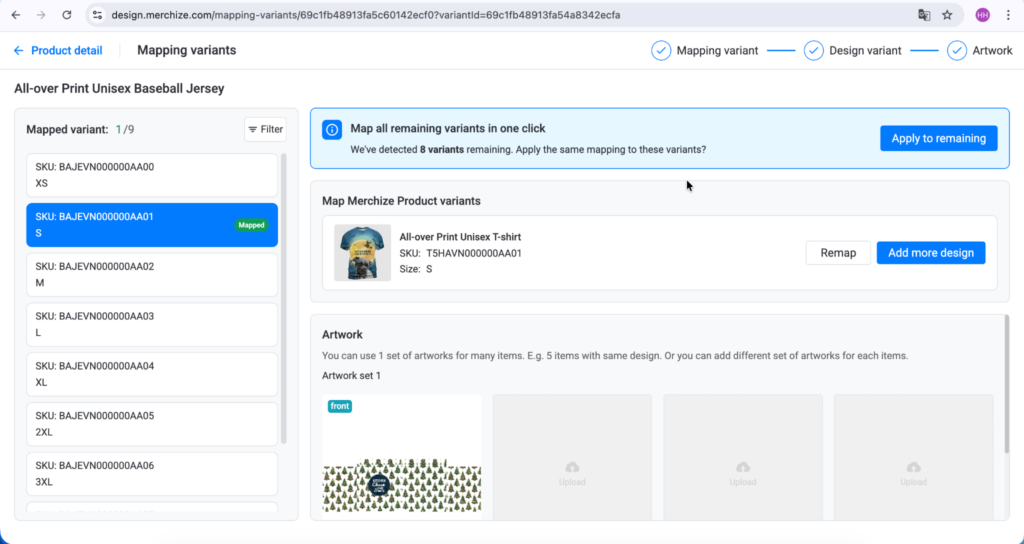
3. Select the matching base product from the Merchize catalog.
4. For each variant (size, color, etc.), confirm the correct Merchize SKU from the dropdown.
5. Upload or confirm the print-ready artwork using the Mockup Editor.
6. Click Save or Confirm Mapping. The product status changes to Mapped.
Repeat this for every product you want Merchize to fulfill.
| Important
Every variant must be mapped individually. If a product has many size and color combinations, work through them systematically. Orders for unmapped variants will not route to Merchize automatically. |
Product Status Reference
After syncing, each product in the Merchize app displays one of these statuses:
| Status | What it means | Action needed |
|---|---|---|
| Unmapped | The product has synced to Merchize but is not yet linked to any catalog SKU. | Complete mapping (Step 6). |
| Need Update | The product was edited in Shopify after the last sync — Merchize has stale data. | Click Sync on the product to pull in the latest Shopify data. |
| Mapped | Fully configured and ready. Orders for this product will process automatically. | None. The product is ready. |
| Error | A sync or setup issue occurred. | Click the product to read the error details, then retry or contact support. |
All products mapped? Move on to Section 3 to configure order sync.
Section 3 — Order Sync and Fulfillment
With products mapped, Merchize is ready to receive and process orders from your Shopify store. This section explains how orders flow from Shopify to Merchize, how to configure sync behavior, and how to pay for production.
Step 7: Configure Order Sync Settings
Go to Merchize app > Settings > Order Sync. There is one main toggle and, when enabled, a choice of which orders to sync:
- Automatically sync orders to Merchize (Recommended)
When enabled, orders are automatically synced to the Merchize platform. When disabled, no orders will be synced and all fulfillment requests must be made manually from the order detail page.
When auto-sync is ON, choose which orders to sync: - Orders with items assigned to Merchize location only (Default)
Only imports orders that contain at least one line item assigned to the Merchize fulfillment location in Shopify. Recommended for most stores. - Orders with all items assign to Merchize locations or Shop Location
Imports every paid order where all line items are assigned to a Merchize fulfillment location or your Shop Location.
How Orders Flow into Merchize
The order must be paid (Shopify payment status: Paid). Then, depending on your sub-option:
- Merchize location only: At least one line item must be assigned to the Merchize fulfillment location in Shopify.
- All items at Merchize/Shop Location: All line items must be assigned to a Merchize fulfillment location or the Shop Location.
If the expected order does not appear, see the troubleshooting section at the end of this guide.
| What happens on import — Mapping-First workflow
When an order arrives for a fully mapped product, it moves directly to the payment step in Merchize. No manual action is needed per order — you only need to pay for production. |
Step 8: Pay for Fulfillment
Merchize does not automatically charge your Shopify payment method for production costs. You must confirm payment inside Merchize for each order before it is sent to the factory.
- In the Merchize app, go to Orders.
- Open the order you want to send to production.
- Click Pay Now to confirm payment from your Merchize account balance.
- Once payment is confirmed, the order is released to the factory for production.
| Note
Make sure you have sufficient balance in your Merchize Fulfillment Platform account before orders start arriving. You can top up your balance inside the Merchize platform. |
Step 9: Tracking and Fulfillment Updates
Once Merchize ships the order, the entire tracking flow back to Shopify is automatic. You do not need to take any action.
| 1 | Factory ships the order and a carrier tracking number is generated |
| 2 | Merchize records the tracking number and pushes it to Shopify via the app |
| 3 | Shopify marks the order as Fulfilled |
| 4 | Your customer receives a shipping notification email (if Shopify notifications are enabled) |
You can view tracking information in two places:
- Shopify Admin > Orders > [your order] — tracking number appears in the fulfillment section once the order ships.
- Merchize app > Orders > [your order] — shows the tracking number and current shipment status.
Your store is now fully set up with the Product Sync First workflow. When customers order, products are fulfilled automatically.
Section 4 — Order-First Flow (Alternative Method)
What is the Order-First Workflow?
The Order-First workflow lets you skip the upfront product mapping (Steps 5 and 6 above) and instead map products and upload designs on a per-order basis as orders arrive. It is designed for sellers who want to start selling quickly, or who offer highly customized or one-off products.
| Product Sync First (Section 2) | Order-First (Alternative) |
|---|---|
| Set up all mappings and artwork before orders arrive. | Skip upfront mapping. Configure products order by order as they come in. |
| Orders process automatically — no manual steps per order. | Each new order requires manual review, mapping, and design upload before production. |
| Best for established catalogs and high-volume stores. | Best for new sellers starting quickly or stores with highly personalized products. |
| Orders arrive ready for payment and production. | Orders arrive in Attention Required status until you complete the setup for each one. |
How to Use the Order-First Workflow
If you choose this method, you do not need to complete Steps 5 and 6 from Section 2. Instead, follow these steps each time an order arrives.
Initial Setup (One-Time)
- Install and connect the app (Sections 1 and 2, Steps 1 to 4 still required).
- Configure Order Sync to Auto-Sync ON so orders appear in Merchize automatically.
- You do not need to map any products in advance. Proceed to selling.
When an Order Arrives
Every new order for an unmapped product will appear in Merchize app > Orders with the status Attention Required.
- Open the order in the Merchize app. You will see the Shopify order details and the line items awaiting configuration.
- Click Select Merchize product to choose the correct base product from the Merchize catalog that matches what was ordered.
- Click Upload Design to provide the print-ready file for that specific order.
- Review the configuration, then click Approve to send the order to production.
- Pay for production inside Merchize as normal (Pay Now).
| Tip
Once you map a product for the first time via an Order-First order, that mapping is saved. Future orders for the same product variant will no longer show as Attention Required — they will process automatically, just like the Mapping-First workflow. |
When to Switch from Order-First to Mapping-First
The Order-First workflow is most useful when you are just starting out or when every order is unique. As your store grows and your product catalog stabilizes, you will likely find it more efficient to switch to Mapping-First by proactively mapping your most popular products. You can mix both approaches — mapped products process automatically while unmapped ones still appear as Attention Required.
Quick Reference
Full Setup Checklist — Product Sync First
| Section 1 — Install and Connect | |
| ☐ | Install the Merchize app from the Shopify App Store |
| ☐ | Log in to your Merchize account (or create one) |
| ☐ | Connect your Shopify store to your Merchize store |
| Section 2 — Product Sync | |
| ☐ | Configure Product Sync Settings (all products, or Merchize location only) |
| ☐ | Add products via Catalogs (Path A) or sync existing Shopify products (Path B) |
| ☐ | Map every product variant to a Merchize catalog SKU with artwork |
| ☐ | Confirm all products show Mapped status in the Merchize app |
| Section 3 — Order Sync | |
| ☐ | Configure Order Sync Settings (Auto-Sync ON recommended) |
| ☐ | Top up Merchize account balance for production payments |
| ☐ | Place a test order to verify end-to-end flow |
| ☐ | Confirm tracking syncs back to Shopify when the order ships |
Troubleshooting: Orders Not Appearing in Merchize
If a paid Shopify order is not showing up in the Merchize app, check the following:
- Order payment status: The order must be marked as Paid in Shopify. Pending or partially paid orders are not imported.
- Fulfillment location: At least one line item must have its fulfillment location set to Merchize in Shopify.
- Auto-Sync setting: If Auto-Sync is OFF, go to Merchize app > Orders and manually import the order.
- Refresh the list: Click Refresh Data in the Orders tab to force an update.
Where to Get Help
- Merchandize Help Center — browse articles by topic for detailed guidance on each feature.
- Merchize Support — contact the support team from inside the Merchize app or via merchize.com if you encounter an issue that is not covered in this guide.