Categories
-
Ordering & Fulfillment
- Complete Guide: How to get started & set up fulfillment on Merchize
- Create a Manual Order in Merchize
- How To Import Order to Merchize Manually
- How To Create Products And Campaigns At Merchize
- Create & Import orders for FBA Fulfillment
- How to set up Merchize x Order Desk Integration
- F.A.Q About Fulfillment Procedure On Merchize
- General Introduction to Merchize Store Administration
- How To Add Sub Account To Your Store
- How To Connect PayPal Account To Pay Subscription & Transaction Fee Automatically.
- How To Contact Merchize Support
- Connect Merchize to Shopify API via a Custom App
- Brand Packaging Kit & Thank-you Card Features I Setup Guides
- Verify US Shipping Address
- How to cancel orders and items
- Set up custom fulfillment workflow with conditional logic
- How to Process TikTok Shop Orders With Merchize
- Instructions for Update Artwork
- How to Bulk Import Artwork via CSV and API
- How to Track and Manage Packages in Shipment Status
- Guide to Order Tracking and Management on Orders page
- How to Process Walmart Orders with Merchize
- Show all articles7 Collapse Articles
-
Integrations
- Connect Merchize to Shopify API via a Custom App
- How to set up Merchize x Order Desk Integration
- Create & Sync Products from Merchize to Shopify
- Create & Sync Products from Merchize to Etsy
- Create & Sync Products from Merchize to WooCommerce
- Create & Sync Products from Merchize to Ebay
- Amazon Integration: Connect & Fulfill Orders Automatically
- eBay Integration: Connect & Fulfill Orders Automatically
- How to configure and sync your Etsy orders to Merchize?
- Google Shopping Custom Label User Guide
- Guideline To Integrate Email Marketing Klaviyo Solution On Your Merchize Store.
- How to sync orders automatically and fulfill from Shopify
- Integrate & Fulfill Orders From ShopBase
- Integrate WooCommerce Fulfill with Merchize
- Integration with Google Shopping
- Connect Customily and Merchize for Product Personalization
- Integrate TeeinBlue and enjoy personalized fulfilment with Merchize
- Connect Merchize to Shopify API via a Custom App With Client ID and Secret ID
- Show all articles3 Collapse Articles
-
Print & Mockup Guidelines
-
Payment & Billing
- How to take payments with PayPal
- Guideline to Merchize Payment
- General Introduction to Merchize Store Administration
- How To Connect PayPal Account To Pay Subscription & Transaction Fee Automatically.
- Set Up Payment In Merchize Setting - To Receive Payment From Customers
- F.A.Q About Fulfillment Procedure On Merchize
- How To Contact Merchize Support
- Account Suspension and Restoration
- How to take payments with Payoneer
- How to take payments with LianLian
-
Delivery & Shipping
-
Storefront Setup
- How to create a storefront on Merchize and configure domain to connect to Merchize
- Add WWW To Your Store
- Bulk Import Products
- Bulk Add Tags For Multiple Products (Bulk Add Tags) Guideline
- General Introduction to Merchize Store Administration
- General Settings In Settings > General of Merchize
- Google Shopping Custom Label User Guide
- Guideline To Integrate Email Marketing Klaviyo Solution On Your Merchize Store.
- How To Add Product Review
- How To Add Promotion Bar For Your Storefront
- How To Add Sub Account To Your Store
- How To Bulk Edit Description
- How To Connect PayPal Account To Pay Subscription & Transaction Fee Automatically.
- How To Contact Merchize Support
- How To Create and Edit Pages on Merchize Storefront
- How To Create Products And Campaigns At Merchize
- How To Create Free Shipping Code For Built-in Payment Store
- How To Edit Store Homepage on Merchize
- How To Fix The Price of a Series of Products
- How To Get Bing Site Verification Code
- How To Get Facebook Pixel ID
- How To Get Google Analytics Tracking ID
- How To Get Google Conversion Tracking Code
- How To Get Google Site Verification Code
- How To Get Google Tag Manager Container ID
- How To Get Store Sitemap Link
- How To Import Bulk Of Products From Shopify To Your Merchize Store
- How To Insert Code Into GTM To Change CSS Store
- How To Install Multi-pixel Using GTM
- How To Integrate The Feature Of Adding Multiple Facebook Pixel ID
- How To Manage And Create New Discount For Store On Marchize
- How To Prevent DDOS Attack By Using Cloudflare
- How To Set Up Facebook Conversion Api
- How To Set Up Free Shipping From $Xx On Merchize
- How To Set Up Shipping Rates With Merchize
- How To Use Product Gallery
- Launching Upsell And Cross-Selling Features V1
- Set Up Payment In Merchize Setting - To Receive Payment From Customers
- Setting up the Menu Navigation Management feature for Store
- How to Generate Facebook Product Feed Files with Merchize Storefront
- Merchize Customer Management
- Connect Customily and Merchize for Product Personalization
- Integrate TeeinBlue and enjoy personalized fulfilment with Merchize
- Show all articles28 Collapse Articles
-
Features & Store Management
-
Other Functionalities & Settings
Set up custom fulfillment workflow with conditional logic
When assigning how your products need to be fulfilled at Merchize, now you can set up conditional fulfillment automatically.
This new feature gives you a streamlined workflow to push order fulfillment requests to our fulfillment system that satisfy specific rules.
This configuration just affects your fulfillment workflow if the orders are still in “Validating” & “Schedule“ process.
See more about:
The order detail page will show: Orders & items details, customer information, packing, production processing, and shipping.
The stages of order fulfillment include the following processes:
1. Receiving: After the order is placed, created, imported or synced from other channels, it has to go to your Merchize order management dashboard. |
2. Fulfillment Request Processing:
Order Status Column Descriptions: Artwork:
Make sure to add the print-ready files associated with each item you want to fulfill. Address: This feature helps Sellers confirm if there is a problem with the US shipping address through the Smartystreets tool, thereby reducing the rate of returns, shipping to the wrong address, etc. See the details here Payment: Display “paid" or “pending" payment transactions, the orders that not directly placed in the Merchize storefront will be automatically marked as “paid”. To Fulfillment: At this stage, it may take about 5 minutes (As per the default settings) to send the order (that match default approval conditions: Address has been marked as “US valid", “Others" or “Buyer confirmed" & Artwork “Completed“) from your store to Merchize fulfillment system. (You can choose your preferred time by changing the options in the Fulfillment setting page).
|
3. Order Fulfillment Processing Understand the Order Fulfillment Status & Progress:
When your order request has been sent to our fulfillment system The status under ‘To Fulfillment’’ column will change to “Pushed” , and the status ‘Fulfillment’’ column should be updated to “Unfulfilled”. When we receive your order, then process & invoice for your orders. If your balance has enough funds available and there are no issues, the next status should be “Fulfilled” (whole order) or “Partial" (selected items). If the order is “on hold”, indicates that the order couldn’t be sent to production due to an issue. (We may occasionally place your order on hold due to lack of balance, print file issues, product confirmation and similar.) If the order is “hold”, indicates that you took the action “pause order” (If you want to resume process you can click the “resume order” in the upper right-hand corner of the order information section)
After production begins, the order progress will display an “In Production” status, and the tracking number of the package will be generated and should appear in the order details. The production time may vary, but usually takes between 2-7 business days.
After the order is produced, then the shipping label is printed & your package is ready to ship. At this point the status will change to “Shipment started”. |
Default Workflow:
- Automatic fulfillment: when you Turn on “Enable” Fulfillment By Merchize feature (in the Setting > Fulfillment page). All the orders placed, created, imported or synced in your Merchize account will be automatically pushed to our fulfillment system, based on default approval conditions: Address (has statuses of “US valid", “Others" or “Buyer confirmed" ) & Artwork (“Completed").
- Manual fulfillment: you will manually request orders and items to be fulfilled >> Go to Manual Fulfillment section to follow the detailed instructions.
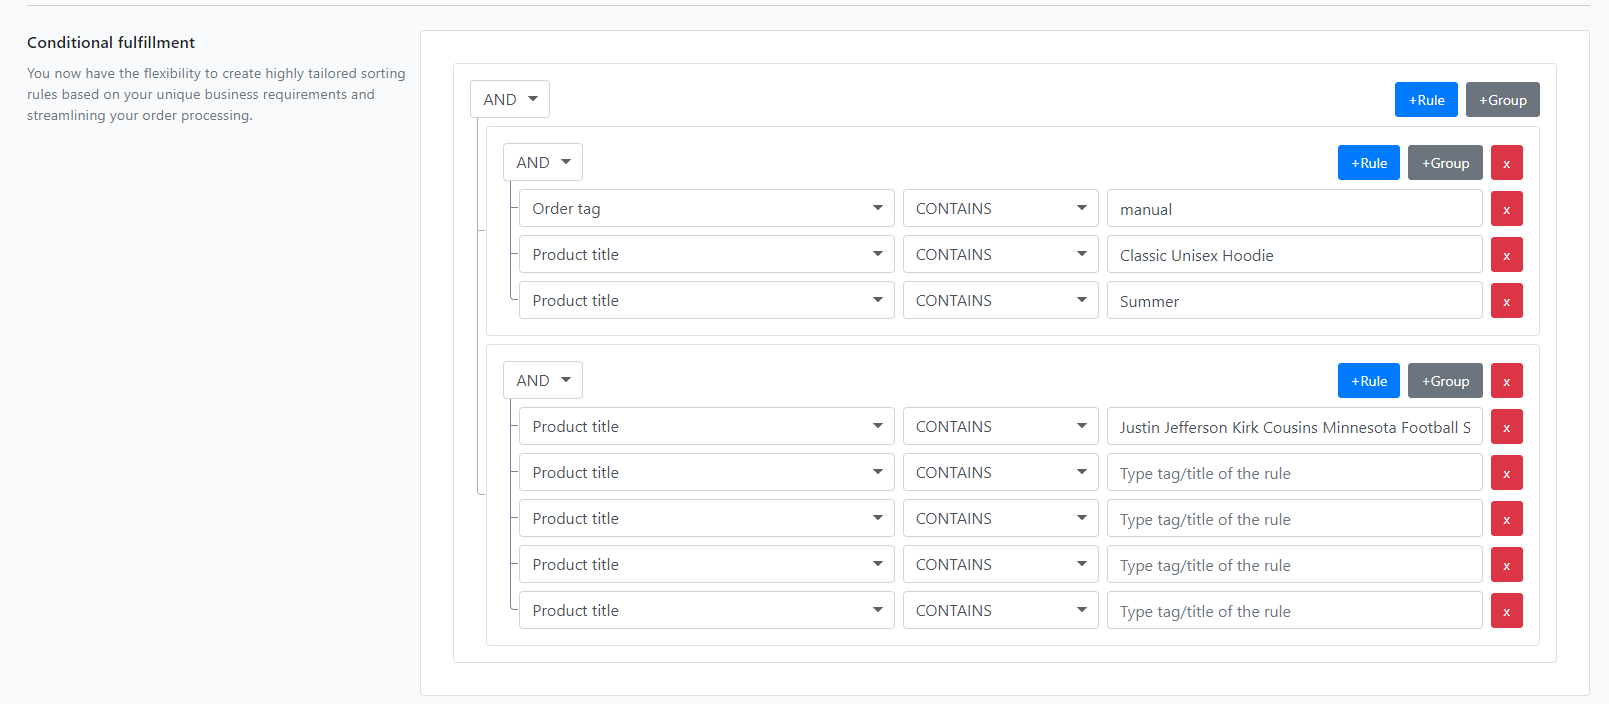
Create your custom workflow
Begin by navigating to Setting > Fulfillment > Conditional fulfillment in your Merchize Admin.
When creating fulfillment rules, you’ll want to try to ensure that your rule set accommodates all possible order scenarios. It’s extremely important that any overlap between rules is intentional so that the wrong orders will be sent to our fulfillment system.
1. First, you can choose the first rule this can be one of two options:
- AND – will only be true if all the rules are true
- OR – will be true if any of the rules are true
After you have selected this type of rule, all subsequent rules must either all be AND or all be OR.
You can add multiple conditions or subconditions: up to 10, with the use of the AND and OR options.
“OR" conditional logic rules are applied in the top to bottom order.
2. You will be able to establish fulfillment rules based on Product Title, Product tag, and Order Tag.
Product Title
You can edit the Products/Items from the Order Details Page (click to the eye icon besides the item title)
Product Tag
Order Tag
3. Select the operation to perform between
- contains
- not contains
4. Then provide a “Value" you wish to use. Text values are supported.
- To add another row to your condition, click add +Rules
- To add a group with subconditions, click add +Groups
You can also make changes and delete x Rules and Groups.
Click Save when you’re finished.
We highly recommend you test out your Conditional Logic rules by first saving your rules, then running with your test orders.
Important Notes
With the conditional workflow, it may take about 5 minutes – as per the default settings (*) to send the order from your store to the Merchize fulfillment system that matches these approval conditions:
- The order is still in the “Validating” & “Schedule“ process.
- The order includes address that has been marked as “US valid", “Others" or “Buyer confirmed“.
- Custom conditional rules are applied.
(*) You can choose your preferred time to send a fulfillment request by changing the options in the Fulfillment setting page.
Push Order Fulfillment manually
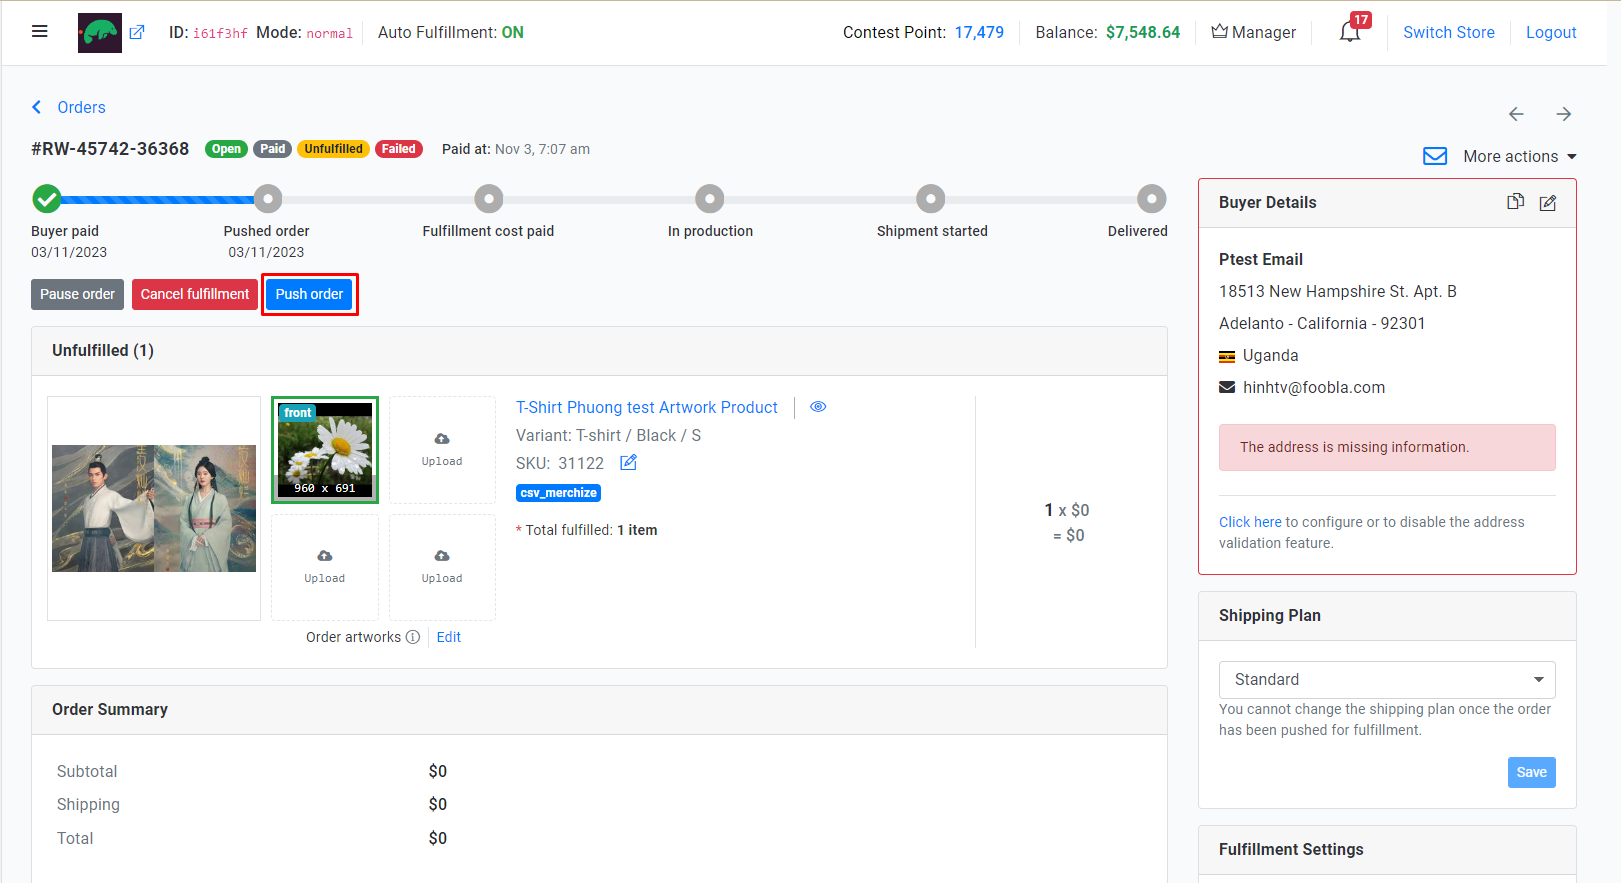
Push single order
Go to Orders page
Click the “Push order" button, after confirming, the order will be sent to our fulfillment system immediately.
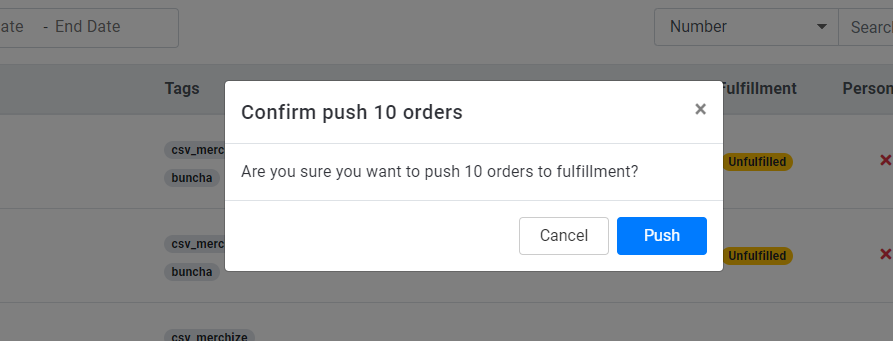
Push orders in bulk
Go to Orders page
You can push orders to fulfillment in bulk by filtering and selecting multiple orders at once (using the checkbox on the left side of the order list column) and then clicking the “Push Orders" button in the dropdown Action menu.
Complete the confirmation when the pop-up dialog appears.
If your request has been disapproved, you will receive email and notification in the upper-right corner.
Important Notes:
With the manual push workflow, the order must follow these approval conditions:
- The order is still in the “Validating” & “Schedule“ process.
- The order includes addresses that have been marked as “US valid", “Others" or “Buyer confirmed“. (This feature has the default ‘Enable’ setting, you can disable it here, in the “Address Validation" section)
- The order has been “paid”.
- Your order has added artworks (printable files).
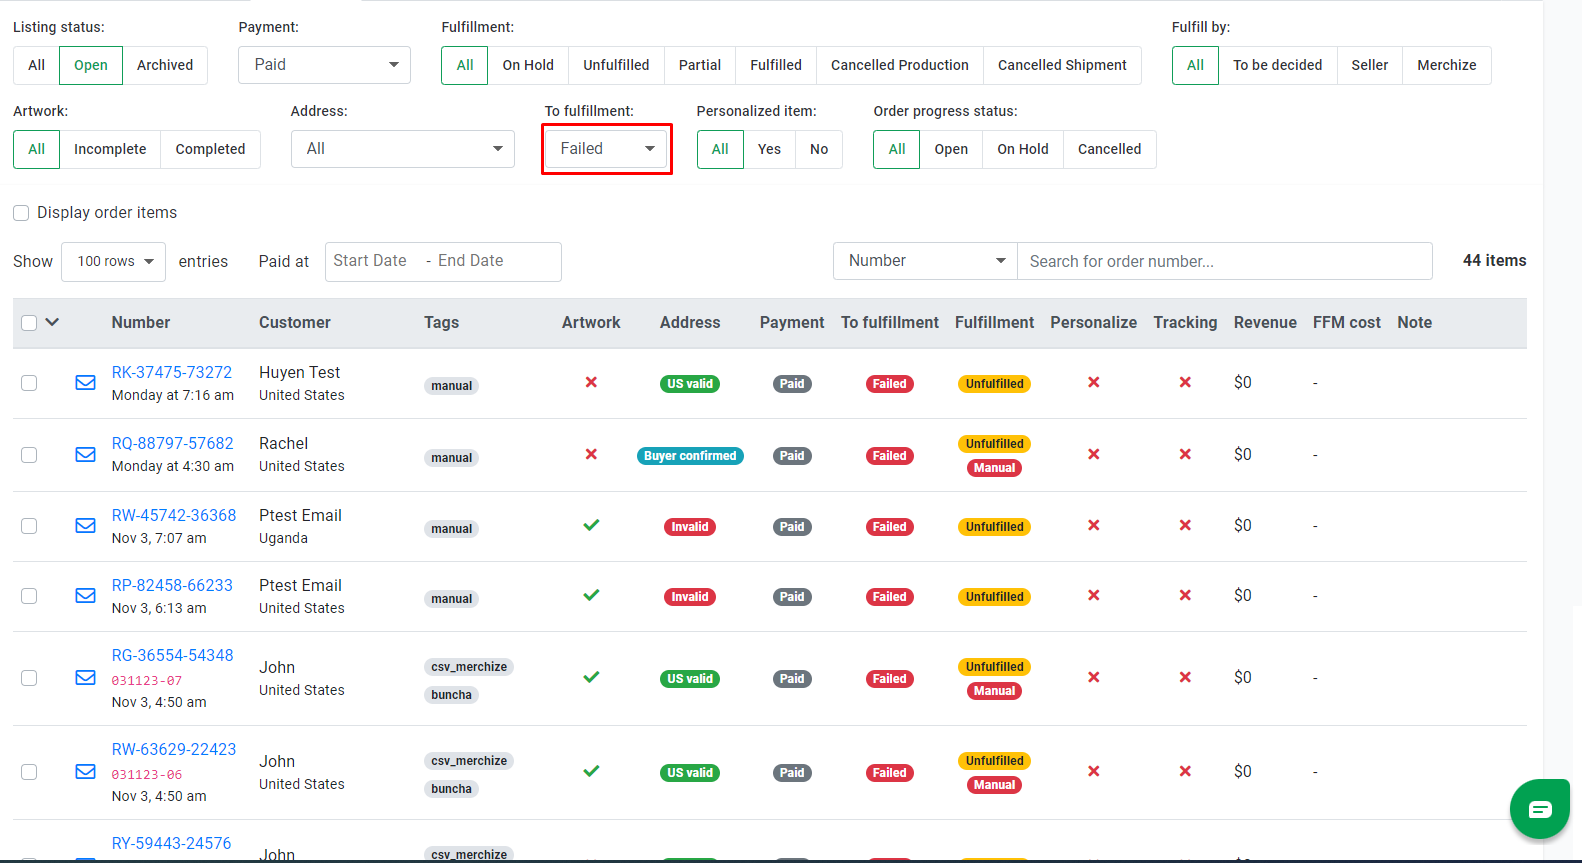
After a pushing job has been processed, you can see the Pushing Status in the “To Fulfillment” column.
The orders in gray “pushed” are those where all the data has been pushed successfully. In red “failed”, there is an error that occurred. (to view all the “Failed" pushing orders, go to the filters on the top section of the Order table, and select the “Failed" status in the To Fulfillment dropdown).


