Categories
-
Ordering & Fulfillment
- Complete Guide: How to get started & set up fulfillment on Merchize
- Create a Manual Order in Merchize
- How To Import Order to Merchize Manually
- How To Create Products And Campaigns At Merchize
- Create & Import orders for FBA Fulfillment
- How to set up Merchize x Order Desk Integration
- F.A.Q About Fulfillment Procedure On Merchize
- General Introduction to Merchize Store Administration
- How To Add Sub Account To Your Store
- How To Connect PayPal Account To Pay Subscription & Transaction Fee Automatically.
- How To Contact Merchize Support
- Connect Merchize to Shopify API via a Custom App
- Brand Packaging Kit & Thank-you Card Features I Setup Guides
- Verify US Shipping Address
- How to cancel orders and items
- Set up custom fulfillment workflow with conditional logic
- How to Process TikTok Shop Orders With Merchize
- Instructions for Update Artwork
- How to Bulk Import Artwork via CSV and API
- How to Track and Manage Packages in Shipment Status
- Guide to Order Tracking and Management on Orders page
- How to Process Walmart Orders with Merchize
- Show all articles7 Collapse Articles
-
Integrations
- Connect Merchize to Shopify API via a Custom App
- How to set up Merchize x Order Desk Integration
- Create & Sync Products from Merchize to Shopify
- Create & Sync Products from Merchize to Etsy
- Create & Sync Products from Merchize to WooCommerce
- Create & Sync Products from Merchize to Ebay
- Amazon Integration: Connect & Fulfill Orders Automatically
- eBay Integration: Connect & Fulfill Orders Automatically
- How to configure and sync your Etsy orders to Merchize?
- Google Shopping Custom Label User Guide
- Guideline To Integrate Email Marketing Klaviyo Solution On Your Merchize Store.
- How to sync orders automatically and fulfill from Shopify
- Integrate & Fulfill Orders From ShopBase
- Integrate WooCommerce Fulfill with Merchize
- Integration with Google Shopping
- Connect Customily and Merchize for Product Personalization
- Integrate TeeinBlue and enjoy personalized fulfilment with Merchize
- Connect Merchize to Shopify API via a Custom App With Client ID and Secret ID
- Show all articles3 Collapse Articles
-
Print & Mockup Guidelines
-
Payment & Billing
- How to take payments with PayPal
- Guideline to Merchize Payment
- General Introduction to Merchize Store Administration
- How To Connect PayPal Account To Pay Subscription & Transaction Fee Automatically.
- Set Up Payment In Merchize Setting - To Receive Payment From Customers
- F.A.Q About Fulfillment Procedure On Merchize
- How To Contact Merchize Support
- Account Suspension and Restoration
- How to take payments with Payoneer
- How to take payments with LianLian
-
Delivery & Shipping
-
Storefront Setup
- How to create a storefront on Merchize and configure domain to connect to Merchize
- Add WWW To Your Store
- Bulk Import Products
- Bulk Add Tags For Multiple Products (Bulk Add Tags) Guideline
- General Introduction to Merchize Store Administration
- General Settings In Settings > General of Merchize
- Google Shopping Custom Label User Guide
- Guideline To Integrate Email Marketing Klaviyo Solution On Your Merchize Store.
- How To Add Product Review
- How To Add Promotion Bar For Your Storefront
- How To Add Sub Account To Your Store
- How To Bulk Edit Description
- How To Connect PayPal Account To Pay Subscription & Transaction Fee Automatically.
- How To Contact Merchize Support
- How To Create and Edit Pages on Merchize Storefront
- How To Create Products And Campaigns At Merchize
- How To Create Free Shipping Code For Built-in Payment Store
- How To Edit Store Homepage on Merchize
- How To Fix The Price of a Series of Products
- How To Get Bing Site Verification Code
- How To Get Facebook Pixel ID
- How To Get Google Analytics Tracking ID
- How To Get Google Conversion Tracking Code
- How To Get Google Site Verification Code
- How To Get Google Tag Manager Container ID
- How To Get Store Sitemap Link
- How To Import Bulk Of Products From Shopify To Your Merchize Store
- How To Insert Code Into GTM To Change CSS Store
- How To Install Multi-pixel Using GTM
- How To Integrate The Feature Of Adding Multiple Facebook Pixel ID
- How To Manage And Create New Discount For Store On Marchize
- How To Prevent DDOS Attack By Using Cloudflare
- How To Set Up Facebook Conversion Api
- How To Set Up Free Shipping From $Xx On Merchize
- How To Set Up Shipping Rates With Merchize
- How To Use Product Gallery
- Launching Upsell And Cross-Selling Features V1
- Set Up Payment In Merchize Setting - To Receive Payment From Customers
- Setting up the Menu Navigation Management feature for Store
- How to Generate Facebook Product Feed Files with Merchize Storefront
- Merchize Customer Management
- Connect Customily and Merchize for Product Personalization
- Integrate TeeinBlue and enjoy personalized fulfilment with Merchize
- Show all articles28 Collapse Articles
-
Features & Store Management
-
Other Functionalities & Settings
Create & Sync Products from Merchize to Shopify
Integrating your Shopify store and Merchize lets you synchronize products and orders instantly between both platforms. It lets you manage your store with ease and productivity even though you are selling on many Shopify Stores.
.
Set up Integration
⚠ Important: From December 2022, new Merchize users will connect to Shopify API via a custom app and use the Access Token for authenticating with the Shopify Admin API.
Follow this detailed instruction for Connecting Merchize to Shopify API via a Custom App
You can see our detailed step-by-step video guide here:
Quick Overview of The Listing Management
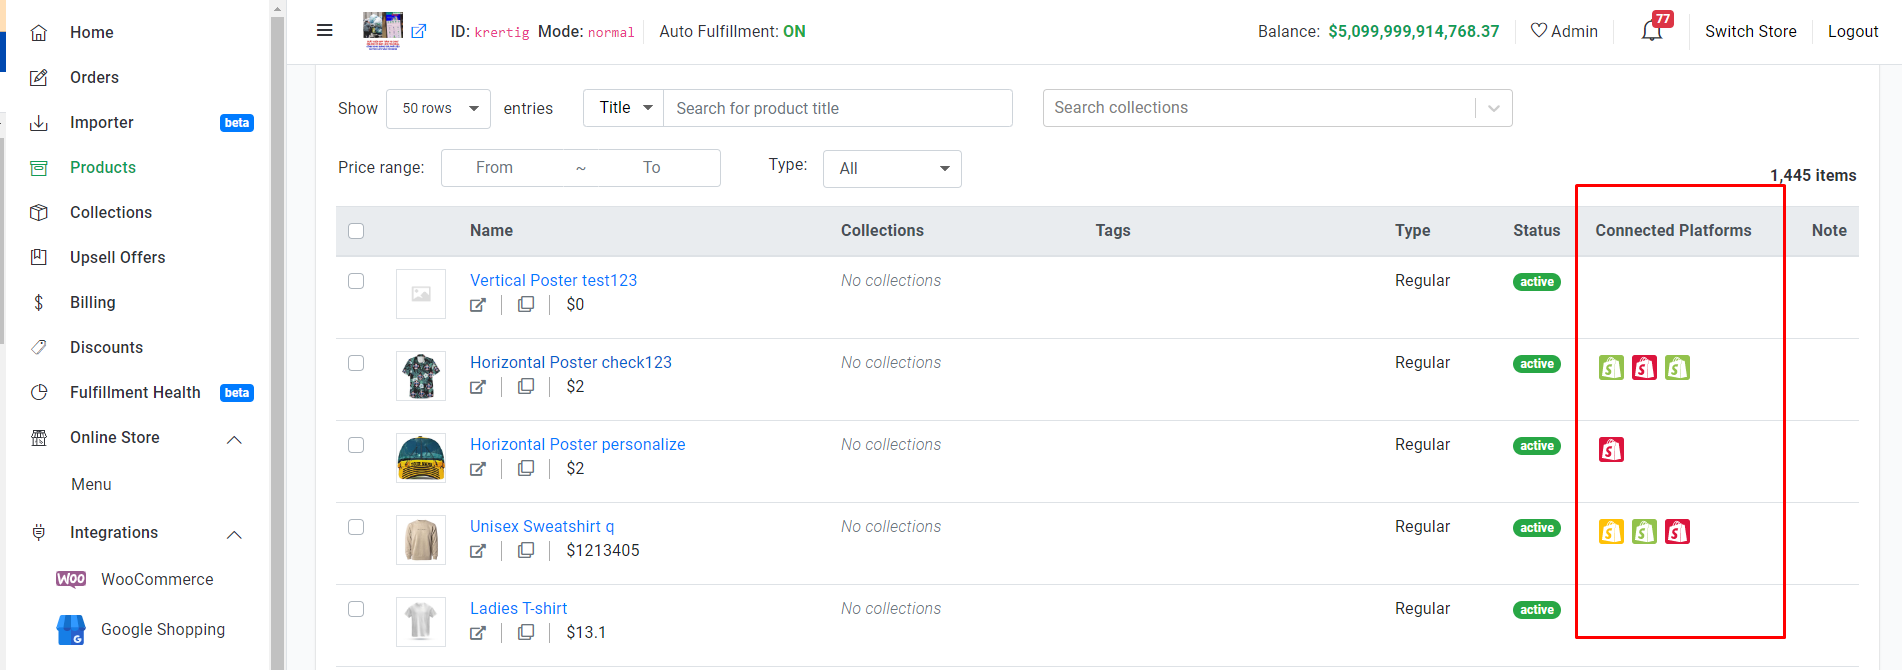
You will notice the Connected Platforms column in your Product Manager.
Here, you can view all integrated sale channels and stores. The listing status of the product for each store will be color-coded and shown under the “Connected Platform” column
Store Icon Reference (with Color Variations) | Status |
| Indicate the products are completely synced and published on Shopify. | |
| Your products will change to “Edited", which means the data has been changed, but it hasn’t been pushed sync to your sales channel. | |
| Your listing is not yet synced or in a (temporary) processing state. | |
| Display errors in processing. These errors may be returned by each channel according to their listing rules. |
You can hover on each icon to get the name of your store.
List product individually
Make sure that you are in the Product page.
- Create your product listing with a title, variants, description, price, and other pertinent information.
- Note that there are some technical limitations for new listing on Shopify:
- The single product listed with a quantity of options/attributes not higher than 3, and variants not higher than 100.
- You can associate only one image with one product variant. (However, there are variant images apps and themes that allow you to assign multiple images per variant option.)
- NOTE: If you are trying to build your products on Merchize for the first time, please refer to this guide: Create Single Regular Product or Use Mockup Generator to Create Campaign of our Help Center.
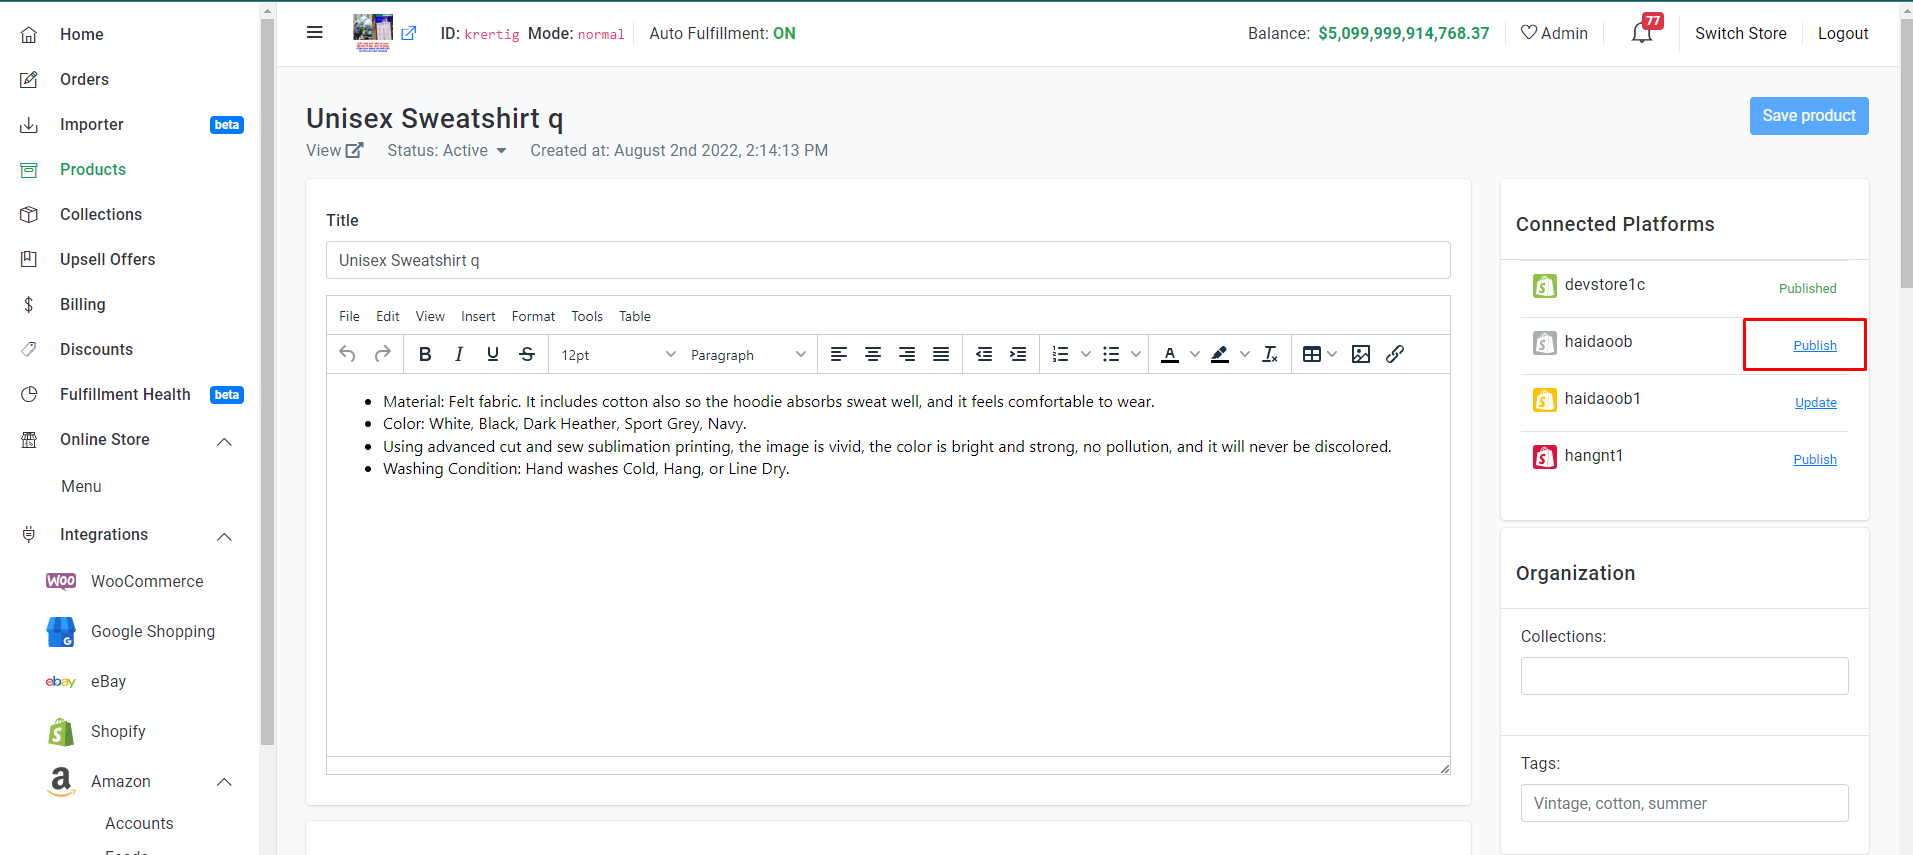
- When you finish creating products, at Connected Platforms section in the right panel select the store that you wish to list by clicking the “Publish” button to the right (or Save Product for further use)
- The product is ready to sell and is available to customers on the online store.
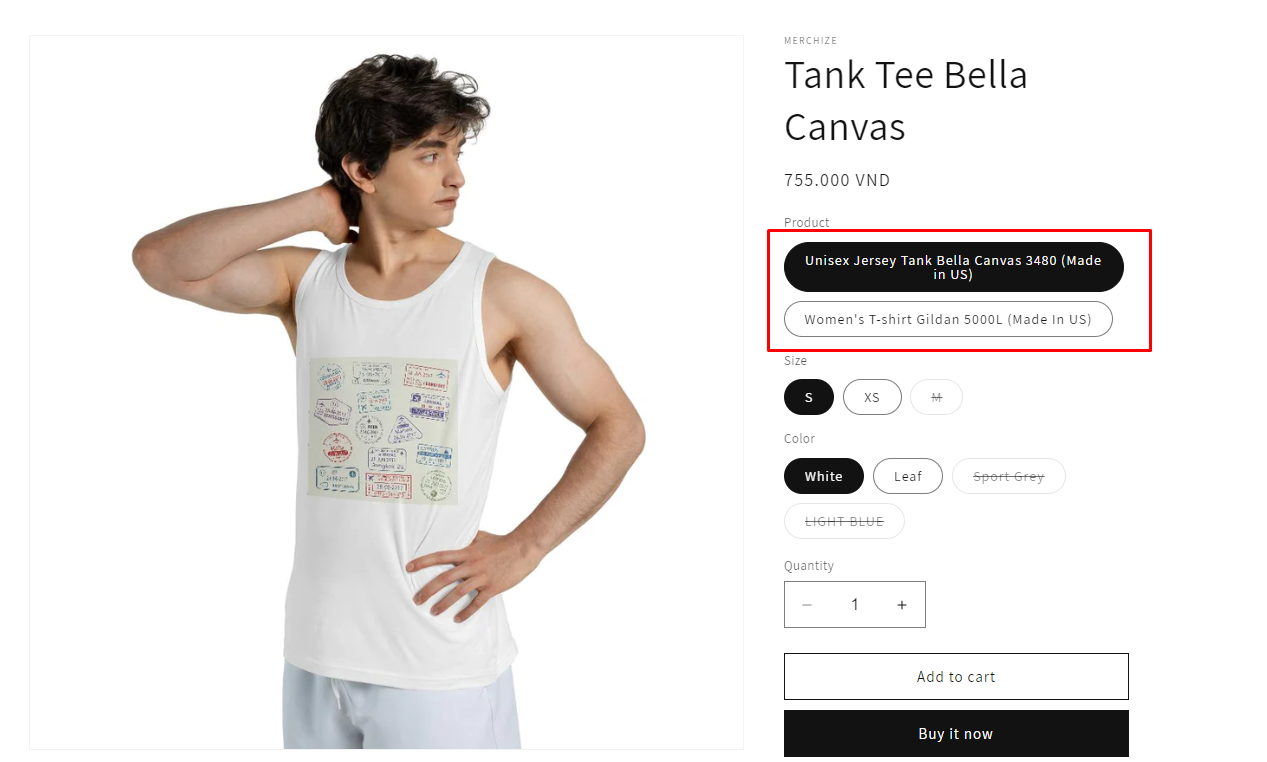
Note that: When using the ‘Create Campaign‘ function to generate a Merchize product link with multiple product type attributes, Merchize will preserve the exact variations for each attribute as they were originally displayed and set up during the synchronization process with your Shopify store.
Example:
List products in bulk
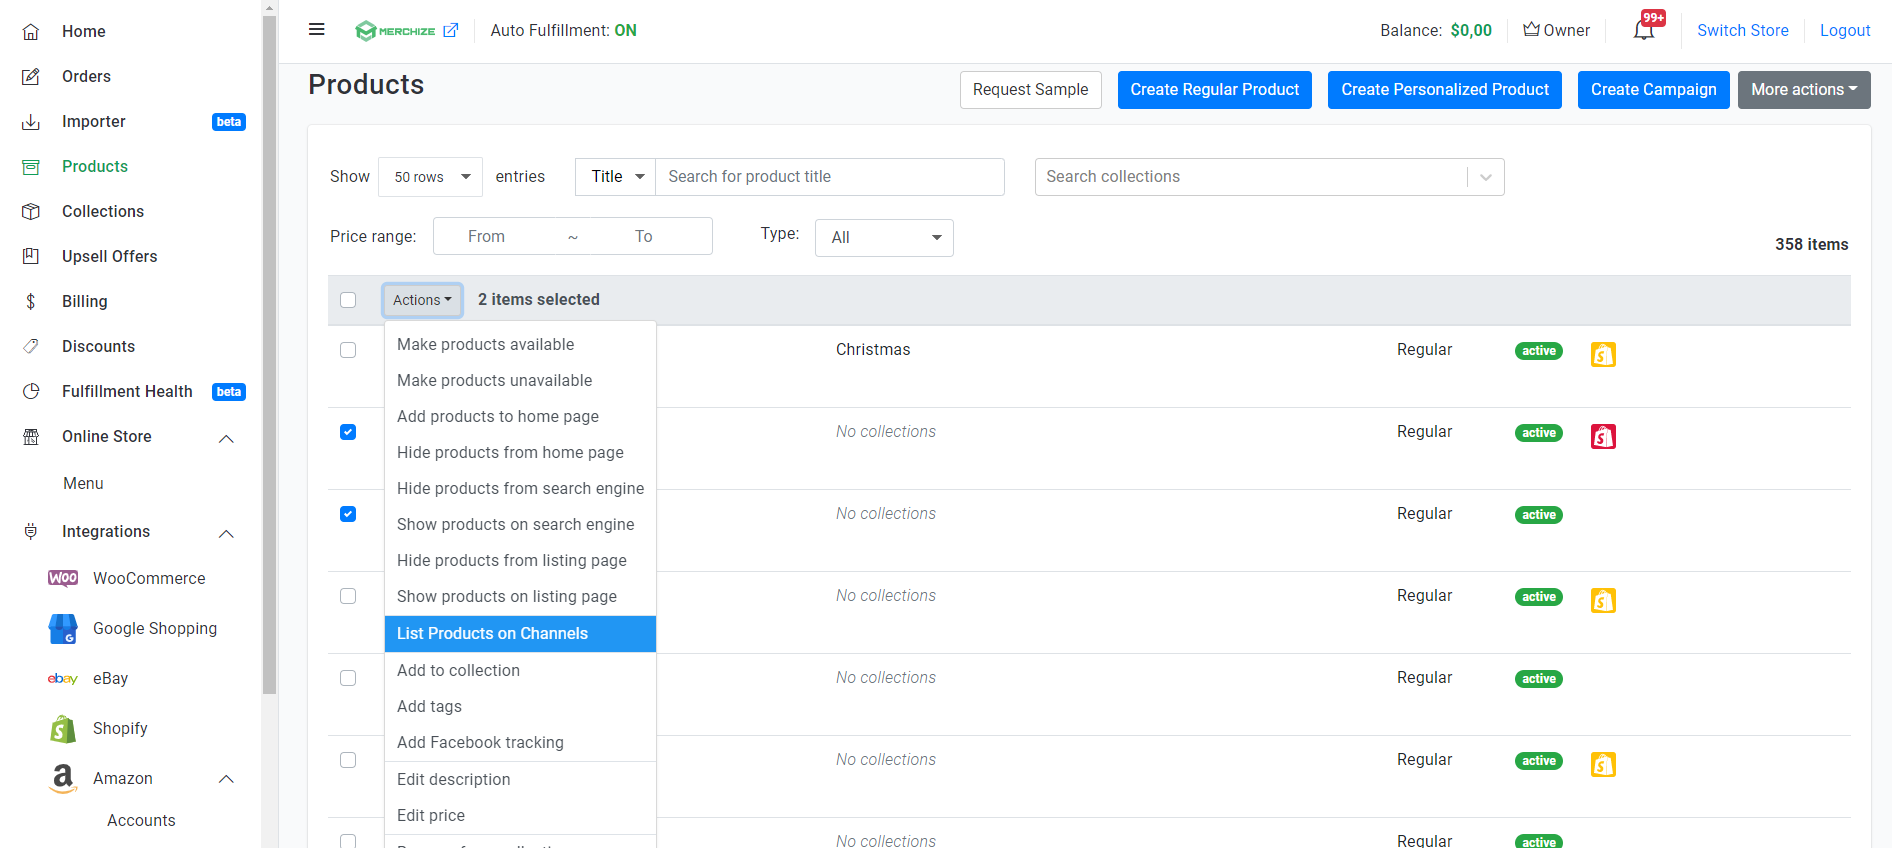
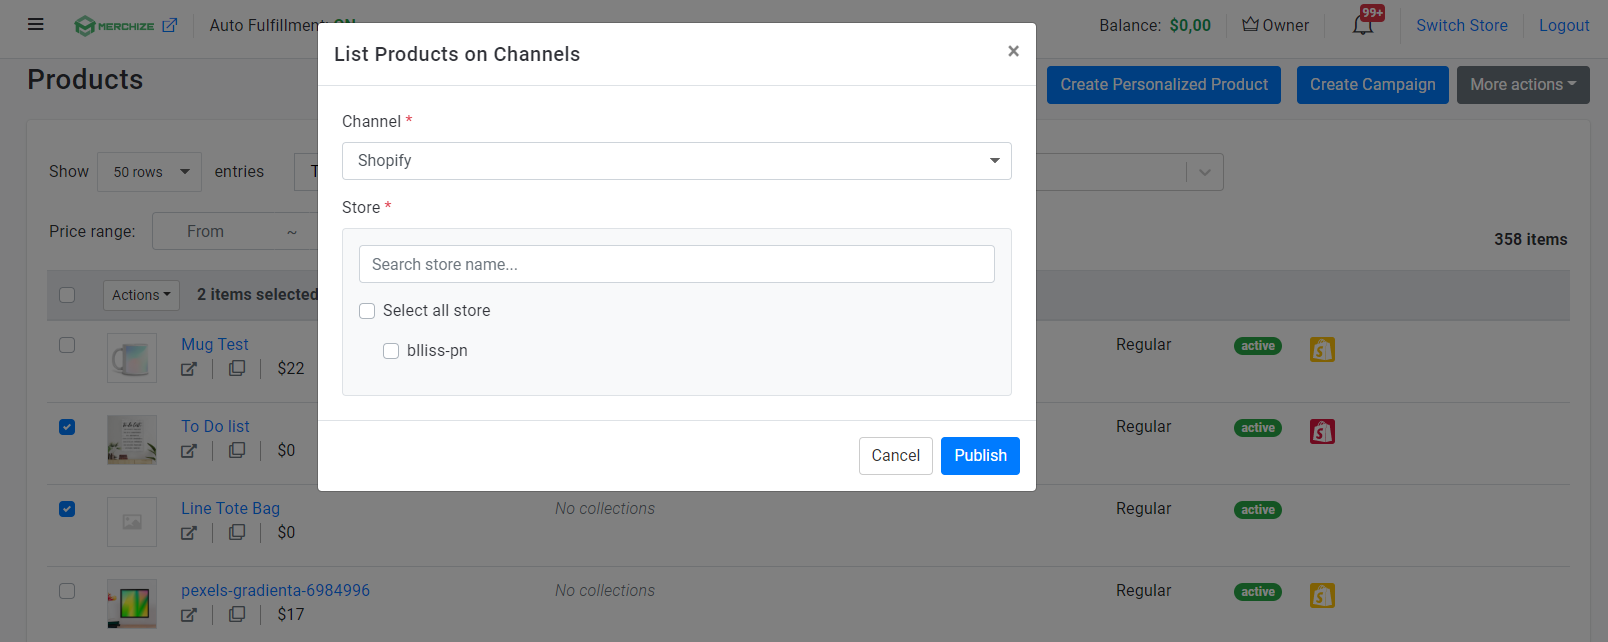
You can push listings in bulk by selecting multiple products at once and clicking the “List Products on Channels" button in the dropdown “Action" menu.
In the pop-up window, you will select integrated channel and stores you wish these products listed.
Now simply click “Publish“, and your bulk listing will go live on Shopify storefront.
You can “CANCEL" to close the window.
Note that processing times may vary depends on the number of listings you have chosen to publish at once.
Edit & update your listings
In the product detail page you can update your listing information manually (product title, images, description, price,..).
You can also either change description, increase or decrease the prices by a percentage or a fixed amount once at a time (Remember, this feature is now only viable to all variants of one product or multiple specific products.)
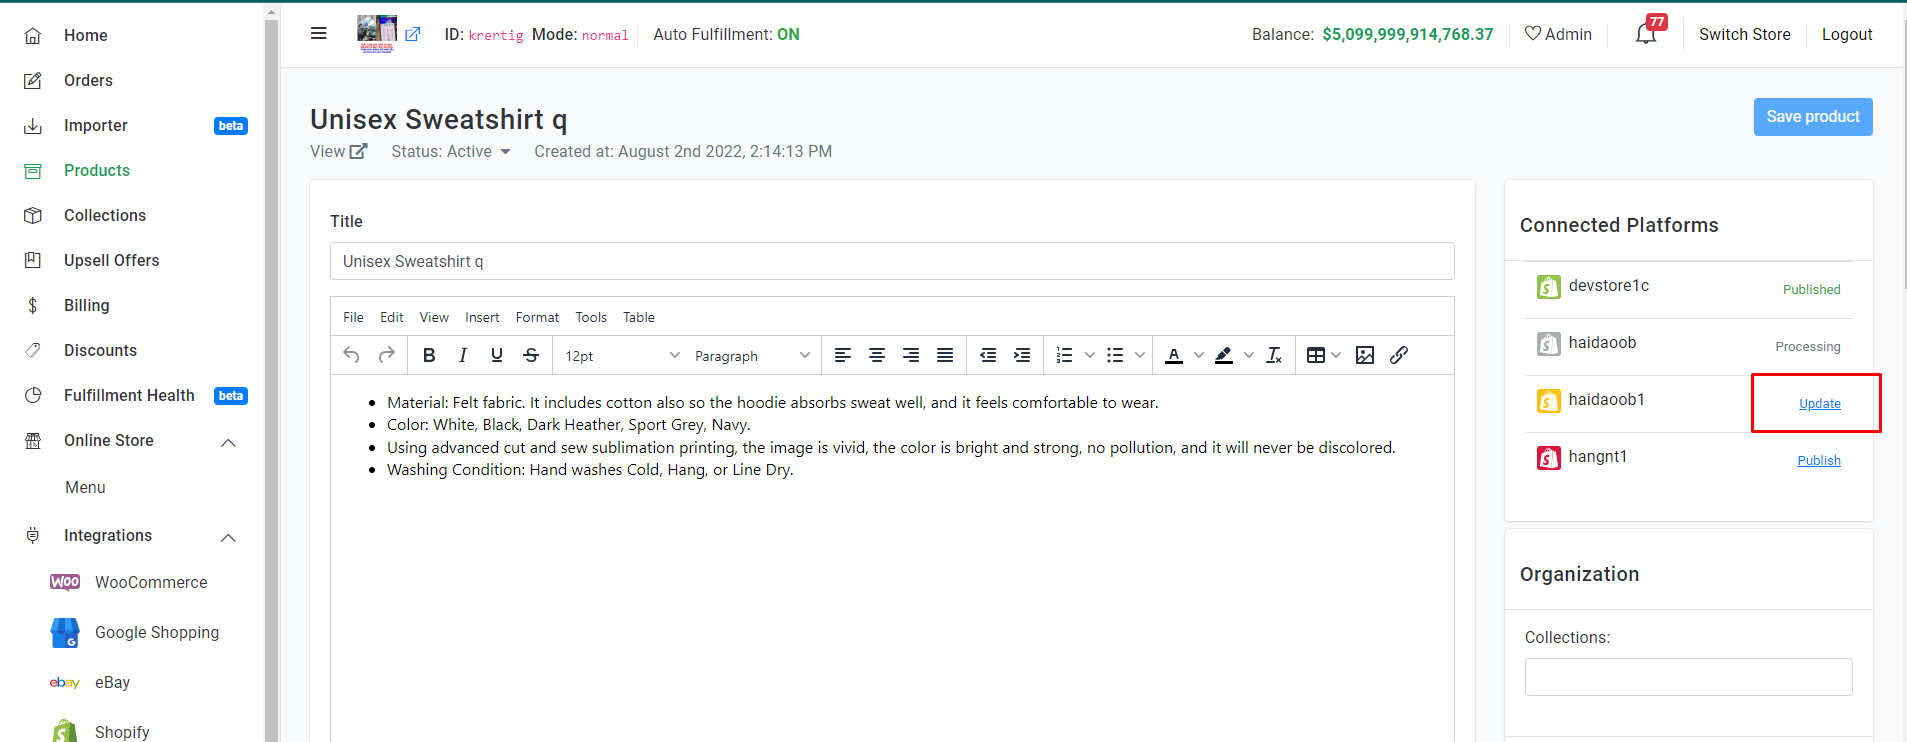
- After you’ve made changes to your listing, then click “Save" on the top or bottom right corner of page.
- The store logo icons will turn yellow, which means the data has been changed. Select the store that you wish to re-sync by clicking the “Update" button.
You will need to perform all product updates for Shopify in Merchize, and publish those changes to Shopify.
If you make changes to synchronized product from Shopify, once that product has order, this will generate different product on Merchize system. (To fulfill order, you need to re-upload artwork).
Product Listing Overview
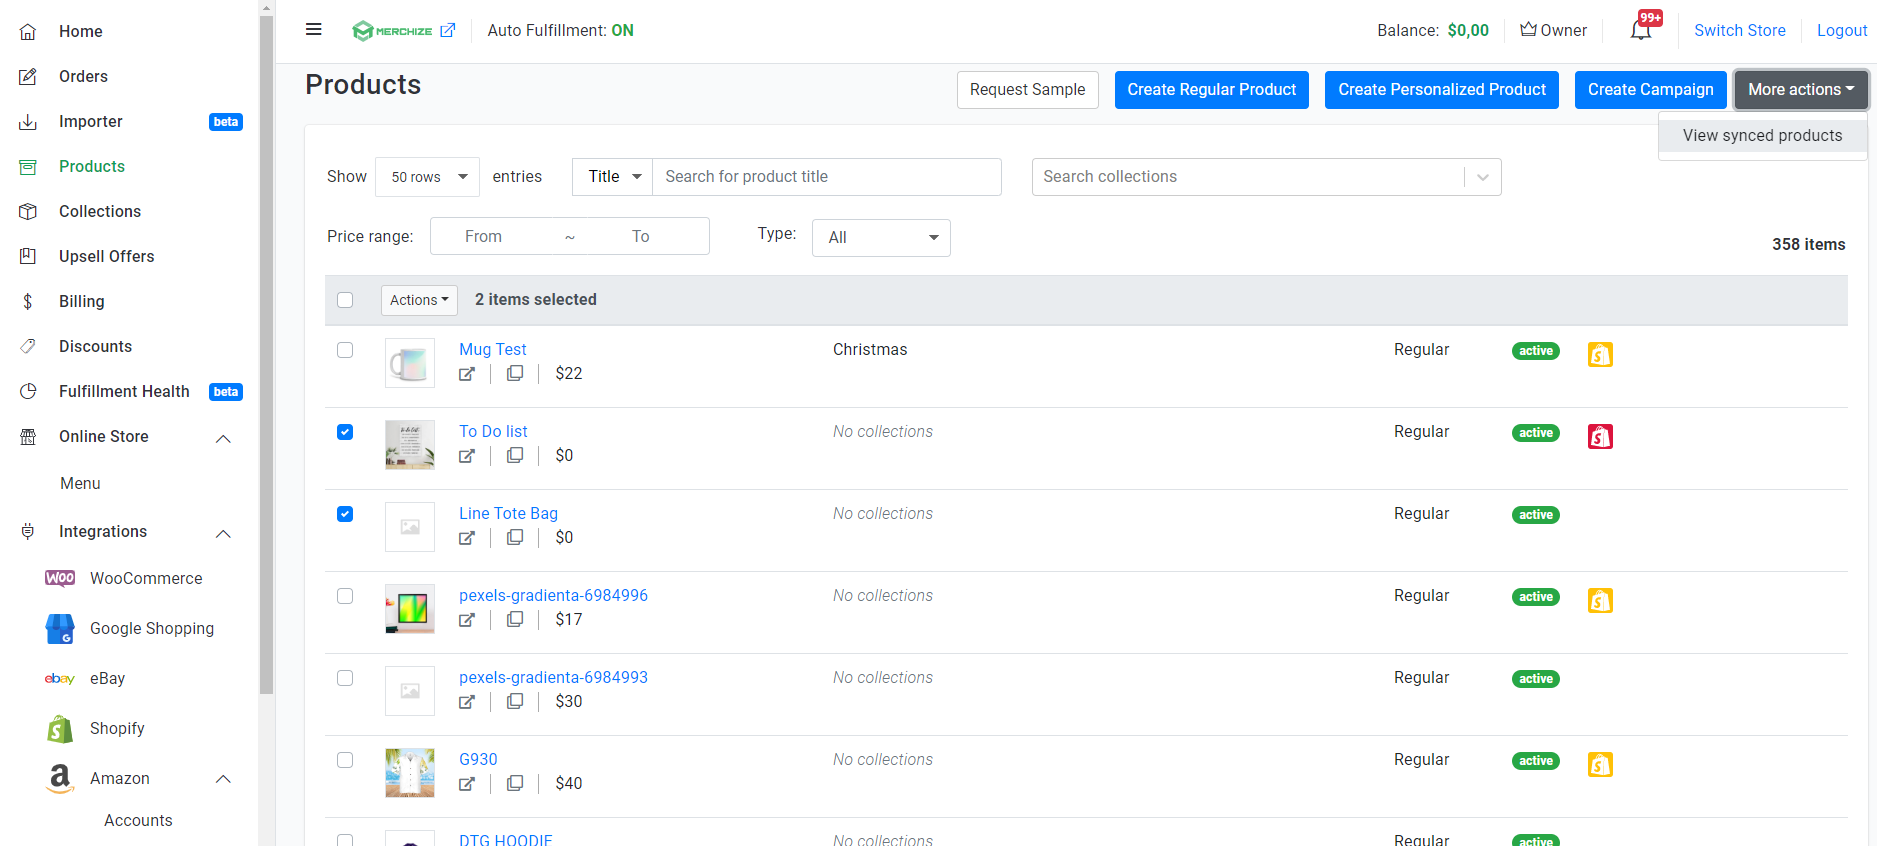
In the Product Section, click View synced products under More Action button, as specified in the screenshot:
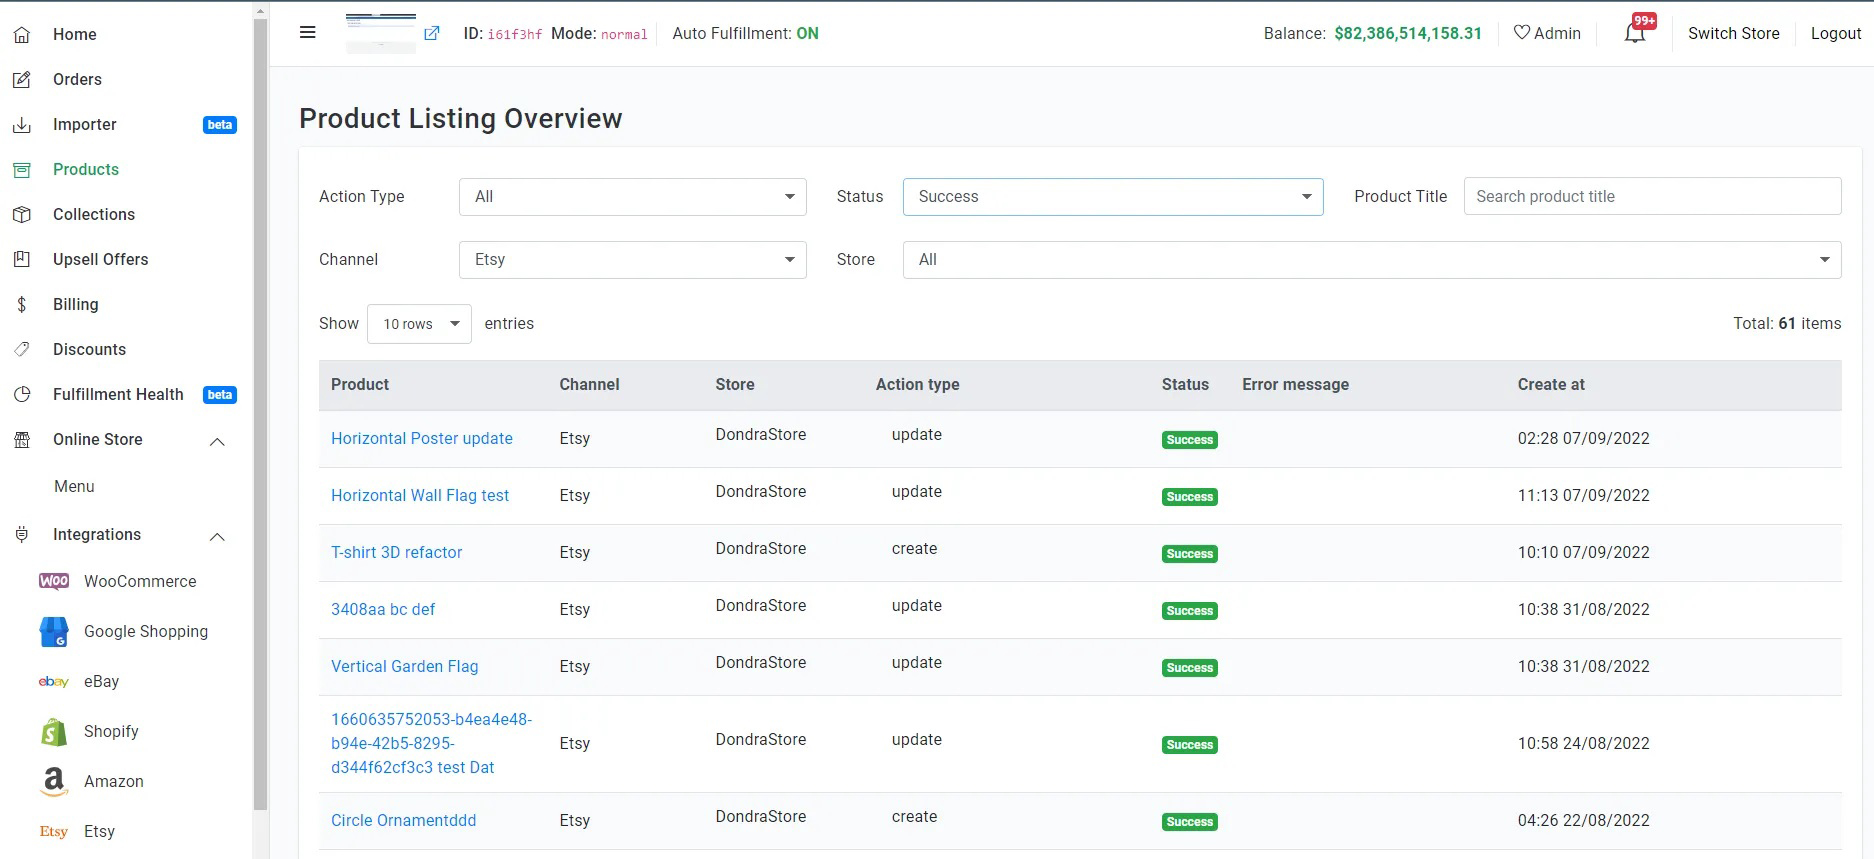
The Product Listing Overview page shows additional information on your product listings, including the listing activity log, active status & processing status on an individual listing.
The workspace controls allow you to use filters to find data that shows for your listings.
You can filter on one or multiple fields in the following areas:
- Product – The listing name linked to the Product Details Page.
- Channel – Once you push listing to external channel, this section shows the associated platform for the listing.
- Store – The destination store of the synchronized listing.
- Action type – The specific action that applies to the listing.
- Status – The current state of the processing.
- Error Message: The cause and nature of processing errors.
- Created on: The date/time stamp when the listing was published to external platform.
Fulfillment of Shopify orders
The orders on all linked products will be automatically synced to Merchize for seamless order management. You can fulfill entire or part of an order, add branding labels & other package customization. You can also quickly search, view and edit any order from all your received orders on multiple stores.
Merchize will process and return tracking automatically to your Shopify store. At that time, customers will also receive an email to notify Shopify’s tracking update.
All Shopify orders will have 2 tags in form: “shopify” and “shopify_your account name”. You can use these tags to identify which orders come from which Shopify account.
Note: Automate the Fulfillment Process
By default, if this is your first use Merchize fulfillment, you need to Turn on “Enable” Fulfillment By Merchize feature (in the Setting > Fulfillment page). This will take you automatically push the order requests to us.
(If you want to get your orders processed manually, or apply custom fulfillment progress, you need to contact Support Team to request appropriate configurations).
*Permissions to change setting apply only to admin/manager role of the store.
How Can I fulfill the personalized orders from Shopify?
You can send personalized orders from Personalizer Shopify Apps (currently we support Customily and Variant Option Product Options) straight to your Merchize account. Merchize will get personalized information like Texts & Images (notice that images must be in PNG or JPEG format). You will also have the option to update or edit artwork, shipping information,… when possible.
Shopify Listing Process Common Errors
- Solution 1: The variant and option limits can only be increased by using a third-party app from the Shopify App Store.
- Solution 2: Separate one of the dimensions into products, instead of variants – then displaying a set of links to these products in place of the variants options. This solution (of having the options setup as different products) is also better for things like Google Shopping.
Enjoyed this? Here’s some other Shopify guides you may like
